80/20 Aluminum Extrusion T-Slot Sysport

BadRobot

Member
Joined
Jul 13, 2014
Messages
52
I have 3 car garage but I have to park my car / truck inside.  Additional, I have a Ford F-150 which is longer than my garage.  I have to park it 30 degree angle.  So I have only triangle area to work with.

My woodworking skills is just a beginner.  I have a hard time cutting squares.  So I turned to 80/20 aluminum extrusion t-slot as an alternative.  I just want to share with you.

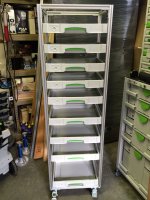
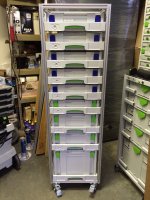
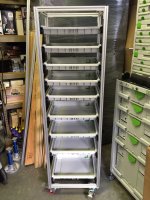
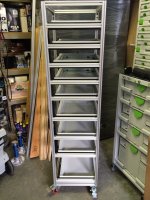
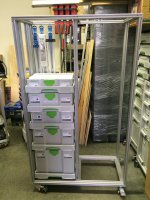
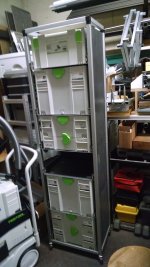
Here is my first version.  I have been using it for a couple months now.  I am happy with it. 


Attachments

  • IMG_0275.JPG
    IMG_0275.JPG
    1.9 MB · Views: 2,437
  • IMG_0273.JPG
    IMG_0273.JPG
    2.1 MB · Views: 1,455
  • IMG_0267.JPG
    IMG_0267.JPG
    2.2 MB · Views: 1,751
  • IMG_0281.JPG
    IMG_0281.JPG
    706.7 KB · Views: 2,434
  • IMG_0280.JPG
    IMG_0280.JPG
    1.3 MB · Views: 1,689
  • IMG_0278.JPG
    IMG_0278.JPG
    2 MB · Views: 1,422
  • IMG_0277.JPG
    IMG_0277.JPG
    2 MB · Views: 1,557
That seems quite tall !!

I like it, but I don't like the effective cost per systainer to store, particularly when it extrapolates to about $150 AUD per systainer [crying]

 
Kev said:
That seems quite tall !!

I like it, but I don't like the effective cost per systainer to store, particularly when it extrapolates to about $150 AUD per systainer [crying]

It is the same height if you stack SYS-Port 500 on top of SYS-Port 1000.

If you compare just the cost of 80/20 aluminum extrusion which is $362.33 per 9 shelf which other materials, for example plywood.  The cost will not much different.  The cost per shelf is $40.26.  I exclude Sys AZ and casters because regarding what material you use, you have to buy Sys AZ and casters.  However, you save a lot of time to cut and assemble it when compare with plywood.

Another reason that that I went with 80/20 aluminum extrusion is reusability.  I can take it apart and build another application.  If I want to get rid of it altogether, I just take it apart and sell it as used 80/20 aluminum extrusion.  It will get my money back at least 50-60% of its original cost. 

I have unlimited of shelf adjustment.  It is a plus for me.
 
Looks great.  Thanks for sharing an alternative approach to storing the stack.

Do you find it to be stable at that height when moving it around?  And curious what you store in the upper drawers given you have to remove the Systainer to access.

 
neilc said:
Looks great.  Thanks for sharing an alternative approach to storing the stack.

Do you find it to be stable at that height when moving it around?  And curious what you store in the upper drawers given you have to remove the Systainer to access.

This is my first generation that I have been using it for awhile now.  It is stable to move around.  I even put a couple boxes on top of it when it is static.  I also use it as miter/chop saw extension by attaching another 80/20 1030 Aluminum Extrusion T-Slot in front of it.

I usually put light stuffs and not use quite often in top Systainer, for instant, prep pads or sandpapers.

I have a second generation which is dual stack.  It costs almost the same as this one but beefier.  I eliminated the horizontal bars altogether.  I have only 2 vertical bars to hold Sys AZ.  It not only has folding MFT table but also storage for long clamps, rulers and Festool rails in the back.
 
I think it looks very nice, let's face it, using Festool drawers and 80/20 extrusions will never be the bargain basement approach. They're both pretty proud of their pricing. [eek]

I'm going to make something similar but will be using 2 panels of plywood to hang the drawers off of. Just substituting the ply should reduce the 80/20 bill by around $200.

Besides, that 1" deep recessed area on each side panel may give me some room to store short guide rails or MFS rails in. Bonus round...

 
This is my second generation which costs the same as the first generation but double the capacity.  Beside, it has folding MFT table in the back (not show in the picture). 

View attachment 1

It is true that 80/20 and Sys AZ is not a good combination in term of cost.  However, the flexibility is unlimited.  I use it as miter/chop saw extension and MFT table.  I have limited space to work with.  I have to be resourceful as much as I can.  I will take pictures of folding MFT and extension when I use it.
 

Attachments

  • IMG_0282.JPG
    IMG_0282.JPG
    1.5 MB · Views: 1,778
Looks great!  [thumbs up]
A couple of years ago, I decided to make my own, before Festool offered the DIY drawers.  I had quite a bit of 80/20 that
I had bought from a scrap metal guy and thought that it was perfect for a cabinet such as this.
I had to fabricate my own drawers out of sheet metal and add my own drawer glides.  I have some sheet metal fabrication tools a spot welder that made this easy other than the layout.
I used the 80/20 as a binding point to hold the sides, back and tops together.  The sides are floating and were milled out with table saw and angle was cut with 45 degree router bit.  Took a little experimenting, but was easy once setup was done.
The tops are attached by countersunk machine bolts.  The holes in the ends of the 80/20 is perfect size to be tapped for 5/16 SAE course thread (possibly 8mm as well, have not checked).  I smashed the washers into a socket in order to follow the taper on the countersunk bolt.
Most everything involved in this project was scrap material except the bolts that I bought, drawer glides and a small bit of 18 ga mild steel.
Very fun and functional!


Look great.

Well, I wish I have the skills to build it.  I did what I could.  The goal is to organize my garage and use the most out of it.  It is not just a Sys-Port.  It is also my MFT table and saw extension.  That is the idea behind it.  I might put panels later when I can find cheap used aluminum panels.
 
paulymatic said:
Looks great!  [thumbs up]
A couple of years ago, I decided to make my own, before Festool offered the DIY drawers.  I had quite a bit of 80/20 that
I had bought from a scrap metal guy and thought that it was perfect for a cabinet such as this.
I had to fabricate my own drawers out of sheet metal and add my own drawer glides.  I have some sheet metal fabrication tools a spot welder that made this easy other than the layout.
I used the 80/20 as a binding point to hold the sides, back and tops together.  The sides are floating and were milled out with table saw and angle was cut with 45 degree router bit.  Took a little experimenting, but was easy once setup was done.
The tops are attached by countersunk machine bolts.  The holes in the ends of the 80/20 is perfect size to be tapped for 5/16 SAE course thread (possibly 8mm as well, have not checked).  I smashed the washers into a socket in order to follow the taper on the countersunk bolt.
Most everything involved in this project was scrap material except the bolts that I bought, drawer glides and a small bit of 18 ga mild steel.
Very fun and functional!


Yours look great and ahead of time.

I am grateful that I discovered FOG.  I got a lot of ideas and learn from these ideas.  I cannot thank you enough for everyone who share their idea.  I did the same.  Just my way for appreciation to FOG community.
 
BadRobot said:
This is my second generation which costs the same as the first generation but double the capacity.  Beside, it has folding MFT table in the back (not show in the picture). 

View attachment 1

It is true that 80/20 and Sys AZ is not a good combination in term of cost.  However, the flexibility is unlimited.  I use it as miter/chop saw extension and MFT table.  I have limited space to work with.  I have to be resourceful as much as I can.  I will take pictures of folding MFT and extension when I use it.

Awesome...can you show a materials/price list for this one as well?
 
promark747 said:
BadRobot said:
This is my second generation which costs the same as the first generation but double the capacity.  Beside, it has folding MFT table in the back (not show in the picture). 

View attachment 1

It is true that 80/20 and Sys AZ is not a good combination in term of cost.  However, the flexibility is unlimited.  I use it as miter/chop saw extension and MFT table.  I have limited space to work with.  I have to be resourceful as much as I can.  I will take pictures of folding MFT and extension when I use it.

Awesome...can you show a materials/price list for this one as well?

This is the total cost so far, $314.60.  It depends on how many Sys AZ you put in.  I just fully populated on side.  That is the total cost at this point without Sys AZ and casters.

I populated another side with Harbor Freight Storage boxes and Festool Sortainers.

The cost does not include folding MFT table in the back and saw extension.

The part list is below.  You don't have to make it as high as mine.  I have limited space, so I have to expand upward.  Another reason is a storage for Festool rails.

T-Slot       Qty Note
1 x 2 x 36 3/4 4 Width
1 x 2 x 60         6 Height
1 x 2 x 60         6 Side rails
1 x 2 x 14         6 Depth


Attachments

  • Cost2.JPG
    Cost2.JPG
    84.2 KB · Views: 1,114
Someone asked me about my cost.  Is it realistic cost?  It is the actual cost for what I paid.

Here is one example.http://www.ebay.com/itm/371484630669?_trksid=p2060353.m2748.l2649&ssPageName=STRK:MEBIDX:IT

If you compare these 2.
This one cost $9.99 per 72 inches.http://www.ebay.com/itm/191735683275?_trksid=p2060353.m1438.l2649&ssPageName=STRK:MEBIDX:IT

This one cost $15.25 per 74 inches.http://www.ebay.com/itm/331704769299?_trksid=p2060353.m1438.l2649&ssPageName=STRK:MEBIDX:IT

I will go with $9.99 per 72 inches instead of $15.25 per 74 inches.  It will not fit your application anyway.  You have to cut to fit.

You have to shop around.  I usually buy overstock aluminum extrusion T-Slots.  It is new with bargain price.  There are some techniques:
- Overstock
- Counterbore at the end if it come with one.  You save $2.25 per counterbore.
- Tab at the end if it comes with one.  You save $1.95 per tab
- Access hole at the end if it come with one.  You save $1.95 per hole.
- Access hole jig.  Buy one if you can.  It will save your money.
- Buy as long as t-slot as you can and cut it yourself.
- Buy everything in one lot to save on s&h.
- Avoid joint plates as much as possible.  It costs a lot more that end tab and screw.  It looks nicer too.
- Tab and drill access holes yourself.
 
I ordered some 80/20 that I forgot to have counterbored for the anchor fasteners. Is it pretty straightforward to do them myself?  I agree they look better than other connection methods and are supposedly the strongest.
 
I agree with all of BadRobot's points.  When I started with my 80/20 building, I settled on one size.  In my case 40mm stock.  Then kept looking until I found overstock extrusions of 2, 3 and 4 feet.  They were much cheaper than the equivalent in exact mm length. 
I also bought the counter bore bit thinking I would do it myself only to find that it was a 20 mm bit with a 20 mm shank.  Luckily, I have a neighbor with a very expensive metalworking mill and he does the few I really need.  The initial setup took some time because the depth and the setback for the counter bore needs to be very precise.  Since it has digital controls, he now just has to dial the settings in and go. 
I use the tabs and screw where ever possible and do the tapping and access drilling myself using the 80/20 jig and like BadRobot I like the look better.
 
I too made a tall Sys port using 8020.  I used their guick frame 9025 tubing and 9250 three way corner to build mine.  The 9025 has u-channel incorporated into the extrusion which made inserting the black ABS for the three sides and rear easy.  I used clear acrylic for the front door.  I had steel u-channels 16" wide X 12" deep with 2" sides bent for the shelves.  I made square cutouts in the 18 ga shelve that the feet of the systainers fit.  The shelf slides are 12" with 1" over travel that I bought on Ebay 10/$50.00 and I screwed to the uprights.  Every thing totaled, I have less than $200.00 in the project.  This picture does not have the door installed.  In the left hand rear you can see my first attempt.  It is made with 8020 9706 which had flanged edge.  The Systainers slide in on the flanges which are on the inner bottom of each extrusion.
 

Attachments

  • IMG_20160105_082830473.jpg
    IMG_20160105_082830473.jpg
    2.6 MB · Views: 1,621
greymann said:
I agree with all of BadRobot's points.  When I started with my 80/20 building, I settled on one size.  In my case 40mm stock.  Then kept looking until I found overstock extrusions of 2, 3 and 4 feet.  They were much cheaper than the equivalent in exact mm length. 
I also bought the counter bore bit thinking I would do it myself only to find that it was a 20 mm bit with a 20 mm shank.  Luckily, I have a neighbor with a very expensive metalworking mill and he does the few I really need.  The initial setup took some time because the depth and the setback for the counter bore needs to be very precise.  Since it has digital controls, he now just has to dial the settings in and go. 
I use the tabs and screw where ever possible and do the tapping and access drilling myself using the 80/20 jig and like BadRobot I like the look better.

The cheapest and simplest way to butt-join a stick (rail) of 40mm 8020 stock to the side of another piece (stile) is to put a socket head cap screw into the hole in the end.

Use 5/16" or 8mm fasteners and tap the appropriate thread. Then all you need to do is drill a clearance hole through the side of the other stick (stile) for the hex key to pass through. It's not adjustable is the only downside.
 
I am a bit frugal with materials, so I looked for ways to stretch them, so to speak.
If you can cut your 80/20 crisp and square, you can drill and tap both pieces, insert a 5/16 NC stud and twist the two pieces together tight.  I have stress that your cut needs to be perfectly square in both directions.  The plus is that you can create usable lengths out of your short pieces.   


promark747 said:
I ordered some 80/20 that I forgot to have counterbored for the anchor fasteners. Is it pretty straightforward to do them myself?  I agree they look better than other connection methods and are supposedly the strongest.

I bought counterbore bit but I did not get good results.  May be I don't have a good drill press or it requires special setting that I don't know.  I usually use end fasteners but it limits the mobility.  That is the reason I came up with the second generation.  I just move slide rails up and down through t-slot instead of using counterbore fasteners.  It also cheaper too.

The only thing that adjustable is SYS AZ sliders.  Everything else is static.  So end fasteners are my best option.

I use counterbore whenever it comes with t-slots but I won't drill it myself. 

You don't have to use 1020 at corners.  You can use 1010 t-slot if it is more cost effective.  The reason I used 1020 is the cost.  I bought 1020 x 76" for $14.99 which is cheaper than 1010 in most cases.  The keyword is "overstock".  It is new with a bargain price.

 
Back
Top