Hi all.
I don't have a panel saw, but I need panel saw like capability as I work with sheet goods a lot. About 70% of my work is with mdf and ply.
I have a good table saw, plus all the Incra stuff anyone old want, plus a MFT/3 and rails.
What I need to do is break the sheets down quickly into components, but I'm getting stuck on something that should be easy.
Many of the pieces to be cut are small. Only 80 or 120mm wide.
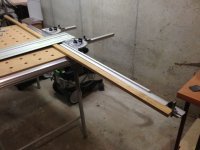
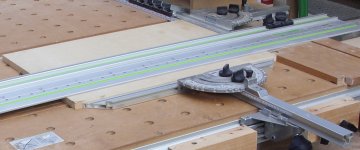
So, I've made my own jig, which is nice, but I've also purchased the rail clamp system from Seneca and the Incra rails. This allows arbitrary distances to be set and cut quickly and accurately.
But I keep thinking of the MFT and how it might be used to make cuts of small things.
I'd like to accurately cut off multiple slices on the visible waste-side of the rail, with the "waste" left under the rail. It would then be slid across and the next piece cut off.... Zing zing zing, 150 units done....
But how does one account for the kerf of the saw? I hardly want to be measuring out 83.2 or 123.2mm for the stop (be it nice or just a block of wood, or whatever).
Anyone with any ideas?
If I don't make sense, I'll include some pictures tomorrow.
I don't have a panel saw, but I need panel saw like capability as I work with sheet goods a lot. About 70% of my work is with mdf and ply.
I have a good table saw, plus all the Incra stuff anyone old want, plus a MFT/3 and rails.
What I need to do is break the sheets down quickly into components, but I'm getting stuck on something that should be easy.
Many of the pieces to be cut are small. Only 80 or 120mm wide.
So, I've made my own jig, which is nice, but I've also purchased the rail clamp system from Seneca and the Incra rails. This allows arbitrary distances to be set and cut quickly and accurately.
But I keep thinking of the MFT and how it might be used to make cuts of small things.
I'd like to accurately cut off multiple slices on the visible waste-side of the rail, with the "waste" left under the rail. It would then be slid across and the next piece cut off.... Zing zing zing, 150 units done....
But how does one account for the kerf of the saw? I hardly want to be measuring out 83.2 or 123.2mm for the stop (be it nice or just a block of wood, or whatever).
Anyone with any ideas?
If I don't make sense, I'll include some pictures tomorrow.