Audio Console

iamnothim

Member
Joined
Feb 5, 2014
Messages
1,436
My son has undertaken to build Tom Christiansen's solid state Modulus 86 Amplifier and Differential Preamp.  He has completed most of the boards and has started a balanced phono preamp to go along. 

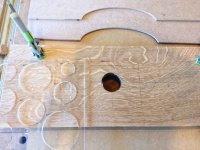
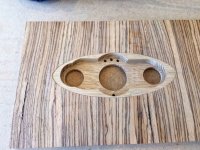
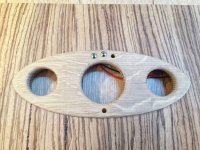
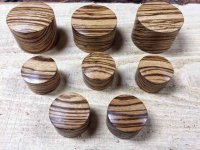
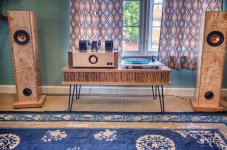
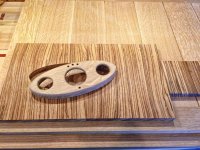
I have started work on the "enclosure".  Grant hinted that he liked my audio table and wanted one... so I am killing two birds with one enclosure.  A combined table and amp enclosure like the TV Radio Consoles of yesteryear.  The Modulus 86 amp will go straight into the center, left cavity of the table.  The right cavity will hold the phono preamp, DAC's etc.  Turntable on top next to my picture..... Right.  [member=17405]Crox G[/member] turned the zebra wood knobs for the volume, source selector, and on/off.  As you can see they are Dope. Drop-dead-gorgeous.  Thanks Crox !!!

I put another photo of my completed audio table so those playing at home can follow along.  The zebra knobs will nestle into the white oak bezel that is inlayed into the zebra center band.  I haven't cut the height down yet.

[attachimg=1]

[attachimg=2]

[attachimg=3]

[attachimg=4]

[attachimg=5]

[attachimg=6]
 

Attachments

  • Mod86_Enc-3.jpg
    Mod86_Enc-3.jpg
    340.2 KB · Views: 1,891
  • Mod86_Enc-4.jpg
    Mod86_Enc-4.jpg
    464 KB · Views: 1,904
  • Mod86_Enc-5.jpg
    Mod86_Enc-5.jpg
    478 KB · Views: 1,919
  • Mod86_Enc-6.jpg
    Mod86_Enc-6.jpg
    380.8 KB · Views: 1,892
  • Mod86_Enc-2.jpg
    Mod86_Enc-2.jpg
    75.9 KB · Views: 1,893
  • Mod86_Enc-1.jpg
    Mod86_Enc-1.jpg
    862.5 KB · Views: 1,894
Here's a shot that shows the table top.

[attachimg=1]


Attachments

  • Mod86_Enc-9.jpg
    Mod86_Enc-9.jpg
    504.4 KB · Views: 1,840
About Inlay.  Pretty easy.

This was the first time I tried inlay.  I saw that Whiteside had a bit/bushing inlay kit.  I like Whiteside bits so I ordered it. Here are some things I learned.

The Whiteside bit is a Solid Carbide spiral bit.  Ya don't want to drop it.

The bit has an overall length of 2".  Hence, after the subtracting the bushing/template thickness you aren't going to go more than 1/2" deep.  So how did I make cutouts from 5/4 stock? 

I learned how from a cutting board how-to on Fine Woodworking.  After making the inlay grooves on the field and part, rough cut the waste away using a Carvex jigsaw.  (My least favorite tool. There's always drama.)  Keep the saw blade on the inside edge of the groove wall of the field and the outside edge of the groove wall of the part.  Then chuck up your trusty spiral flush-cut bit into your router, route flush to the groove wall, and viola' thick pieces that fit together perfectly.  This will only work on the field if you want to cut all the way through the stock.  Otherwise the depth of the excavated void in the field will be about 1/2".  You can always use the flush bit with inlay pieces. (If they aren't too small)  I'm making the oak bezel part proud of the zebra field.  I used a 1/4" rounder for all the edges.  There was significant trepidation while running the end grain ends of the piece into the bit on the CMS.  I bought a Bench Dogs Push Pad a month ago or so.  I love that thing for the router table and the bandsaw. 

Drill any holes and make details on the part before cutting out the part.

I put some small pieces of the template material in the center of the field template area with double stick tape to support the router base.  This helped a lot.

Templates.  I had a hard time making an oval template that looked symmetrical after I cut out the area and sanded the inside edges of the "contiguous" template.  I finally got smart and cut the template stock in half, taped them together, and spray glued a cutting guide of half the oval (Arc).  Clean up the edges, mate the halves of the template, and you have a symmetrical oval.  At least top to bottom.  I know I didn't describe this well but you can see the "split" template in a photo above.

All-the-best,

Luke
 
Outstanding! Layers and layers of beauty...Only analog deserves such a monument....Bravo!
 
Absolutely a beautiful set! The knobs are fantastic as well. Thanks for sharing the inlay template trick too.
 
Couple picks after cutting the band
down

a3f083276fb1819aa7b7ba1ec2348bb4.jpg


4fcaa25dabff5dcdaec6654b83ff4999.jpg


Sent from my iPhone using Tapatalk
 
I would have preferred to center it but it has to be on the end so I can have a vent for a 12" long heat sink.

Sent from my iPhone using Tapatalk
 
iamnothim said:
I would have preferred to center it but it has to be on the end so I can have a vent for a 12" long heat sink.

Sent from my iPhone using Tapatalk

Well I think it looks "cool" off to the side!
 
iamnothim said:
After making the inlay grooves on the field and part, rough cut the waste away using a Carvex jigsaw.  (My least favorite tool. There's always drama.)

You are not the only one.
 
[member=28483]iamnothim[/member]

Now I'm quite curious about your listening setup in the workshop .. anything special ?
 
JimH2 said:
You are not the only one.

I'm glad I have company.

Kev said:
[member=28483]iamnothim[/member]

Now I'm quite curious about your listening setup in the workshop .. anything special ?

The project is for the amp my son is building.
The only thing I have in the shop is an Amazon Echo
"Alexa.  Cut 20mm off that board"
 
Looking at your knobs makes me think that the idea of a lathe probably isn't all ugly. (A small one!!!)
 
Kev said:
Looking at your knobs makes me think that the idea of a lathe probably isn't all ugly. (A small one!!!)
Will you please stop looking at my knobs

Sent from my iPhone using Tapatalk
 
iamnothim said:
Kev said:
Looking at your knobs makes me think that the idea of a lathe probably isn't all ugly. (A small one!!!)
Will you please stop looking at my knobs

Sent from my iPhone using Tapatalk

But Luke, you have some of the nicest-looking knobs...  [big grin]

All kidding aside, you do some of the most interesting projects. 
 
Back
Top