Beam wraps

Twoodman66

Member
Joined
Feb 27, 2016
Messages
96
Hi All
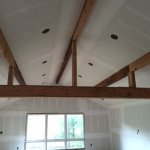
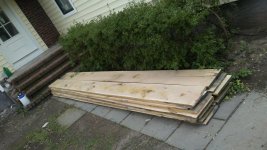
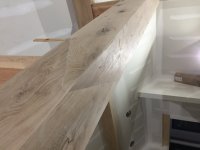
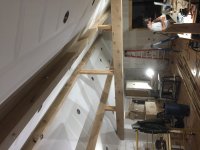
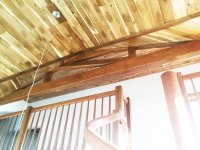
I have this up coming project which includes wrapping the existing exposed beams with rustic white oak and mitered corners to  simulate a beam.  Runs are 3@ 35 lineal ft. And one @ 21. I'm struggling with what to do with my horizontal seams.
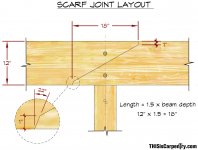
A. Plumb scarf
B. Butt joint with dowel
C. Angled scarf with high/low dowel
Any and all options and suggestions greatly appreciated
Thanks
 

Attachments

  • image.jpeg
    image.jpeg
    38.9 KB · Views: 678
  • image.jpeg
    image.jpeg
    385.1 KB · Views: 630
nice project! i have no experience in mitered beams in this length. im sure glue and brads are plenty for it. theres goona be so much flex and bends due to length which leads to gaps in the miter. pending on the color/stain of the finish i think youll need to fill the gaps with filler, its also pretty high up so dont kill yourself trying to make it perfect..it shouldnt be that noticeable.
 
Build all your beams in the shop, on a good flat bench. Use tape on all your miters and then fold them together when you glue them up. Add blocks with pocket holes inside to hold it square while the glue dries. Once it is all dried, remove the blocks and add dominos to the seams.
Cut a little dog ear off the corner of your glue blocks so you dont need to hammer them out later after the glue dries.
Hope this helps.
 
Sounds like he's more concerned with where he needs to joint lengths of board together to make his long pieces.

Ideally you find a mill that's got something like 35' pieces and you have them deliver it. Next in my opinion would be a butt joint with dowels or dominos and let it set up under pressure for a day. Hot glue a few blocks on the backside to use as clamping points and leave them be until the glue fully sets up. A plumb mitered scarf can come out perfect or it can come out looking like some amateur did it just with changes in season and sometimes you can't donanyrhkng about it. So I vote butt joint and dowels.
 
Riz
I wish on the 35' lengths. Rustic/worm holed oak here in Ny is fairly pricey to begin with long lengths as such was just not in the budget. Think I'm with you on the butt joint and dowels. Thinking of Coloring the dowel with dye to make them pop not sure though

 
Wait so you mean more of a pegged mortise and tenon or dowels in the cut ends so you can't see them?

I'm guessing your using 3/4 stock to cut down price so I don't really know if a pegged m and t would work.
 
No pegged for just looks only. As opposed to hiding seams possibly highlight them.
Yes started with 4/4
 
Is it the type of project where you could express, or highlight the join, with a 3mm x 3mm shadow line at the join? (Routed into the end of one of the boards) Would be enough to hide the joint opening slightly.
Some people like that sort of thing, some don't.
 
Are you going for a rustic feel? Trying to make it look like a timber framed piece?

The faux peg idea is kind of slick and sells the whole illusion of it being real. Maybe look up what a pegged scarf joint in timber framining ends up looking like and try to replicate it. I've seen some pretty elaborate keyed joints that you could mimic from the outside and throw some pegs in to make it look real.
 
Exactly was I was thinking. As opposed to attempting hiding joints
Go in the opposite.  I once told if your gonna miss miss big and go in a different
Direction. The shadow line is an interesting one thanjs
 
Maybe something like this only chamfer the edges to accentuate the joint and use contrasting pegs.


Attachments

  • scarf-1.jpg
    scarf-1.jpg
    324.4 KB · Views: 499
rvieceli said:
Maybe something like this only chamfer the edges to accentuate the joint and use contrasting pegs.

If you were going to do this for effect, why not just route and inlay to better accentuate the joint?
 
Hi, how about cutting you bottom pieces to resemble a huge Mortice and tennon, pegged for effect?  also think the Scarf  joint would look really good, especially if you add a faux peg, although not the one pictured as it wouldn't work on a joint of this size. 
 
Some pics of my progress
 

Attachments

  • IMG_4921.JPG
    IMG_4921.JPG
    1.6 MB · Views: 557
  • IMG_4927.JPG
    IMG_4927.JPG
    1.9 MB · Views: 559
I had the same dilema in my house. I decided against cladding the beams altogether and drywalled them because I couldn't make my mind up how to do the joints. I'm not tempted to go over that with oak.

Nice job.

 
Had a client request that we wrap their truss in Jatoba.  Ended up planing pieces down to 6mm and 8mm thick.  I glued about half of it up into an L-shape and then clad as much as possible with those. Ended up keeping those preassembled joints in the most visible/prominent areas. I used just a straight butt joint on the bottom run as the longest jatoba I was able to get was well under the 18' span needed. We weren't able to obtain a real good grain match, but the joint doesn't stand out after the whole beam was sanded and finished. We glued the cladding to the truss as well as gluing the edges where the cladding met. 21ga pins and clamps to hold pieces in place till the glue set.  The Rotex 150 was a life saver when it came to sanding the Jatoba after all the piecing together and gluing it took to wrap all those angles.

Client was very happy.

View attachment 1
 

Attachments

  • Wrapped Truss.JPG
    Wrapped Truss.JPG
    5.7 MB · Views: 379
Back
Top