best drill for tongue and groove flooring

I drive 4" screws easily with my Milwaukee M12 drills and impact. IF I owned a CXS I wouldn't hesitate to use it for screwing something.

On that note I would not screw a tongue and groove floor down. As I own a Bostitch floor stapler that is what I would use. Otherwise a flooring nailer would be another option. Screwing each and every screw would drive the install time up 8X. In other words for every screw you put down I can put 8 staples in. The flooring guns also tend to push the wood together really well which close up unsightly gapes. 
 
Hi, welcome there is this guy.[attachimg=1]
 

Attachments

  • Screenshot (28).png
    Screenshot (28).png
    359.3 KB · Views: 618
[welcome] to the FOG.

The CSX will work fine, but it will grind down the batteries in a hurry, so follow Michael's solution.  [big grin]

However, I'm with Peter_C on this one, I'd just use a Bostitch flooring stapler unless you have a VERY small area to deal with. This is what the Bostitch was designed to do. It drives large staples through the tongue of the strip flooring which allows each leg of the staple to find its own path. Thus sometimes the legs of the staple go down, sometimes they go up and sometimes one goes up and the other goes down. This just increases the holding strength of the fastener.

Also, because the staples are driven at a 45º angle, when the stapler is struck with a mallet, it pushes the entire piece of strip flooring closer to the part that's already fastened to the floor, thus eliminating or minimizing any gaps. There have been times where I would have a 1/8" gap between boards when they were warped and when driven VERY VERY HARD with a mallet, the strip flooring would nicely butt up against the existing strip.

Another consideration, is driving flat head screws into soft wood tongues is different than hardwood tongues. In softwood, they burrow themselves into the wood. In hardwood, oak/maple, they may break off the tongue or even crack it and move it forward. At that point, when you butt up another flooring strip to it, the tongue has been physically moved too far and it will not allow a nice tight fit with the next piece of wood. There will be a gap and there is no way to solve it unless you attack the male profile with a hand plane or the female profile with a router. Make it easy on yourself.  [big grin]
 
Thanks for the reply guys!

Its only for a small kitchen floor 6m2, and time is not really a big issue
I'd like to put the CXS to other uses as well like building kitchen cabinets

The Bostitch flooring stapler looks pretty cool though!
 
As above CXS will be fine for that area. but we'd recommend a dedicated "tongue Tite" T&G flooring screw from our experience.
Hope this helps.
 
The classiest way I've seen was to face drill the boards.  Then glue in a contrasting wood plug.  You are going to sand the floor before finishing.  It is more work, but it lends an aura of craftsmanship to the installation. 

The only extra work is gluing in the plugs.  The floor sanding will deal with getting the plugs flush.  You are planning on drilling anyway. 

The other alternative is to buy (from Harbor Freight) or rent a flooring nailer.  It will make installing go much, much faster.

The H-F unit is $150.00, about the cost of renting for a couple of days. 
https://www.harborfreight.com/2-in-1-flooring-air-nailerstapler-64268.html

 
If you decide to go the flooring nailer route, you'll need compressed air at around 70-90 psi.

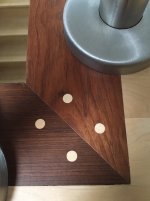
If you decide to use the top/face method, here's some examples of what Packard was talking about.

For the 45º mitre, I wanted to ensure that the mitre will never open up so top screwing was the only method that would work. After 11 years it's still tight.  [smile]

[attachimg=1]

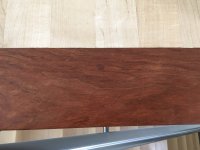
In this example, I again needed to have the security of a top/face mounted screw but I didn't want them to be easily visible. With some careful color matching and grain direction matching, they become invisible when viewed from 5+ feet away. This photo was taken at a distance of about 12".

[attachimg=2]

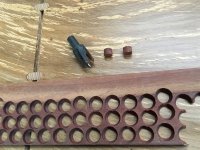
[attachimg=3]
 

Attachments

  • 4645.jpg
    4645.jpg
    813.9 KB · Views: 474
  • 5277_S.jpg
    5277_S.jpg
    774.5 KB · Views: 490
  • 5253.jpg
    5253.jpg
    1,013.4 KB · Views: 511
That face screwed flooring is exactly what I was referring to.  It gives the floor a very craftsman-like vibe.  I've seen both the color matched versions and the contrasting versions.  I am OK with either.  The contrasting plugs can look very busy if it is used throughout the installation.  But if it is used at the butt-ends, it looks excellent.  The rest of the floor is installed with nails or matching plugs so that it does not look like a polka dot floor. 
 
For me the face screwed and plugged boards look bleedin awful.
T&G loor boards should be secret nailed and apart from the edges of the room where you basically can't secret nail em.

With hardwod flooring I usually use a Portanailer which just uses a big mallet to operate the mechanism, its fast and easy and Ive done quite a lot of flooring this way.

I get the plugged holes on hardwood door casings, skirting and so on but to my eyes it looks gash on flooring.
 
I'm amazed that no-one has mentioned ratcheting floorboard clamps. Maybe everyone likes big gaps between their boards?
 
Back
Top