Best way to fill mis-cut domino mortises in a walnut chair?

gearhound

Member
Joined
Oct 12, 2016
Messages
149
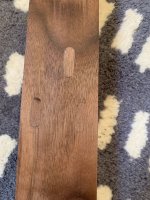
I'm about finished building a rather complicated walnut chair and foolishly mortised 3 dominos on the wrong side of one of the chair legs. The legs are 8/4 stock and already joined to the arm rest and other leg and splayed so I really don't want to track down more 8/4 stock and rebuild one entire side of the chair.

I'm pretty frustrated with my stupidity, but trying to tell myself if I clean it up properly it could just look like a through-tenon on that side. The mortises are for the 6x40mm domino and I have some scrap walnut from the project around that I'm trying to use to make walnut domino plugs, but I don't have a router table to round them over or a chisel to square up the mortises. I've cut some scraps down to the corresponding domino size, but wondering if I should try to handheld route each side with my 1/4" round-over bit (which would require creating some sort of balancing jig for how thin the stock is) or if I should track down a tiny chisel to square up the mortises? 

Thanks for any suggestions!
 
I don’t think you’ll find a router bit that exactly matches the radius of a Domino but you can get in the ballpark. Then use a sander to get closer and finally hand sand to fit tight. Remember that you’re just making surface plugs not structural tenons (I hope) so they can be tapered for easy fitting.

If you aren’t comfortable using the router skip to a sander. Belt sander is better in that case.
 
Michael Kellough said:
I don’t think you’ll find a router bit that exactly matches the radius of a Domino but you can get in the ballpark. Then use a sander to get closer and finally hand sand to fit tight. Remember that you’re just making surface plugs not structural tenons (I hope) so they can be tapered for easy fitting.

If you aren’t comfortable using the router skip to a sander. Belt sander is better in that case.

Thanks for the quick response Michael! I've got the ridgid belt/spindle sander combo machine I can shape the stock with....was thinking of doing that initially, but don't want to see any gaps in the mortise as it is high up on the leg of the chair and will be noticeable. Do you think it'd be best to use just a tiny bit of glue at the bottom of the mortise before putting in the plug...I want these plugs to be as invisible as possible.
 
I don't think you're ever going to get a good enough fit to make it look like a through tenon.

I would recommend you view this mistake as a design opportunity.

First fill the domino mortise with a standard domino and cut it off flush.

Then inlay a decorative element such as contrasting wood or metal to cover the mistake.  Do it on both sides.

That way everyone thinks you're artistic and you're not looking at a constant reminder of your oops.

Also, buy some chisels.  Not every tool needs a cord to be valuable in your shop.

Good luck!

Joe
 
Find the best grain match. Use your sander combo machine to make the plugs. Tapper them slightly. Use a Q-Tip to smear a little glue in the mortice. Tap plugs into the mortices. Allow the glue to set over night. Clean up the plug with a chisel and sander (or use the MFK-700 as I show in a video).

If that is not satisfactory, do what Joe suggests.

Tom
 
What Tom suggested but go over it with a crayon or hot fill stick to blend in any anomalies that may be left.  Then use wax wash to clean up the excess of the wax left on area around the repair then spot finish the repair area.

Wood Repair Products in Orange Calif specialize in repairing furniture and have 400 different colored crayons to match perfectly as well as hot melt sticks and other repair products.
I dont have any affiliation with them other then I go there and buy there products when needed.

Here is their website. You can give them a call maybe send them a photo and they might be able to help
https://woodrepairproducts.com
 
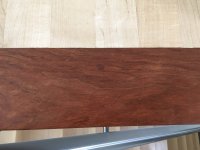
If you take the extra step as Tom noted and match grains this photo is an example of what you can expect. Just take your time...you've already invested a ton of time in the construction of the chair. What's another couple of hours?

I should add, this photo is of a Brazilian cherry plug from 4" away, from 2 or more feet away this anomaly isn't even visible.

[attachimg=1]
 

Attachments

  • 5277_S.jpg
    5277_S.jpg
    774.5 KB · Views: 1,727
Here is how I fixed a similar blow-through blunder which might even work better in your case, because walnut is easier to find a grain match due to its darker tone:

1) Find an oversized patch about 2mm thick that has the best grain match to the surface
2) Ca or epoxy glue that patch in proper grain orientation to one end of the domino used for the project
3) after the glue is COMPLETELY cured, sand the patch flush with the domino (or even better an hair larger)
4) Trim the domino on the other end as necessary
5) Insert and glue the patched domino into the mortise
6) Slightly sand the patched surface flush

Try this a couple of times on some scrap to develop your technique first.
 
You are not alone in making mistakes so do not feel bad.

I’ve had to patch errors in highly visible spots. I’ve found regular shaped patches (circles, rectangles, ovals, and tenons) stand out even perfectly done. The eye seems drawn to them.

I echo the suggestion to buy a set of really good chisels. I like Lie Nielsen and Blue Spruce. Learn to sharpen them. This is actually enjoyable and a sharp plane or chisel is a joy to use.

I’d use a irregular pattern to chisel material from the chair around the bad mortises. I’d use the same pattern to make inserts from matching Walnut. Glue the patch in. Any gaps can be filled with a slurry of Walnut sandings and glue.

My favorite repair pattern is a crescent. It’s easy to make.
 
ChuckM said:
Ca or epoxy glue that patch in proper grain orientation to one end of the domino used for the project

Great idea... [thumbs up]
 
Or fix the holes (domino in + flush cut) and glue a strip of different colored (but pleasingly matching) wood to the outsides on both sides, flush trim like edge banding, to turn it into an optical effect?
 
All the above suggestions will be an improvement, you could depending on the size of the area, find a matching veneer, and cover any faces symetrically. A shame to cover otherwise unspoilt solid timber I know but, it depends on how satisfied you’d be with the other methods.
Obviously you could try the other methods first.

I have a cabinet I made years ago with a corrected error on the top, I never told anybody about it, and nobody has ever mentioned it when admiring. Maybe they are sparing my blushes, or it just doesn’t show, apart from me, as I know it’s there.  ;)
 
Thanks for all the tips guys! I'm yet to attempt any repair...decided to take yesterday off, but I'm going to try attaching a grain matched one to the end of a domino 1st and if that proves to be too difficult for me just shape one on my edge sander and go with the glue/sawdust trick to fill if there's gaps. This is my 1st ever chair build so I expected mistakes to be made (even though I 1st made a fully functional prototype out of baltic birch plywood to eliminate as many as I could on the actual build). Also, trying to take solace in my wife having purchased an expensive chair from Room & Board that uses exposed dowel joinery that's pretty visible....when she had the chair delivered I told her I could make that, which is how this whole build started!
 
If you are trying the domino patch method, you can always "undo" your fix as long as you have not put glue to the domino or mortise.

One more note: the patch should match the actual mortise cut, not the domino itself (hence the slightly larger remark in my post) as a domino is not an exact mirror image of the mortise. I made a few (not just one) and found the best grain and size match to fix the mistake I had in one of my previous projects (lumber used - sapele).

The patch is made on the side of the credenza (right in front of the shelf), not visible to the untrained eye, and shielded by the sliding door when closed.
 

Attachments

  • Photo 15.JPG
    Photo 15.JPG
    541.5 KB · Views: 583
  • 20190218_092607[1].jpg
    20190218_092607[1].jpg
    326.6 KB · Views: 545
ChuckM said:
One more note: the patch should match the actual mortise cut, not the domino itself (hence the slightly larger remark in my post) as a domino is not an exact mirror image of the mortise. I made a few (not just one) and found the best grain and size match to fix the one blow out I had in one of my previous projects (lumber used - sapele).

It's a futzy method but I still like it.  [big grin]

Once the "general shape of the sapele patch" is mounted to the Domino, you can easily size the patch with some 240 paper one stroke at a time. And the dry fitting can be done outside the Domino mortise hole by inverting the Domino, so you can easily see how close the fit is. Leave the patch just slightly larger by a few thousandths, invert the Domino so the patch is up and drive the Domino home using a flat maple block. Some of the patch will them be smooshed (if that's a word) into contact with the surrounding wood. Sand & finish.

Me likee...thanks Chuck.
 
Cheese said:
And the dry fitting can be done outside the Domino mortise hole by inverting the Domino, so you can easily see how close the fit is. Leave the patch just slightly larger by a few thousandths, invert the Domino so the patch is up and drive the Domino home using a flat maple block. Some of the patch will them be smooshed (if that's a word) into contact with the surrounding wood. Sand & finish.

Me likee...thanks Chuck.

Thanks. Cheese. What you descrbied was exactly how I did it, inverting the patch to check. You just completed the last chapter of my instructions on how to carry out a domino patch fix! [laughing]
 
If you have a router and an inlay set, you could route out a bigger area, and then a matching patch instead of trying to exactly match the domino.  This might let you have an easier time of it.

The last two time I did something similar, it wasn't a domino, but had the same problem.  The first time I cut a mortise on the wrong side of a line for a high chair I was making (teaches me not to write Xs); I cut a patch for it and glued it in, because I already had stock that was meant to fit in there.  The other time was that I cut through a biscuit for alignment so it showed through into the end grain. I bought an appropriate plug cutter, drilled out a matching hole, and then filled it with a plug.  If you look for these, you can see them; but otherwise they were better than starting over as I was fairly far into each project.

One thing to keep in mind is that you don't need to get the patch exactly flush, you can sand it after the fact.
 
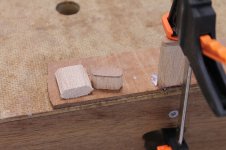
Just finished practice attaching a 4.5mm piece to the end of the domino and it worked out pretty damn well! Thanks so much for posting this tip [member=57948]ChuckM[/member]!

Here's a pic of my results....attempt 1 is at the top, #2 on the bottom left, #3 on the bottom right. Attempt 3 looks the best...this one I left the most material on the edge and pounded it in with a maple block. (The glue is yet to set so I just gave them about a 2 second sand with 220 because I had to see asap how it looked![attachimg=1])


Attachments

  • IMG_0295.jpg
    IMG_0295.jpg
    1.2 MB · Views: 1,444
Glad my tip worked for your sample piece. Practice makes perfect, Gearhound! [big grin]

The lower patch on the right looks a good match. A bit of dark wax would probably nail it.

 
Back
Top