ryanjg117
Member
- Joined
- May 18, 2015
- Messages
- 329
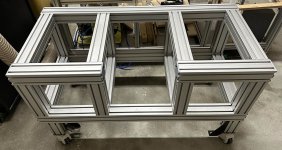
I'm a fan of aluminum extrusion, so naturally when this little workbench base showed up on my local Craigslist, I snagged it for a song:
[attachimg=1]
I believe the original owner had it custom made to hold/balance large truck tires in the open middle segment. It's built from 80x80mm extrusion and uses very strong counterbored anchor fasteners at the joints.
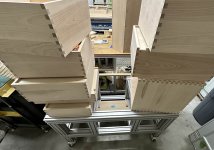
Without a top, the base only measured about 23" from the ground, so naturally I used it to store all my junk:
[attachimg=2]
Given the base was a bit short, I thought a thicker top would work, and being a fan of Ron Paulk but never having built his Smart Bench, I watched his video showing assembly of the new CNC-cut versionassembly of the new CNC-cut version of the Paulk Smart Bench and decided I could make something similar, but sized perfectly to the extrusion base.
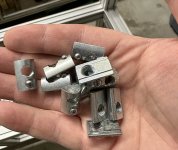
Before I started, I tested the extrusion slots and they perfectly fit Festool clamps, so I removed the black plastic end caps and replaced them with 3D printed caps which maintain the extrusion slot. Just like the MFT/3, this will allow me to slide Festool clamps in sideways to vertically clamp panels for edge banding, etc.
[attachimg=3]
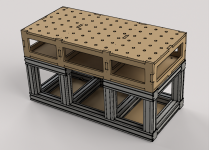
Next, I took measurements and modeled the base in CAD, so that I could ensure the mounting holes for the top (and bottom) panels would line up with the extrusion slots. This also makes quick work of laying out the 20x96mm hole pattern.
[attachimg=4]
With the design pretty well done, I had to decide on material. I was initially considering Baltic Birch and even ordered some, but when I picked it up from my local lumber supplier, I was surprised to see they wrapped the Baltic Birch in what appears to be an MDO type panel:
[attachimg=5]
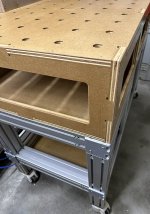
Not great impact resistance (actually, terrible), but surprisingly strong with the hardwood core. And, well, free. I figured with a decently rugged finish, it would hold up fine to occasional shop use. I then cut the parts on my CNC router and it assembled easily, even though I could have fine-tuned some dimensions for an even better fit-up. Each panel is glued up and I used trim screws rather than clamps.
[attachimg=7]
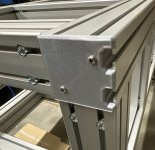
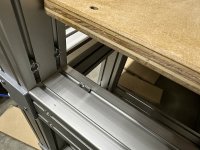
For attaching the top to the extrusion base without having to disassemble it, I'm using slide-in T-nuts. These make assembling or modifying extrusions a breeze, and even include a spring loaded ball-bearing which keeps the T-nut in position, even in vertical extrusions.
[attachimg=6]
Here you can see the T-nut inserted. It tilts in and requires a bit of fiddling to get it correctly registered in the T-slot, but it beats having to disassemble everything.
[attachimg=8]
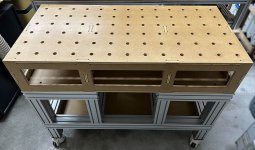
Looking forward to some more shop table space... that will quickly be consumed.
[attachimg=9]
[attachimg=1]
I believe the original owner had it custom made to hold/balance large truck tires in the open middle segment. It's built from 80x80mm extrusion and uses very strong counterbored anchor fasteners at the joints.
Without a top, the base only measured about 23" from the ground, so naturally I used it to store all my junk:
[attachimg=2]
Given the base was a bit short, I thought a thicker top would work, and being a fan of Ron Paulk but never having built his Smart Bench, I watched his video showing assembly of the new CNC-cut versionassembly of the new CNC-cut version of the Paulk Smart Bench and decided I could make something similar, but sized perfectly to the extrusion base.
Before I started, I tested the extrusion slots and they perfectly fit Festool clamps, so I removed the black plastic end caps and replaced them with 3D printed caps which maintain the extrusion slot. Just like the MFT/3, this will allow me to slide Festool clamps in sideways to vertically clamp panels for edge banding, etc.
[attachimg=3]
Next, I took measurements and modeled the base in CAD, so that I could ensure the mounting holes for the top (and bottom) panels would line up with the extrusion slots. This also makes quick work of laying out the 20x96mm hole pattern.
[attachimg=4]
With the design pretty well done, I had to decide on material. I was initially considering Baltic Birch and even ordered some, but when I picked it up from my local lumber supplier, I was surprised to see they wrapped the Baltic Birch in what appears to be an MDO type panel:
[attachimg=5]
Not great impact resistance (actually, terrible), but surprisingly strong with the hardwood core. And, well, free. I figured with a decently rugged finish, it would hold up fine to occasional shop use. I then cut the parts on my CNC router and it assembled easily, even though I could have fine-tuned some dimensions for an even better fit-up. Each panel is glued up and I used trim screws rather than clamps.
[attachimg=7]
For attaching the top to the extrusion base without having to disassemble it, I'm using slide-in T-nuts. These make assembling or modifying extrusions a breeze, and even include a spring loaded ball-bearing which keeps the T-nut in position, even in vertical extrusions.
[attachimg=6]
Here you can see the T-nut inserted. It tilts in and requires a bit of fiddling to get it correctly registered in the T-slot, but it beats having to disassemble everything.
[attachimg=8]
Looking forward to some more shop table space... that will quickly be consumed.
[attachimg=9]
Attachments
-
 IMG_2484.JPG135.7 KB · Views: 261
 -
 IMG_2481.JPG120.9 KB · Views: 260
 -
 IMG_2485.JPG144.9 KB · Views: 249
 -
 Paulk-Mini-Bench.png613.4 KB · Views: 254
 -
 IMG_2479.JPG142.6 KB · Views: 251
 -
 IMG_2487.JPG153.9 KB · Views: 251
 -
 IMG_2498.JPG137.4 KB · Views: 250
 -
 IMG_2489.JPG143.8 KB · Views: 254
 -
 IMG_2499.JPG87.7 KB · Views: 255