Butcher block countertop with waterfall end

Crazyraceguy

Member
Joined
Oct 16, 2015
Messages
4,901
A little side-job for an architect that one of the sales guys knows.
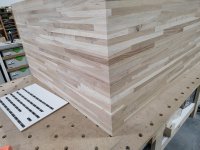
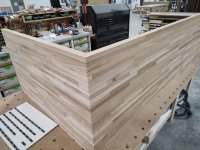
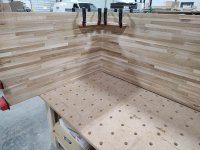
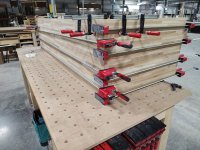
This is one of those situations where the exterior basement walls have a partial block wall that is offset from the drywall section, leaving a ledge. The interior partition walls do not. This 25" wide section runs into one of the ledges, are only 8" wide, so there will be a 90 degree joint there.
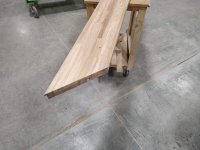
I don't have it all layed out yet, but did cut the miter on the end. This is not yet glued, just held by the friction of five 10mm Dominos.

Ignore the Shaper tape board, it has nothing to do with this.
 

Attachments

  • Butcher block waterfall edge.jpg
    Butcher block waterfall edge.jpg
    390.6 KB · Views: 189
  • Butcher block waterfall.jpg
    Butcher block waterfall.jpg
    368.7 KB · Views: 180
Always loved grain continuity; looks great! Would love a follow-up photo when it gets finish
 
woodbutcherbower said:
Looks like a job for a TS60  [big grin]

It absolutely was. I worked on it more today and the guy who brought this job to me was out in the shop hanging out/watching. He asked how I did that cut. I showed him the TS60. He said "no way", that little saw can do a cut like that? Up, it sure can.
In the first pics I posted, both sides were still over-length, so I set up the track and showed him the cut.
Now granted, it was a square cut, not the bevel, but it cut across that material like it was nothing.
The guy was stunned, quiet, smooth and not a speck of dust released and the same blade did the rips as well as cross cuts. (that new general purpose one) I think the factory "fine finish" one would be too much here. It's great on laminate, veneer, and ply.
I used the FS3000 to straighten one edge of each of the wall cap parts, before cutting them to width. They were off-cuts from wider pieces and had a bit of bow in them, from releasing the tension.
I got all of the cutting done today, Dominos in the miter on the other end, a single dog-bone to tighten that joint, a rabbet along the back edge (for scribing), and the glue-up of the waterfall.
Those 98" Besseys might weigh a ton, but they sure are great for this kind of thing.
Plus, I bricked the CT26 again  [unsure] so you'll have that...

The client came to give some final dimensions/approval this morning. She saw it at the point of the first pics and just loved it.

It can all go to the finish department on Monday and get delivered either Friday afternoon or Saturday morning. The finish is a 2 step process that we worked out last summer, for some locker room benches.
It's basically a clear sealer and conversion varnish top coat. It's very tough, water resistant, and imparts no color at all. The normal pre-cat lacquer we use for most jobs does have some yellow and ages a bit more.
Originally, we were supposed to do the install (me and the sales guy) but she has decided that she and her husband want to try it themselves.


Attachments

  • Butcher block miter.jpg
    Butcher block miter.jpg
    393.2 KB · Views: 125
  • Butcher block wall cap.jpg
    Butcher block wall cap.jpg
    334.9 KB · Views: 127
  • Butcher block glue up.jpg
    Butcher block glue up.jpg
    398.6 KB · Views: 128
  • Butcher block glue outer.jpg
    Butcher block glue outer.jpg
    336.6 KB · Views: 130
Now that's a thing of beauty... [thumbs up] ...just love the look of all of those parallel strips of wood wrapping around the corner.

Great idea on the rabbet for scribing, that's a new one for me, it looks to be about 1/4" thick?
 
Cheese said:
Great idea on the rabbet for scribing, that's a new one for me, it looks to be about 1/4" thick?
 

I concur!!!  I sometimes use a 5° to 10° back bevel for scribing, but the rabbet would make things even easier.  Great idea!!!  [smile]
 
Cheese said:
Now that's a thing of beauty... [thumbs up] ...just love the look of all of those parallel strips of wood wrapping around the corner.

Great idea on the rabbet for scribing, that's a new one for me, it looks to be about 1/4" thick?

Yes, 1/4" wide and 1/4" deep. The site was checked out by one of the project managers and found to be slightly over square, so he made me a template to match. That end is cut to that angle, then the 45s were referenced from that edge. In theory, it should be very close "as-is" but I don't expect the walls to be straight. There is always tape/mud on inside corners too, they never fit something square. The angle should be right, but I would bet that there is some taper/bevel into the corner. A quarter inch of scribe is plenty.
I did the first pass across the back of the wider section with the OF1400, a 1/2" compression bit, and edge guide, mostly to not cut through at the miter and run across the end grain. I did the back of the 8" wide sections with the TS60, since that is way faster and less messy.
 
Back
Top