Cherry Table Strip

Scott B.

Magazine/Blog Author
Member
Joined
Nov 24, 2011
Messages
2,004
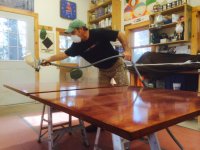
We are working on a 10' long farm style cherry table, strip and refinish project this week.

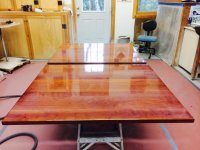
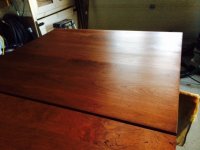
Stripped and stained:

[attachimg=1]

The table top had the classic runner line down the center where the sun had aged it differently around the perimeter of the table, oddly it was darker under the runner.

Here is a video of the stripping process, the initial removal round:


Attachments

  • photo (94).JPG
    photo (94).JPG
    102.3 KB · Views: 2,495
That's beautiful.  Tell us more about the details of how you finished it.  What did you use and what was the process?
 
Michael Kellough said:
Was the original finish linseed oil? I've read that in low light BLO darkens.

No, the original finish was some sort of tinted lacquer from 14 years ago that kind of puked out in the sunlight but stayed dark under the runner all those years.

Generally, you are correct, linseed or any oil darkens cherry radically.
 
RLJ-Atl said:
That's beautiful.  Tell us more about the details of how you finished it.  What did you use and what was the process?

Thanks.

The first video (above) shows the initial round of stripping, which was at 80g. I stayed with the ETS150 until I got up to 180 and then switched to the RS2 for 240 and 320, then we applied our own blended gel stain (classis cherry) with rags and polished it in.

That is where the project stands now. We do stain on fridays so it can have 48-72 hours before monday comes around and we start spraying clear on it.

We will be videoing all of that and putting out a "Cherry Gone Bad" Part II video sometime next week, showing the spray sequences and in between coat prep. Can't wait to pop that grain with some clear.
 
I don't know about you guys, but I was on pins and needles heading into this one.

3 coats to go.

[attachimg=1]
 

Attachments

  • clear.jpg
    clear.jpg
    68.3 KB · Views: 2,041
Sal LiVecchi said:
Scott.  The grain has popped for sure it looks awesome, as always great work

Sal

Thanks Sal, this is why we are advocates of sanding sealer. It ain't over til it's over.
 
Here's the second of four clear coats.

I am sharing the chronology of this project not to show off the work we do, but mostly so that folks here who finish cabinetry and furniture can see the steps and minutiae we go through to get it just right by any standards. Most of us struggle with getting as close to perfection as we can, and we are no exception. It is especially stressful when the piece is being done for someone else.

What is cool is that the steps on the finish side are the same whether it is a refinish project or a new piece. Hope this is helping some FOG members to see the due diligence it takes to get a nice finish. It's a challenge, a slippery slope. It is possible to get backwards in a hurry. Especially on the in between coat moves.

We are accumulating much detailed footage of each sequence and will be compiling a vid summary on completion.

[attachimg=1]

Feedback encouraged!  [big grin]


Attachments

  • photo (97).JPG
    photo (97).JPG
    120.6 KB · Views: 1,968
Breaking out the RS2 prior to today's spray round. It really is like an enormous, stable, gentle RTS400.

[attachimg=1]
 

Attachments

  • photo (98).JPG
    photo (98).JPG
    128.1 KB · Views: 1,913
Scott

Looking really good!  Most of us mortals could achieve the same level of finish................... If we paid you! [big grin]

Bryan

PS.  You should put together a 6 or 8 part video series going through the whole process, stripping to final finish.  Talking about your equipment, tips and techniques.  I would buy that DVD or subscribe to that video series through your Prep2Finish initiative or on your website.
 
Wooden Skye said:
Scott

Looking really good!  Most of us mortals could achieve the same level of finish................... If we paid you! [big grin]

Bryan

PS.  You should put together a 6 or 8 part video series going through the whole process, stripping to final finish.  Talking about your equipment, tips and techniques.  I would buy that DVD or subscribe to that video series through your Prep2Finish initiative or on your website.

Thanks Bryan.

It really takes patience. Resisting the temptation to just get it done. The good finishers that I have learned from are ritualistic and methodical, but also into controlled experiment.

We could definitely carve our footage into a Youtube series.

It would be really helpful to know what types of questions you and others seek answers to. We are happy to fill in the blanks.

While finishing is complex, we really try to keep it simple and fun. Although you can probably sense the gravity of the situation in our expressions as we work.

Definitely post up any stain/clear/spray/prep/technique questions!
 
tjbnwi said:
Looking good Scott.

Tom

Thanks Tom. I've been low grit sanding all summer, so it was nice to step up through some. And a good warm up for our next project, a maple kitchen coming through the shop for clear.
 
Scott

Would welcome the video series.

A few questions I'd have / areas to discuss:

- controlling blotch on maple / pine / cherry
- getting color right
- surface prep / grit progression for stain versus dye
- using light / raising grain / fixing problem areas like dents and dings
- when to strip versus sand and overcoat
- spraying versus wiping stain versus dye
- controlling dust - vac, tack cloth, wiping with spirits, etc.
- getting viscosity right / sprayer settings / considerations (assuming HVLP)
- popping the grain
- finish coats - water based vs lacquer vs poly
- finishing the finish - final sanding
- overcoming mistakes - drips, runs, fixing colors

Recommended books or videos.  I've watched several from Charles Neil, for example.

Lots to learn but appreciate the expertise you are bringing!

neil
 
Great suggestions, Neil, thank you. That is like an entire semester at the Paint Academy!
 
Scott B. said:
Great suggestions, Neil, thank you. That is like an entire semester at the Paint Academy!

Ha!  Well I don't mind going back to school!

Thanks Scott -
 
Coming from an automotive refinishing background I find it interesting that you spray such a large flat piece horizontally. Especially when it is not being done in a controlled environment such as a booth. With such a large panel laying like that you increase the chance of getting something in the finish and also create a lean over.

Love your posts and was just curious as to why not hang vertically?
 
NEW2FES said:
Coming from an automotive refinishing background I find it interesting that you spray such a large flat piece horizontally. Especially when it is not being done in a controlled environment such as a booth. With such a large panel laying like that you increase the chance of getting something in the finish and also create a lean over.

Love your posts and was just curious as to why not hang vertically?

That's a great question.

The delivery systems (gravity HVLP) are very similar from automotive to wood finishing but the products and substrates are completely different.

Anytime we can spray horizontally, we prefer that because we can lay on a thick coat with no risk of sags or curtains. The key to our finishes is to get them as wet as possible and let them level into themselves. That creates the hardest coating and builds the best sheen. We use waterborne whenever possible (including here), and they have a fairly broad open time, so we take advantage of that.

We do spray some things vertically, for instance the legs for this table, so that we could get all 4 sides in the same session. It is a different approach though, a tack coat approach. Thinner coats grabbing each other until you feel like they might bust loose.

As to air flow and ventilation, with waterborne, the mist is very light and stays in the air long enough to be drawn out and exhausted by the wall fan. We run it while spraying and for long enough at the end of the session to clear the space.
 
I was a furniture finisher in the '80s and '90s, and agree with Scott. Horizontally allows you to lay on more product and keep it open for longer, therefore letting it flow to a smooth finish. Drawer fronts, doors and panels were nearly always sprayed thus. I occasionally came across furniture sprayed by automotive refinishers, while it was well done, it was easy to see it had been done while vertical.

Very nice job, Scott. I can still feel the butterflies in my stomach when doing large tops like that.
 
Back
Top