sancho57
Member
- Joined
- Jan 13, 2011
- Messages
- 6,903
I posted my Leaning book case i made for my son in college. Now he said he needed a desk.
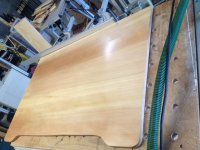
So I built this using almost entirely festools (the non festools were b/c festool doesn't make one ..yet)
This is just the top.
Made from Piranha Pine,
Planed to 20mm using my Makita thicknesses
Edge jointed using the TS55 and rail
Joined using the domino 500
Cross cut to size using the MFT w/ ts 55
the shape was cut using my PS300 jig saw.
sanded with my RO 150 - using the hard pad it makes sanding flat a surface very easy and easier to control than a belt sander.
Applied Wax and buffed with the RO150 and a felt pad
In the process of adding a small drawer.
the white you see on the photo of the top is the light reflecting on the top, that pad really makes it shine.
As this for a college student and needs to be easily move (college kids move a lot) The legs are the round metal legs 28" high the base of the legs screws on to the top and the legs just screw on and are easily removed. The legs are being delivered to him to install. I got him a ryobi drill so he can assemble things he buys. When I get this to him and he assembles I will have him take photos of the desk completed .