Crox G
Member
- Joined
- Nov 27, 2012
- Messages
- 93
My son’s school needed three carts for transporting and charging laptop computers. We were able to design them to hold 24 each. I used nearly every tool, especially my Festools, to do the job, so the project was a success in that regard.
[attachimg=1]
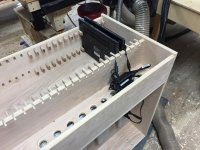
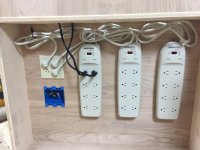
The carts store the laptops on their long edges, divided by rows of dominoes. The cords and power supplies are stored in a parallel trough. The power leads feed down through holes to three power strips below. Those strips in turn plug into a quad-receptacle box, which is fed by an extension cord plugged into a recessed male plug. I hope the expert electricians approve!
[attachimg=2]
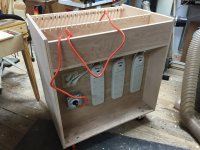
The bases on two of the units consists of six panels each, all 800 mm by 600. How about that for lazy! On the third, for smaller computers, I made the end panels in the golden ratio, 494 by 600. The sides of the top sections are about 150mm tall. This was a good exercise in my conversion to metric.
The TS55 was a joy to use on the domestic baltic birch 18mm plywood. With my Parf Dogs (thanks Peter Parfitt!) all the panels were square and true. I fastened them with self-tapping screws with Torx heads, using the Ti-15 (i love it), and rounded over the edges with the 1400 router.
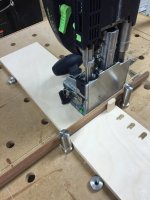
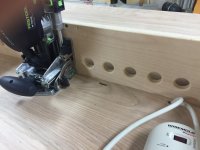
The Domino XL was the star of the show, however. I wanted parallel rows of equally-spaced dominoes, fit within the 800 mm length. 25 dominoes to support 24 computers came out comfortably at 32 mm on centers with about a 10 mm margin on each end. I decided to use 10x50 dominoes and found that I could index each hole from the previous one, using the tall Parf dogs and a 12 mm spacer. I had a leftover strip of 12 mm sipo, which worked perfectly. There was no appreciable cumulative error, but just to be safe, I used the first set of holes as indexes to make the second row of holes. I used the Domino's first indexing pin for side spacing. At 100 dominoes per cart, my supply went fast. Thanks Bob Marino!
[attachimg=3]
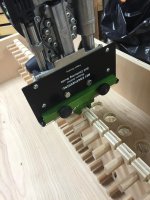
I wanted to notch the top of the divider, in between the dominoes, in order to have a place to park the charging cord for each laptop when it is removed. How to cut a 7-8 mm slot in the edge of the plywood? I didn’t trust my table saw technique or my router, either hand-held or table mounted. I had the Ahah moment and tried the Domino held vertically. I used Rick C.’s self-centing guide and an 8mm cutter with Seneca adaptor. I just worked to an eyeballed line, which was close enough. It worked great, with just a little tearout on the edges, easily sanded off with emery paper.
[attachimg=4]
The leads for the power strips looked sloppy. I wanted to hide them in the unused hollow space between the two supporting sides. Domino XL to the rescue again! Three 12 mm slots cut just above the power strips allowed just enough width and length to cram most of the wire out of sight. A couple of cord clips and zip ties made a much tidier job.
Before:
[attachimg=5]
After:
[attachimg=6]
[attachimg=7]
I sanded the panels with 220 grit on the ES 150/3, and eased any remaining sharp edges with the RO 90. I drilled shelf pin holes on the side opposite the power strips using a plastic Rockler jig and self-centering bit, but boy did I wish for an LR32! Finally, the Festool countersink with the hole in the side made a nice clean job for the flat-head bolts for the casters.
A fun few days in the shop.
[attachimg=1]
The carts store the laptops on their long edges, divided by rows of dominoes. The cords and power supplies are stored in a parallel trough. The power leads feed down through holes to three power strips below. Those strips in turn plug into a quad-receptacle box, which is fed by an extension cord plugged into a recessed male plug. I hope the expert electricians approve!
[attachimg=2]
The bases on two of the units consists of six panels each, all 800 mm by 600. How about that for lazy! On the third, for smaller computers, I made the end panels in the golden ratio, 494 by 600. The sides of the top sections are about 150mm tall. This was a good exercise in my conversion to metric.
The TS55 was a joy to use on the domestic baltic birch 18mm plywood. With my Parf Dogs (thanks Peter Parfitt!) all the panels were square and true. I fastened them with self-tapping screws with Torx heads, using the Ti-15 (i love it), and rounded over the edges with the 1400 router.
The Domino XL was the star of the show, however. I wanted parallel rows of equally-spaced dominoes, fit within the 800 mm length. 25 dominoes to support 24 computers came out comfortably at 32 mm on centers with about a 10 mm margin on each end. I decided to use 10x50 dominoes and found that I could index each hole from the previous one, using the tall Parf dogs and a 12 mm spacer. I had a leftover strip of 12 mm sipo, which worked perfectly. There was no appreciable cumulative error, but just to be safe, I used the first set of holes as indexes to make the second row of holes. I used the Domino's first indexing pin for side spacing. At 100 dominoes per cart, my supply went fast. Thanks Bob Marino!
[attachimg=3]
I wanted to notch the top of the divider, in between the dominoes, in order to have a place to park the charging cord for each laptop when it is removed. How to cut a 7-8 mm slot in the edge of the plywood? I didn’t trust my table saw technique or my router, either hand-held or table mounted. I had the Ahah moment and tried the Domino held vertically. I used Rick C.’s self-centing guide and an 8mm cutter with Seneca adaptor. I just worked to an eyeballed line, which was close enough. It worked great, with just a little tearout on the edges, easily sanded off with emery paper.
[attachimg=4]
The leads for the power strips looked sloppy. I wanted to hide them in the unused hollow space between the two supporting sides. Domino XL to the rescue again! Three 12 mm slots cut just above the power strips allowed just enough width and length to cram most of the wire out of sight. A couple of cord clips and zip ties made a much tidier job.
Before:
[attachimg=5]
After:
[attachimg=6]
[attachimg=7]
I sanded the panels with 220 grit on the ES 150/3, and eased any remaining sharp edges with the RO 90. I drilled shelf pin holes on the side opposite the power strips using a plastic Rockler jig and self-centering bit, but boy did I wish for an LR32! Finally, the Festool countersink with the hole in the side made a nice clean job for the flat-head bolts for the casters.
A fun few days in the shop.

")
")