Counterbore 8020 for anchor fasteners (DIY)

jthacker48

Member
Joined
Nov 11, 2017
Messages
12
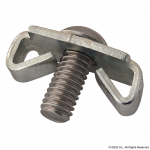
I've been lucky enough to stumble into several hundred feet of 80/20 at a crazy price recently. In addition, it came with a couple hundred anchor fasteners and various other fasteners and accessories.

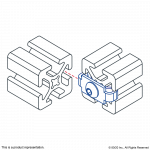
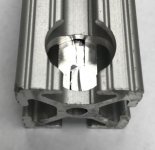
The extrusion is various lengths and I'm going to need to cut it to length for my projects. The cutting I can handle. I'm having trouble figuring out how to counterbore aluminum for the anchor fasteners without a mill.

I've got a Wen 4214 12" variable speed drill press with a chuck that can hold up to 5/8". But I've got 15 series 8020 and the anchor fasteners are 13/16". I cant use 8020's suggested end mill plus I'm not sure if an end mill would work right in drill press even if it would fit.

I've seen a lot of mixed answers and none of them breed a lot of confidence except spend a bunch of money and time taking it to a machine shop. I'd like to do it myself if at all possible for a plethora of reasons.

Is it reasonable to counterbore 80/20 without a mill? 

If so, what kind of bit would I use in my drill press?
 
I've used a 20mm HSS drill bit to counter-bore the 80/20 style stuff for the quick connect fittings.  I first used a 10mm spotting drill to mark the hole in the main profile between the groove channel, otherwise there can be a lot of wander.  Make sure the piece is clamped firmly. Also, I used cutting fluid otherwise you can end up with the bit stuck. I only used a Bosch PBS40 drill press so not the most sturdy of things. I found best on a low speed, high torque.
 
Svar said:
This cuts aluminum very well using a regular drill or drill press:https://www.amazon.com/Jancy-Slugge...nular+Cutter&qid=1582563110&sr=8-2-fkmr0&th=1
It might work without a pilot bit in a drill press with work piece secured. If these are 80/20 connectors I've seen, hollow cutter should still work.
Alternatively, make a template with hole in it and use plunge router with small aluminum mill and guide bushing.

I don't think that will work because that seems to only cut the outer edges of the circle. If couterboring, I'm not going all the way through the aluminum. So wouldn't this just cut a ring but not remove the center of the ring?

I've got a plunge router. Are you suggesting just tracing the edge of a template and clearing it with the router? Interesting. Seems like it could be time consuming for 50+ holes.
 
Ha! I was JUST looking into what this would take yesterday as Im planning to purchase some 80/20 to build an enclosure for my 3D printers.
Was starting to look to me like counter-boring for the Anchor Fasteners was best left for those with a mill or letting them do the machining when ordering it. I did find out the sell jigs to make the access hole for the End Fasteners though and I was considering picking one of those up along with a tap to cut threads into the ends.
 
You are right. I thought it's already hollow in the middle because of the t-slot, but you still need to do the bottom.

[attachimg=1]

With router it will be similar to making a regular mortise, except round one. There are plenty of specialty router bits for cutting aluminum.
 

Attachments

  • Cbore.JPG
    Cbore.JPG
    39 KB · Views: 9,744
[member=66473]jthacker48[/member] the cutter that 8020 sells is an anular cutter. I believe that it has a 3/4 inch Weldon shank. You would need a Weldon adapter for your press to get the cutter to fit. Pretty sure you have an MT2 taper on your press. 

You would get an an MT2 to Weldon arbor, remove the chuck and arbor from your press and replace it with MT2 Weldon taper and use the annular cutter. 

You’ll also need some way to secure the workpiece to the table while cutting.

Cutter from 8020 is about 70 or so
The taper adapter about 50 to 70
https://www.amazon.com/s?k=Mt2+weldon&ref=is_s

Ron
 
You have a difficult task ahead of you.  [big grin]

You need a 13/16" or 20 mm diameter cutter.
It needs to provide a flat bottom.
It needs to be capable of plunge cutting and removing the center of the cut material.
It needs to cut aluminum which dictates the helix angle of the cutter or it needs to be carbide.
It must have a 10 mm, 12 mm or 1/2" diameter shank to fit into a conventional hand held router.

None of the above "needs" produce a slam-dunk winner except for using an end mill in a knee mill, Bridgeport style.

Unfortunately, an end mill also cannot be used in a drill press because the end mill shank is too hard and the chuck will not "bite" into the shank. The end mill will simply spin in the chuck.

You could fit an Albrecht chuck with diamond coated jaws to the drill press that may work but that's another $$$ story.

So, for a few holes I'd try using the Festool 20 mm router bit. I am impressed with how well it works considering the router speeds involved and it is carbide tipped, that's a bonus round. I would also dial the router down to its minimum speed and then increase the speed slowly from there until you hit the sweet spot. Note: The sweet spot, may indeed be the lowest speed you can set the router at. Use a lubricant.

HOWEVER, I've never used the Festool bit on aluminum, only on hard maple and ply so it may or may not work. Consider it just a $80 experiment if it self-destructs or the carbide chips.  [smile]  If it does work, I doubt that you'd be able to produce more than 10 counterbores before it goes south because of the geometries of the cutter. It's a delicate cutter with angles and geometries that better match wood than aluminum.

And then...you need to consider and fabricate the fixture you'll need to produce uniform locations for the connectors.

Bottom line, for 50+ machining operations, I'd look for a local machine shop that you can work with. This is easy-peasy for them and shouldn't cost much if you have the all of the 8020 sections machined at the same time. You'll probably spend as much in tooling and fixturing costs as opposed to machine shop costs.

They place 2 stops on the mill bed, insert a cutter in the head, dial in a depth and clamp down the 8020.  Or they just use a vise on the mill bed that already has an end stop. Either way...simple, accurate & repeatable.

Repeat 50 times...done.

Why not just use a different method to join the sections?
 
I bought a set of small high speed steel holes saws Similar to these for the same purpose you’re asking about. But I never tried it.

Figured I’d start with a pilot hole then use the hole saws starting with the smallest. The trouble with this idea is that the hole saws can only cut several millimeters so there will be a substantial 10mm core that has to be removed (small counterbore?) before starting the cycle again.

Seemed like too much trouble. I just used the end connection and the jig for drilling holes for the hex key.
 
I think what rvieceli proposing is the best idea so far. Keep in mind that most of the hole is already empty space due to t-slot, so it won't put too much stress on the drill press.
 
Interesting thread, I did a little bit of research on this topic when I was planning my workshop and concluded that it wasn’t worth pursing. This thread has filled in all the holes and confirmed my doubts :)

I ended up buying lots of 25” pieces with a counter bore on both ends. These form the base building block for almost everything I’ve built. I then vary the build using pieces these fasten into.

It’s slightly restrictive but it’s given me a modular design which I can easily repurpose. The cost has been offset by the speed counterbore can be used and the unforced standard design.

Sent from my iPhone using Tapatalk
 
[member=67145]Dusty.Tools[/member] , hindsight! ;)

Actually, your creations inspired me to start hunting down extrusions.  If I end up taking the pieces to a machine shop to get milled, I will almost certainly have them all cut to common lengths and all milled at once.  I've got some small pieces that I'll probably take a swing at with the various methods from above before taking them though.  Mostly out of curiosity more than a belief that I'll be successful. 

I guess that's the downside of buying used extrusion.  On the flipside, I did only paid $400 total for all of it. 

My 80/20 Bounty
 
Michael Kellough said:
I bought a set of small high speed steel holes saws Similar to these for the same purpose you’re asking about. But I never tried it.

Figured I’d start with a pilot hole then use the hole saws starting with the smallest. The trouble with this idea is that the hole saws can only cut several millimeters so there will be a substantial 10mm core that has to be removed (small counterbore?) before starting the cycle again.

Seemed like too much trouble. I just used the end connection and the jig for drilling holes for the hex key.

Seems like this would cause the same issue that was discussed earlier in the thread.  Since I need a counterbore which won't cut a hole through the entire piece, a hole saw will leave a ring but will not remove the material in the center of the ring. 
 
I build a lot of 8020 and use a 5/8" counterbore to make my recess'.  I use mine to recess truss head screws but the proper size should work for the what you want to do. 
 
rvieceli said:
[member=66473]jthacker48[/member] the cutter that 8020 sells is an anular cutter. I believe that it has a 3/4 inch Weldon shank. You would need a Weldon adapter for your press to get the cutter to fit. Pretty sure you have an MT2 taper on your press. 

You would get an an MT2 to Weldon arbor, remove the chuck and arbor from your press and replace it with MT2 Weldon taper and use the annular cutter. 

You’ll also need some way to secure the workpiece to the table while cutting.

Cutter from 8020 is about 70 or so
The taper adapter about 50 to 70
https://www.amazon.com/s?k=Mt2+weldon&ref=is_s

Ron

[member=3192]rvieceli[/member], thanks for the suggestion.  I'd run across this bit on Amazon while searching a few days ago.  I was just a little confused about how it works as the shaft and drilling tip look to be the same size despite the description saying otherwise.  Any thoughts if something like this would work?  If so, it's a much cheaper solution with seemingly less hassle.
 
jthacker48 said:
[member=67145]Dusty.Tools[/member] , hindsight! ;)

Actually, your creations inspired me to start hunting down extrusions.  If I end up taking the pieces to a machine shop to get milled, I will almost certainly have them all cut to common lengths and all milled at once.  I've got some small pieces that I'll probably take a swing at with the various methods from above before taking them though.  Mostly out of curiosity more than a belief that I'll be successful. 

I guess that's the downside of buying used extrusion.  On the flipside, I did only paid $400 total for all of it. 

My 80/20 Bounty

Nice haul :) you saved a ton, so there’s less harm getting it milled professional!

Sent from my iPhone using Tapatalk
 
Why not just use a different style of fastener?

[attachimg=1]

A 5/16-18 hole has to be tapped into the end of a rail. The pilot hole is already there so you just need to use a spiral point tap to add the threads.

[attachimg=2]

Then a simple clearance hole has to be drilled in the mating part to use a hex key to tighten the connector.

[attachimg=3]

Can't get much easier than that. Total outlay for the project...a drill bit and a tap.

[attachimg=4]
https://8020.net/3680.html
https://www.mscdirect.com/product/details/40214165
 

Attachments

  • 3680_5:16-18.png
    3680_5:16-18.png
    1.2 MB · Views: 7,504
  • 3680_5:16-18_2.png
    3680_5:16-18_2.png
    136.6 KB · Views: 7,223
  • 3680_5:16-18_3.png
    3680_5:16-18_3.png
    130.7 KB · Views: 7,374
  • 3680_5:16-18_4.png
    3680_5:16-18_4.png
    104.6 KB · Views: 7,135
Back
Top