HowardH
Member
I've had the system going on 3 weeks and just finished up my first project using it which is a rolling cabinet for my Tormek 8. It arrived in several boxes as I ordered not only the basic bench but also the Platinum accessory package which includes, IIRC, pretty much all the available accessories. It came very well boxed and the only damage was to one of the outriggers. No biggie as Rob is going send me a replacement knob which was broken and I'll have to reset the leg stops.
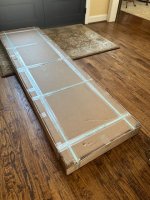
[attachimg=1]
With the accessory kit, there are a lot of parts so you need to have a convenient place to keep it all together. I have a rolling utility cart and it works well for that purpose.
First impression? It's big and that's a double edge sword. It's much better than an MFT in the regard you can put a full length piece of ply and it's not going to fall off.
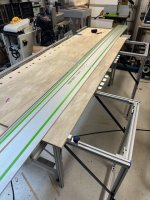
[attachimg=2]
The bad news it's big and it takes up a lot of room, especially with the outriggers attached. I have a 1.5 car garage space and it's tight. Also, it's extremely well made and thought out. Rob's been working on it for decade, IIRC, and it shows. It's also very rigid. You can push it pretty hard and it doesn't rock. The legs are foldable so when you are done with it, just fold it up and lean it against the wall. It's also easier to square the guiderail to the table with the simple but ingenious set up blocks. I no longer panic taking it on and off wondering how much trouble it's going to be to square it up. Takes about 30 seconds. I also like the way it's designed where I will never have to cut into any part of the table other than the replaceable insert. Even then, the kerf is always going to be in the same spot.
Let's talk accessories. The Trackstars are movable brackets you can position along the 80/20 frame to extend the length of a cross cut if needed. For ripping a full length sheet of ply, it really makes it much easier and safer than trying to manhandle a heavy sheet of ply through a table saw. Again, once it's set up, being able to push the tracksaw through the sheet is preferable unless you have a tablesaw with a large side extensions and outfeed table or a full size slider. There is also a Rip Gauge which helps to set the distance between the Rip stops and splinter strip on the rail. It also works on both sides of the rail so you don't have to add or guess how much extra to cut off to allow the blade kerf when measuring from the right side of the rail. I wish it had some sort of measuring marks on it as it's a bit cumbersome to use a tape measure and have to hold the gauge until you can get the setting you want. The Outriggers are also great to support cut-offs on plywood so they don't fall to the floor.
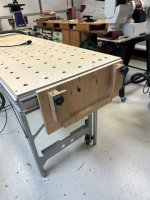
I was also able to attach my Vacsys holder but the holes for the flange bolts are drilled for an mft and not the 80/20 so I going to have to make another one for this system.
[attachimg=3]
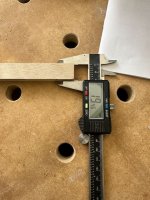
The guiderail brackets are truly phenomenal. Not flimsy feeling like the MFT's. Once tightened, they are rock solid. There is no provision, tho, for cutting at any other angle than 90 deg so if that's something you need, there is an aftermarket accessory you can get to accomplish that task. Again, once it's set up, it's as square as one can get. I did a 5-cut test and the results where within a few hundredths of a mm on a 300mm test piece.
[attachimg=4][attachimg=5]
One thing I discovered right away is if I continue to cut long rips of plywood, I have to go buy a much longer guiderail that will cover the entire distance rather than putting two shorter rails together. I had to do it a couple of times already and it's huge pain in the 6 and it takes a lot of time.
Here are my observations. I got rid of my Sawstop contractors saw to make room for this. I hated that saw for reasons not germane to this discussion. If you need to build cabinets and have a one man shop, this is a great system as it's infinitely safer than using a table saw. On the other hand, and this also is a reflection on my unfamiliarity with the system at this point, there is a lot of set up you may need in order to complete a task on smaller part that would only take a few seconds on a table saw. I found you really have to plan out your project in advance and know exactly what parts you will need because of the set up time. Once it's set up though, you can make repeatable cuts in quick order like cabinet sides. On my project, I didn't plan everything through very well and found I to re-setup the Trackstars when I ran out of material. My bad on that. I'm not a pro and don't carry an inventory of sheet goods. On the other hand, the parts all came out dead square when used with the his own design parallel guides. You will never need to use any other parallel guides nor will you want to once you get the hang of these. At some point, after we move and I can get a dedicated shop, I'll probably get a Festool TKS-80 if I can figure out how to get one over here. It's simply just going to make simple, one-off tasks much easier.
At the end of the day, I'm very satisfied that Rob has delivered what's promised in his system. It took a bit over 3 months to get it due to supply chain issues but I understand a lot of those issues have been resolved. I also believe there will be some tasks that are better suited to a regular table saw like ripping shorter pieces of hardwood, etc. You can do all of that on this system but there's a setup that must be done compared to moving a fence to where you want it and turning on the saw with a table saw. Again, I am still feeling my way around and I'm sure I'll get much faster at setting this up. Where this is going to shine is when I build my garage cabinets later on as I will be able to handle the task on my own. It's going to be helpful when more instructional videos come out to demonstrate best practices on using the system. I have read some of the comments about the cost and if you remember it has more capacity than 2 mft's bolted together, it's actually less expensive, at least until you start adding the accessories which are what really makes the system worthwhile. If you have a table saw and just want a long MFT with a better fence and guiderail brackets to cut sheet goods, then this makes a whole lotta sense in it's near basic configeration.
[attachimg=1]
With the accessory kit, there are a lot of parts so you need to have a convenient place to keep it all together. I have a rolling utility cart and it works well for that purpose.
First impression? It's big and that's a double edge sword. It's much better than an MFT in the regard you can put a full length piece of ply and it's not going to fall off.
[attachimg=2]
The bad news it's big and it takes up a lot of room, especially with the outriggers attached. I have a 1.5 car garage space and it's tight. Also, it's extremely well made and thought out. Rob's been working on it for decade, IIRC, and it shows. It's also very rigid. You can push it pretty hard and it doesn't rock. The legs are foldable so when you are done with it, just fold it up and lean it against the wall. It's also easier to square the guiderail to the table with the simple but ingenious set up blocks. I no longer panic taking it on and off wondering how much trouble it's going to be to square it up. Takes about 30 seconds. I also like the way it's designed where I will never have to cut into any part of the table other than the replaceable insert. Even then, the kerf is always going to be in the same spot.
Let's talk accessories. The Trackstars are movable brackets you can position along the 80/20 frame to extend the length of a cross cut if needed. For ripping a full length sheet of ply, it really makes it much easier and safer than trying to manhandle a heavy sheet of ply through a table saw. Again, once it's set up, being able to push the tracksaw through the sheet is preferable unless you have a tablesaw with a large side extensions and outfeed table or a full size slider. There is also a Rip Gauge which helps to set the distance between the Rip stops and splinter strip on the rail. It also works on both sides of the rail so you don't have to add or guess how much extra to cut off to allow the blade kerf when measuring from the right side of the rail. I wish it had some sort of measuring marks on it as it's a bit cumbersome to use a tape measure and have to hold the gauge until you can get the setting you want. The Outriggers are also great to support cut-offs on plywood so they don't fall to the floor.
I was also able to attach my Vacsys holder but the holes for the flange bolts are drilled for an mft and not the 80/20 so I going to have to make another one for this system.
[attachimg=3]
The guiderail brackets are truly phenomenal. Not flimsy feeling like the MFT's. Once tightened, they are rock solid. There is no provision, tho, for cutting at any other angle than 90 deg so if that's something you need, there is an aftermarket accessory you can get to accomplish that task. Again, once it's set up, it's as square as one can get. I did a 5-cut test and the results where within a few hundredths of a mm on a 300mm test piece.
[attachimg=4][attachimg=5]
One thing I discovered right away is if I continue to cut long rips of plywood, I have to go buy a much longer guiderail that will cover the entire distance rather than putting two shorter rails together. I had to do it a couple of times already and it's huge pain in the 6 and it takes a lot of time.
Here are my observations. I got rid of my Sawstop contractors saw to make room for this. I hated that saw for reasons not germane to this discussion. If you need to build cabinets and have a one man shop, this is a great system as it's infinitely safer than using a table saw. On the other hand, and this also is a reflection on my unfamiliarity with the system at this point, there is a lot of set up you may need in order to complete a task on smaller part that would only take a few seconds on a table saw. I found you really have to plan out your project in advance and know exactly what parts you will need because of the set up time. Once it's set up though, you can make repeatable cuts in quick order like cabinet sides. On my project, I didn't plan everything through very well and found I to re-setup the Trackstars when I ran out of material. My bad on that. I'm not a pro and don't carry an inventory of sheet goods. On the other hand, the parts all came out dead square when used with the his own design parallel guides. You will never need to use any other parallel guides nor will you want to once you get the hang of these. At some point, after we move and I can get a dedicated shop, I'll probably get a Festool TKS-80 if I can figure out how to get one over here. It's simply just going to make simple, one-off tasks much easier.
At the end of the day, I'm very satisfied that Rob has delivered what's promised in his system. It took a bit over 3 months to get it due to supply chain issues but I understand a lot of those issues have been resolved. I also believe there will be some tasks that are better suited to a regular table saw like ripping shorter pieces of hardwood, etc. You can do all of that on this system but there's a setup that must be done compared to moving a fence to where you want it and turning on the saw with a table saw. Again, I am still feeling my way around and I'm sure I'll get much faster at setting this up. Where this is going to shine is when I build my garage cabinets later on as I will be able to handle the task on my own. It's going to be helpful when more instructional videos come out to demonstrate best practices on using the system. I have read some of the comments about the cost and if you remember it has more capacity than 2 mft's bolted together, it's actually less expensive, at least until you start adding the accessories which are what really makes the system worthwhile. If you have a table saw and just want a long MFT with a better fence and guiderail brackets to cut sheet goods, then this makes a whole lotta sense in it's near basic configeration.

") My only clarification for everyone is that the bench frame is our own custom profile and there are no parts from 80/20 in our design. We do use T-slot for some of the accessories but that comes from another supplier.
My only clarification for everyone is that the bench frame is our own custom profile and there are no parts from 80/20 in our design. We do use T-slot for some of the accessories but that comes from another supplier.