Display "boxes" finished installed

Crazyraceguy

Member
Joined
Oct 16, 2015
Messages
4,901
Shaper Origin box-joint project.
I have done box-joints several different ways, dado in the table saw, router table, and even Leigh dovetail jig. The most significant difference is that with those methods, is that the width of the panel is largely unimportant. Meaning that, once set-up, cutting parts for a 6" wide drawer is no different than a 4" drawer, except you have to keep cutting a little longer.
With the Origin, it matters because the thing is doing the "math" for you.
All you have to do is tell the thing how wide your parts are, and how many total pins you want. This is why the width matters, it won't "just keep cutting". Adjusting the fit is very easy too, right on the screen.
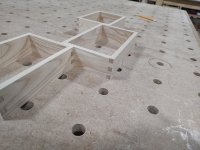
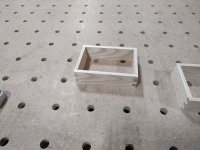
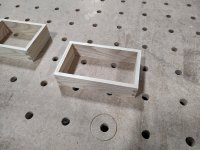
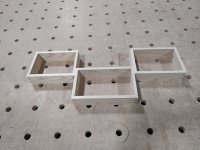
This was pretty simple. 2" wide and 5 pins total.
3/8" thick Ash

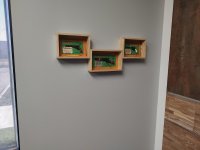
I think the final configuration is going to be the group of three, glued together as one.
 

Attachments

  • Boxjoint.jpg
    Boxjoint.jpg
    298.6 KB · Views: 272
  • boxjoint2.jpg
    boxjoint2.jpg
    342.2 KB · Views: 194
  • boxjoint3.jpg
    boxjoint3.jpg
    392.8 KB · Views: 162
  • boxjoint4.jpg
    boxjoint4.jpg
    317.6 KB · Views: 240
Does the Origin provide a recommendation for the number of pins based on either mechanics and/or aesthetics, or does the user have to come up with that based on previous experience?
 
I like the looks of the almost square fingers. Most people (myself included) lean toward narrower fingers, but when I see joints like this, I always tell myself to try it next time.
 
Have you tried stacking parts and cutting two sides at a time?

I tried it with 1/4" ply as a test, and wasn't thrilled with the results because the parts wouldn't stay still when clamped.  I was going try it with solid wood soon, but if you've tried it and it doesn't work, it doesn't work.
 
squall_line said:
Does the Origin provide a recommendation for the number of pins based on either mechanics and/or aesthetics, or does the user have to come up with that based on previous experience?

No, it doesn't tell you anything. It has menu choices on the screen wanting information from you.
1)It wants to know how thick the material is.
This determines the amount of travel in and out. (toward you and away)
2)It wants to know how wide the material is.
This is used later in it's "thinking"
3)You tell it how many pins you want in total. (both halves of the joint)
4)It already knows the bit diameter, which you previously entered.
5)There is also a space to account for a "glue gap", this is what determines how tight the fit will be.

Then it "does the math" and shows you an "A" board and the opposing "B" board, so you can alternate between them, depending on which side you are working with.

If you tell it that you want more pins than will fit with your bit diameter, it will tell you it can't do that.
You can either change bits, or reduce the number of pins.

jeffinsgf said:
I like the looks of the almost square fingers. Most people (myself included) lean toward narrower fingers, but when I see joints like this, I always tell myself to try it next time.

This was the result of 5 pins on a board that is 2" wide. The pins are just over 3/8" wide, right at .400"

"Theoretically" you could do an even number of pins and each board would be the same. You would just have to be more aware of inside and outside when you load them in. It would be faster, if that was the only requirement.

WastedP said:
Have you tried stacking parts and cutting two sides at a time?

I tried it with 1/4" ply as a test, and wasn't thrilled with the results because the parts wouldn't stay still when clamped.  I was going try it with solid wood soon, but if you've tried it and it doesn't work, it doesn't work.
I haven't tried it yet, but there really isn't any reason that it wouldn't work, other than movement. (Like you experienced)
In this particular case, the parts were so small that I had to do some "adapting." I did these on the Shaper Workstation. The pins on the vertical plate are too far apart for the shortest pieces, since they are only 5" long. So, I first clamped an auxiliary fence in there to support them better. It was only 1/4" thick, so stacking wouldn't have worked. Then I did a "new grid" from that position.

The first time I used it for box joints was just a test pair. I had a few minutes to spare one day and tried it for later reference. That first pair was a little loose, but I was just trying to see what it would do.
Pairs of parts should be fine, it's just a fixturing thing. Try it with some solid wood, end grain cuts really easily like this. That Ash just peeled off in nice little confetti pieces, really smooth.
 
I got the backs in them last Saturday, while fiddling with other things. Glued them together earlier in the week and sprayed some lacquer on them Friday and hung this afternoon. This is the general manager's office wall. He has these miniature, vintage, collector cap guns mounted on display cards. I think from the 40s or 50s? I'm sure they were intended to be toys and actually used, but these were never removed from the backing.

Since they end up making a shelf on the top, I assume that something will end up on top of them too.
 

Attachments

  • Shadowboxes.jpg
    Shadowboxes.jpg
    172.4 KB · Views: 202
My dovetail jig makes finger joints rather efficiently.  Is the Shaper Origin more efficient, or is it just that it is the equipment that you use frequently and you are comfortable with it.

I assume that the box joint is used for appearance sake, not because of the inherent strength of the joint.

Note:  I never use the box joint capabilities of the dovetail jig.  It is exactly the same amount of work to turn out dovetails, which I believe make for a stronger joint.
 
Packard said:
My dovetail jig makes finger joints rather efficiently.  Is the Shaper Origin more efficient, or is it just that it is the equipment that you use frequently and you are comfortable with it.

I assume that the box joint is used for appearance sake, not because of the inherent strength of the joint.

Note:  I never use the box joint capabilities of the dovetail jig.  It is exactly the same amount of work to turn out dovetails, which I believe make for a stronger joint.

Yes, they were purely for appearance, there is no strength issue in these simple little things.
It is very efficient. Once you tell it how many total pins you want and how wide the parts are, you just line the parts up against the reference pins and go.
The real beauty of it is about the width of the pins. They don't have to have anything to do with the bit diameter, other than being bigger. What that really means is, the width of your parts does not have to be a multiple of the bit diameter.

You're right about the dovetail jig. I have a Leigh, that I use occasionally for through dovetails, which are my preferred type. I just don't like the look of the typical machine-cut half-blinds. When the pins and tails are equal, they just look funny to me. It can cut box joints too, but as you said, its just as much work, maybe more. With through dovetails you can space them out and not have as many cuts. I like the bigger tails.
As I understand it, someone has worked out a way to do dovetails with the Origin too, but I have never tried it.
 
Back
Top