Hi there,
I recently purchased my first Festool product, a Domino 500.
I have gained a lot by the great information on this forum, and wanted to make a contribution in return. Woodwork is a hobby I have dabbled in for many years, but recently I have started to get back into it again after a long break (job, kids, renting houses with no garage etc), hence I still consider myself a novice. There are many great reviews of the Domino already, by far more experienced craftsmen, so I decided I would give a review from a beginner’s perspective by describing my first project with the Domino. It is an expensive tool, and potentially a difficult decision for anyone who is not yet sure they want to fully invest in the hobby. Hopefully this will help!
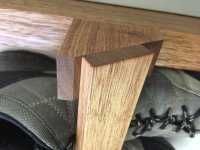
After doing a few test joints on some scraps, I decided to build a shoe rack. Not a very glamorous project, but one of great importance to the person in my house who gives approval for the next tool purchase! We have a very narrow gap behind the back door (150mm) which it had to fit into, and it needed capacity for at least 10 pairs. Here is the finished product:
View attachment 1
View attachment 2
It is constructed from a single sheet of melamine covered chipboard, with a eucalyptus frame and rails. Each rail is mounted on a wedge shaped block, to give a good angle to hold the shoes. Dominoes were used to mount the wedges to the main frame, and also to mount the rails to the wedges. I wanted to do this with no screws or nails visible.
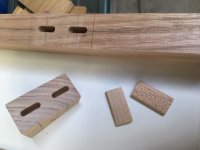
I started by cutting a rebate into the main frame timbers, so that the edge of the chipboard would be hidden. It might have been possible to then screw the wedges on to the main frame from the back, but the rebate meant I would have been too close to the edge, and at risk of breaking through the side walls (yes I am a novice at this, and didn’t trust my drilling to be straight enough!) So I attached them with two mortises in each. In this case, the using the domino was much easier than screws.
View attachment 3
View attachment 4
Cutting the mortises in the main frame was very easy, I just drew a line where I wanted each one, and lined it up by eye. I used the tight setting in all cases which worked perfectly (except for one which I will cover later). I found it very easy to get them in the right position, and the fence made it really simple to register the machine against the side of the main frame. As you can see in the second picture, the alignment ended up perfect. I was blown away by how simple it is to get such a neat and accurate result.
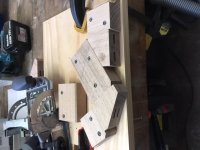
To cut the mortises in the wedge blocks, I had to make a jig as they were too small to clamp without interfering with the fence on the domino, and I didn’t want to hold them by hand. I made the jig from offcuts of the same material, meaning that the domino fence now had a much bigger area to rest on. With the jig, I was able to cut all 40 mortises in around half an hour. That is amazing to me, as my previous attempts to cut mortises proved to be very time consuming fiddly work (with patchy results).
One thing I did find is that you really need a proper dust extractor. Initially I was using an old vacuum cleaner, which extracted the dust perfectly, but to make it work I had to rig up a crazy number of fittings to allow it to connect to the domino. It ended being too long and cumbersome, and tended to pull the machine out of alignment when I was getting ready to plunge. I guess you could use it without dust extraction, but because this machine cuts such a narrow deep slot, there is nowhere for the chips to go. I felt it worked best with dust extraction, even if it is from an old vacuum cleaner.
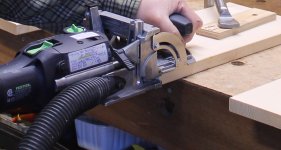
The first real problem I encountered was that the timber I purchased for the rails was 11mm thick, and the minimum depth setting on the domino is 12mm, hence the mortise would go right through. I am not sure if there is a simple solution to this, but in the end I made another jig. It consisted of two pieces of wood 13mm thick which I could lay the rail in between. Now with the domino set on 12mm it would give me 2mm material remaining. Even though the face of the domino machine was not touching the rail, it seemed to cut the mortise without problem. A little more room for error would have been nice, but as I don’t have a thicknessing machine, it was the best I could find. It worked quite well, except once when something must have got stuck under the rail while it was in the jig, and I went right through! Fortunately, I had enough spare timber to make another.
The next problem I had was when I discover one of the slots was not aligned correctly. It was the correct spacing from the side of the frame, as I did not adjust the fence on the domino during the process, but I put the pencil line in the wrong spot [embarassed]! I was about 1.5mm out. I thought I might be able to flex the rail into position, but the joints made by this machine are very tight and strong so this was not possible. I was able to remedy it by re-cutting the mortise, which made the slot an extra 2mm longer, but the rail was wide enough to cover the gap, and the joint still seemed plenty strong enough once glued up.
While the very tight joints are generally a good thing, I did have an issue installing one of the rails. I was having trouble getting the domino started in the mortise, and when I finally managed to drive it home, it split the timber. Fortunately I was able to clamp and glue it up, and after finishing is not noticeable. After that I sanded the corners off each domino before installation. A bit time consuming, but it made installing the remainder of the rails very smooth. I don’t think that would be necessary for larger pieces of timber, it was just the small dimensions of the rail that caused me this problem.
View attachment 5
Overall I am extremely happy with the final result, and with the domino 500. Without it I could not have completed this project, at least not without leaving visible screws. With it I am able to efficiently cut accurate mortises with ease, and they seem to produce a very strong joint - in some cases I had trouble separating them even before glue! In short, this tool has completely transformed how I tackle projects, as I now have a joining method at my disposal that wasn’t there before. For sure, it is an expensive tool, but for me I am convinced after my first project, and I expect there will be many more to come!
Thanks for reading!
I recently purchased my first Festool product, a Domino 500.
I have gained a lot by the great information on this forum, and wanted to make a contribution in return. Woodwork is a hobby I have dabbled in for many years, but recently I have started to get back into it again after a long break (job, kids, renting houses with no garage etc), hence I still consider myself a novice. There are many great reviews of the Domino already, by far more experienced craftsmen, so I decided I would give a review from a beginner’s perspective by describing my first project with the Domino. It is an expensive tool, and potentially a difficult decision for anyone who is not yet sure they want to fully invest in the hobby. Hopefully this will help!
After doing a few test joints on some scraps, I decided to build a shoe rack. Not a very glamorous project, but one of great importance to the person in my house who gives approval for the next tool purchase! We have a very narrow gap behind the back door (150mm) which it had to fit into, and it needed capacity for at least 10 pairs. Here is the finished product:
View attachment 1
View attachment 2
It is constructed from a single sheet of melamine covered chipboard, with a eucalyptus frame and rails. Each rail is mounted on a wedge shaped block, to give a good angle to hold the shoes. Dominoes were used to mount the wedges to the main frame, and also to mount the rails to the wedges. I wanted to do this with no screws or nails visible.
I started by cutting a rebate into the main frame timbers, so that the edge of the chipboard would be hidden. It might have been possible to then screw the wedges on to the main frame from the back, but the rebate meant I would have been too close to the edge, and at risk of breaking through the side walls (yes I am a novice at this, and didn’t trust my drilling to be straight enough!) So I attached them with two mortises in each. In this case, the using the domino was much easier than screws.
View attachment 3
View attachment 4
Cutting the mortises in the main frame was very easy, I just drew a line where I wanted each one, and lined it up by eye. I used the tight setting in all cases which worked perfectly (except for one which I will cover later). I found it very easy to get them in the right position, and the fence made it really simple to register the machine against the side of the main frame. As you can see in the second picture, the alignment ended up perfect. I was blown away by how simple it is to get such a neat and accurate result.
To cut the mortises in the wedge blocks, I had to make a jig as they were too small to clamp without interfering with the fence on the domino, and I didn’t want to hold them by hand. I made the jig from offcuts of the same material, meaning that the domino fence now had a much bigger area to rest on. With the jig, I was able to cut all 40 mortises in around half an hour. That is amazing to me, as my previous attempts to cut mortises proved to be very time consuming fiddly work (with patchy results).
One thing I did find is that you really need a proper dust extractor. Initially I was using an old vacuum cleaner, which extracted the dust perfectly, but to make it work I had to rig up a crazy number of fittings to allow it to connect to the domino. It ended being too long and cumbersome, and tended to pull the machine out of alignment when I was getting ready to plunge. I guess you could use it without dust extraction, but because this machine cuts such a narrow deep slot, there is nowhere for the chips to go. I felt it worked best with dust extraction, even if it is from an old vacuum cleaner.
The first real problem I encountered was that the timber I purchased for the rails was 11mm thick, and the minimum depth setting on the domino is 12mm, hence the mortise would go right through. I am not sure if there is a simple solution to this, but in the end I made another jig. It consisted of two pieces of wood 13mm thick which I could lay the rail in between. Now with the domino set on 12mm it would give me 2mm material remaining. Even though the face of the domino machine was not touching the rail, it seemed to cut the mortise without problem. A little more room for error would have been nice, but as I don’t have a thicknessing machine, it was the best I could find. It worked quite well, except once when something must have got stuck under the rail while it was in the jig, and I went right through! Fortunately, I had enough spare timber to make another.
The next problem I had was when I discover one of the slots was not aligned correctly. It was the correct spacing from the side of the frame, as I did not adjust the fence on the domino during the process, but I put the pencil line in the wrong spot [embarassed]! I was about 1.5mm out. I thought I might be able to flex the rail into position, but the joints made by this machine are very tight and strong so this was not possible. I was able to remedy it by re-cutting the mortise, which made the slot an extra 2mm longer, but the rail was wide enough to cover the gap, and the joint still seemed plenty strong enough once glued up.
While the very tight joints are generally a good thing, I did have an issue installing one of the rails. I was having trouble getting the domino started in the mortise, and when I finally managed to drive it home, it split the timber. Fortunately I was able to clamp and glue it up, and after finishing is not noticeable. After that I sanded the corners off each domino before installation. A bit time consuming, but it made installing the remainder of the rails very smooth. I don’t think that would be necessary for larger pieces of timber, it was just the small dimensions of the rail that caused me this problem.
View attachment 5
Overall I am extremely happy with the final result, and with the domino 500. Without it I could not have completed this project, at least not without leaving visible screws. With it I am able to efficiently cut accurate mortises with ease, and they seem to produce a very strong joint - in some cases I had trouble separating them even before glue! In short, this tool has completely transformed how I tackle projects, as I now have a joining method at my disposal that wasn’t there before. For sure, it is an expensive tool, but for me I am convinced after my first project, and I expect there will be many more to come!
Thanks for reading!