Edge sander guide mount

afish

Member
Joined
May 25, 2020
Messages
1,514
I mentioned Festool should have made a little mount for the edge guide and a couple people thought it was a good idea. I made this because I didnt really want a bulky 12"+ disc sander taking up space but found myself using the edge guide flipped upside down to sand small parts.  So i designed this, and really happy with how it turned out.  It doesnt require any clamping or fasteners it is just cradled and rests there by gravity but once its fully inserted it doesnt move at all and is very solid. The base has 4 dogs that plug into the MFT so it wont go anywhere.  The bag and vac still work as usual.  The back is tall for a future reason.
 

Attachments

  • sander mount complete.jpg
    sander mount complete.jpg
    1.7 MB · Views: 405
Hmmm...I still need to make an insert for a Sys3 to hold my sander with edger attached. Might be worth it to make it functional as you have done. Of course it leaves me wondering what the future project is with the high back?

FWIW I have a 6x48" Powermatic sander I use all the time, especially for metal working.
 
Great jig you have there. Do you happen to have plans for it that you’re willing to share? I recently purchased an origin and this is a great early project fir it

Sent from my iPhone using Tapatalk
 
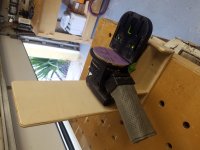
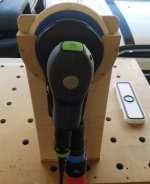
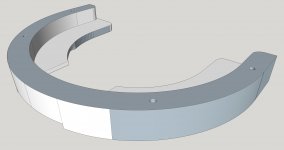
Here is why I left the back taller.  This way the stand pulls double duty. I can simply flip it around if im sanding at the bench and it gives me a nice secure, out of the way place to hang the ETS.  I hate just setting stuff on the bench as I tend to knock things off once and awhile.  It sucks watching a expensive tool go crashing to the ground.  So I always try to make a hanger to avoid that. As mentioned it has 4 plastic dogs screwed to the bottom so it can lift off and be placed anywhere on the bench but wont move around once placed in the dog holes.  If there was enough interest in plans I could make them available for small fee but would need to go back and touch up the file so they could be cut with either cnc or by hand tools.  The sander hanger is a little difficult to offer I use the 125 with a 150 pad so Im not 100% sure the other models are exactly the same or not.  The way I made the hanger it grabs behind the plastic backer of the pad.  I had seen some that just hook on the foam and I didn't like that method as there have been reports of the foam separating from the backer so I didn't want to put extra strain on the foam itself. Plus this hanger is much more secure the others looked like a small bump could pop it out of the hanger. However, this hanger requires some odd notching to achieve this.  I got it close on the cnc and just put the relief carvings in by hand with a trim router on the one side to avoid making a fixture to hold the part since it would need to be flipped over and re clamped in the cnc.  Seemed easier by hand for a 1 off part. 
 

Attachments

  • sander mount backside.jpg
    sander mount backside.jpg
    557 KB · Views: 266
  • hanger.jpg
    hanger.jpg
    454.4 KB · Views: 195
Very creative, I love it! I have been trying to justify getting that setup. You may just have pushed me over the edge.
[big grin]
 
Back
Top