Finished: Rebuilding Pottery Barn Cubbies

Joined
Apr 25, 2014
Messages
1,086
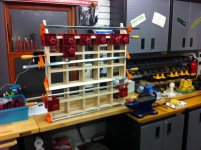
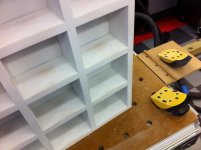
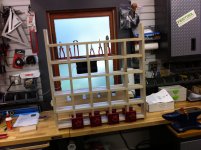
Some quality time with my younger son (#3)

[attachimg=1]

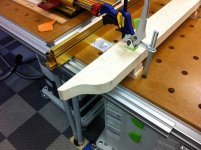
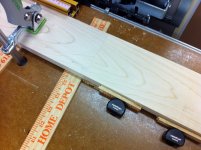
Cutting the short 5-1/2" pieces

[attachimg=2]

[attachimg=3]

[attachimg=4]

[attachimg=5]

[attachimg=6]
 

Attachments

  • image.jpg
    image.jpg
    1 MB · Views: 1,779
  • image.jpg
    image.jpg
    1.1 MB · Views: 1,730
  • image.jpg
    image.jpg
    884.1 KB · Views: 1,721
  • image.jpg
    image.jpg
    757 KB · Views: 1,717
  • image.jpg
    image.jpg
    986.7 KB · Views: 1,734
  • image.jpg
    image.jpg
    994.5 KB · Views: 1,757
Nice work. 

What were you showing with the cut yardstick under the piece?

Also, What are you going to put in the cubbies when completed?

neil
 
Also didn't see them getting Dominoed together - were they?
 
Neilc, I cut a 12"inch length piece and added 5-1/2" at the LS Positioner to get the right offset for the cut. 12" piece sits in front of LS Positioner (left wood piece) and you feed from the right for the cut. Initially I had the problem with the lack of back support so I use 2 Veritas dogs as front support to keep alignment. My 2 girls will put their collection of stuff in there like snow globes....

Wow, yeah I know. I thought about dominos but as I am still getting used to the whole Festool setup and this is a rather small piece I decided some old fashioned glueing and nail gun use should suffice. Spend some real time getting everything square on the MFT/3(s) with the LS Positioner and the INCRA 50" back support rail as well as dialing the LS Positioner and the back rail in correctly.

 
Slartibartfass said:
Wow, yeah I know. I thought about dominos but as I am still getting used to the whole Festool setup and this is a rather small piece I decided some old fashioned glueing and nail gun use should suffice. Spend some real time getting everything square on the MFT/3(s) with the LS Positioner and the INCRA 50" back support rail as well as dialing the LS Positioner and the back rail in correctly.

Wasn't poking at ya or anything. Seeing that pile of pieces there just yelled 'Domino' to me. Of course I just got mine, so *everything* yells 'Domino' to me.

:-)
 
Yeah I start to see dominos everywhere. Dominos of the world unite....

I gotta say I LOVE my MFT/3 & INCRA LS Positioner combo. Unbelievable how easy it is to do precision work. The only variance is you messing up the process or setup.

Completely changed/will change the way I woodwork....
 
I forgot to ask you about the clamps you're using to to hold the small pieces at 90 degrees? Who makes those?
 
Woodpeckers box clamps

http://www.woodpeck.com/boxclampm2.html
 
RKA said:
Woodpeckers box clamps

http://www.woodpeck.com/boxclampm2.html

Those things look slick! Dang - my wallet is gonna hate you!
 
Slartibartfass said:
These clamps are great! Ordered some more... I got the plastic ones...

I have both the plastic and aluminum ones. I prefer the plastic ones. I have about 10 of them and they are great for making sure stuff is square.

 
Got all the individual layers glued and nailed today.

Got the Carvex out to add a curve to the top of the side boards. Cut both clamped together in one go.

[attachimg=1]

Started to glue the first 2 layers together. Memo to self: NEED MORE CLAMPS (already ordered...).

[attachimg=2]

[attachimg=3]
 

Attachments

  • IMG_3654.JPG
    IMG_3654.JPG
    1.6 MB · Views: 1,364
  • IMG_3653.JPG
    IMG_3653.JPG
    1.7 MB · Views: 1,386
  • IMG_3652.JPG
    IMG_3652.JPG
    1.8 MB · Views: 1,385
Finished first one.

[attachimg=1]

Came out ok.

What went well:

Cutting all the pieces to identical length

Glueing everything up square with the clamps

What needs improvement:

I really need a jointer/planer as the width of the boards is slightly off from one another. I could have cut them to the identical size but I FORGOT/didn't THiNk about doing that. Stupid me.

Also the side boards should have been wider as I attach a back and now I have a slight gap to the wall..... My wife didn't mind (I still do....).

Final step is covering the nail holes and priming and painting white.
 

Attachments

  • image.jpg
    image.jpg
    111.1 KB · Views: 1,225
wow said:
Wasn't poking at ya or anything. Seeing that pile of pieces there just yelled 'Domino' to me. Of course I just got mine, so *everything* yells 'Domino' to me.

:-)

Had to laugh at that one.  Just built some small storage drawers for the base of my dovetail jig - using dominoes, of course... 

[tongue]

 
After a little sanding with my Dewalt palm sander it came out ok. Priming and painting white next while I built the second one.

[attachimg=1]
 

Attachments

  • image.jpg
    image.jpg
    282.6 KB · Views: 1,073
Back
Top