Tayler_mann
Member
- Joined
- Nov 23, 2014
- Messages
- 416
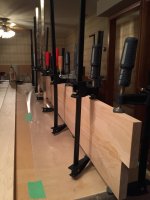
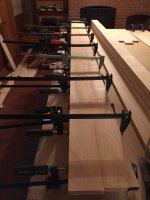
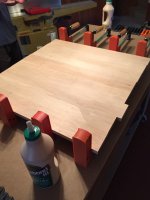
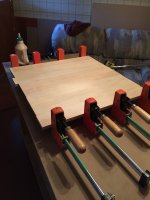
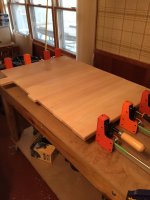
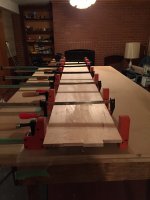
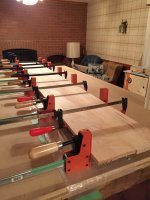
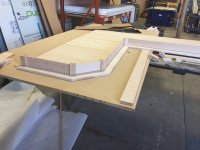
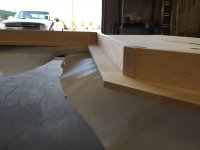
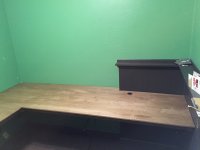
A colleague of mine and I just finished a very nice affordable "L" shaped floating desk for a client. It was made of 13/16" maple for the top and reinforced with a sheet of MDF on bottom with room for expansion and contraction. We used a thinner material for cost savings since the client did not want to spend a lot. The desk measured from one end to the corner 69" x 26" deep. From the other end to the corner it measured 95 1/4" x 30" deep and 23" deep where the wall had jetted into the desk. We glued each joint individual as to keep the desk as flat as possible and the end result had zero variation. It was as flat as I could have wished for it to come out. Each piece worked out perfectly to alternate the grain directions for proper expansion and contraction.
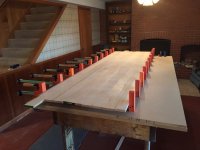
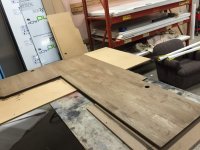
The next task was to of course sand..sand..sand..sand..and sand some more. Fortunately enough my colleague and I are both equipped with RO150's and made short work of the sanding process. after sanding the bottom and flipping it and sanding the top we went to make a scribed pattern of the wall the desk was to fit in. After making a cardboard pattern we came back to trace it to the desk and found out we glued it up backwards......this is where you insert ******** and maybe a few more ****%$. Fortunately, we had such a perfect glue up sequence we simply flipped the top over and sanded...sanded..and sanded some more to get further tear out off of the bottom which was now the top.
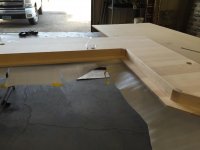
After reviewing our pattern and seeing the 3/4" deviation over a 4" span of the wall. We decided to make a hard pattern out of scrap MDF to do a hard pattern pre-fit to ensure a perfect glove like fit. We went back made minor adjustments to the pattern, which, if this was not done the desk would have never have fit and would have been ruined since we do not have a wood stretcher. After tracing the pattern to the top I used my newly purchased TS55 to cut the straight lines of the walls and used a jigsaw for the rest since it had the most variations in a wall I have ever seen (I also would like to comment I wish I would have had a Carvex for this task).
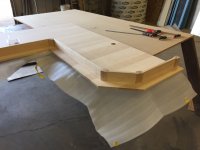
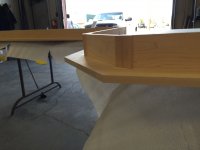
Next was the fun part. We made the apron for the desk out of 5/8" maple, 2" maple, lots of dominos, and lots of pocket screws. The apron had only 2 90 degree cuts in the runs and all 90 degree cuts in the post. The others consisted of 2 - 45 degree cuts and 4 - 22.5 degree cuts. I literally don't think I could have made the apron work without the domino and an accurate saw. Lifesaver that domino tool has become. Finally we put a 1/4" round over on the leading edge with the OF 1400 and did our finish sanding.
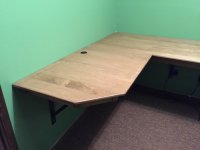
For the stain when we started the project the client had picked a very light colored wood. So naturally my colleague and I picked maple for a wood. Well come to have it after we bought a few hundred dollars of wood they decided they wanted a darker stain. We didn't complain we just realized we were going to have to make it work and be ok with taking a lot of the natural look out. During the finish process we took a sample piece of our maple with of course all the sanding required and pre stain treatment completed. The paint store did a sample with about 7 colors and the picked the middle shade for the stain. We did a test piece before staining hundreds of dollars of wood and found out the paint store that did the sample use about a drop out of a syringe to stain a 4"x4" square. Realizing if we even sprayed the stain we would never get it to come out like that we had another problem to fix. Festool came through with flying colors again. We took out our Rotex sanders and hit everything again with 220 to close the wood up a little bit more. The stain matched the sample perfectly after sanding and went on the desk flawlessly. We than simply took it to my spray booth put 3 coats of lacquer on all sides and got it ready for install.
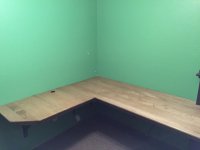
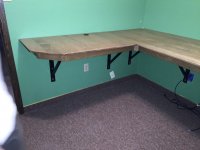
When installing we put the brackets up we welded together and leveled them with each other. After doing that we realized the floor was also around 3 inches off of level. Now it was the nerve racking moment of "Does the desk fit well?" To my amazement and looking at the uneven edges I had jigsawed for the last 3 weeks when finishing the desk and constantly questioning myself if it would it. We flexed the wall a 1/16" and the desk fit perfect into all 4 corners that it was supposed to and only a little bit of wall paint to touch up. I had a great time with this project and learned a lot and felt fairly proud when completed. Unfortunately after install I did not have my nice camera with so I only have iPhone pictures. I came back with my SLR when we put the quarter round around the top, but they had bundles of paper computers and office supplies across the top.
The next task was to of course sand..sand..sand..sand..and sand some more. Fortunately enough my colleague and I are both equipped with RO150's and made short work of the sanding process. after sanding the bottom and flipping it and sanding the top we went to make a scribed pattern of the wall the desk was to fit in. After making a cardboard pattern we came back to trace it to the desk and found out we glued it up backwards......this is where you insert ******** and maybe a few more ****%$. Fortunately, we had such a perfect glue up sequence we simply flipped the top over and sanded...sanded..and sanded some more to get further tear out off of the bottom which was now the top.
After reviewing our pattern and seeing the 3/4" deviation over a 4" span of the wall. We decided to make a hard pattern out of scrap MDF to do a hard pattern pre-fit to ensure a perfect glove like fit. We went back made minor adjustments to the pattern, which, if this was not done the desk would have never have fit and would have been ruined since we do not have a wood stretcher. After tracing the pattern to the top I used my newly purchased TS55 to cut the straight lines of the walls and used a jigsaw for the rest since it had the most variations in a wall I have ever seen (I also would like to comment I wish I would have had a Carvex for this task).
Next was the fun part. We made the apron for the desk out of 5/8" maple, 2" maple, lots of dominos, and lots of pocket screws. The apron had only 2 90 degree cuts in the runs and all 90 degree cuts in the post. The others consisted of 2 - 45 degree cuts and 4 - 22.5 degree cuts. I literally don't think I could have made the apron work without the domino and an accurate saw. Lifesaver that domino tool has become. Finally we put a 1/4" round over on the leading edge with the OF 1400 and did our finish sanding.
For the stain when we started the project the client had picked a very light colored wood. So naturally my colleague and I picked maple for a wood. Well come to have it after we bought a few hundred dollars of wood they decided they wanted a darker stain. We didn't complain we just realized we were going to have to make it work and be ok with taking a lot of the natural look out. During the finish process we took a sample piece of our maple with of course all the sanding required and pre stain treatment completed. The paint store did a sample with about 7 colors and the picked the middle shade for the stain. We did a test piece before staining hundreds of dollars of wood and found out the paint store that did the sample use about a drop out of a syringe to stain a 4"x4" square. Realizing if we even sprayed the stain we would never get it to come out like that we had another problem to fix. Festool came through with flying colors again. We took out our Rotex sanders and hit everything again with 220 to close the wood up a little bit more. The stain matched the sample perfectly after sanding and went on the desk flawlessly. We than simply took it to my spray booth put 3 coats of lacquer on all sides and got it ready for install.
When installing we put the brackets up we welded together and leveled them with each other. After doing that we realized the floor was also around 3 inches off of level. Now it was the nerve racking moment of "Does the desk fit well?" To my amazement and looking at the uneven edges I had jigsawed for the last 3 weeks when finishing the desk and constantly questioning myself if it would it. We flexed the wall a 1/16" and the desk fit perfect into all 4 corners that it was supposed to and only a little bit of wall paint to touch up. I had a great time with this project and learned a lot and felt fairly proud when completed. Unfortunately after install I did not have my nice camera with so I only have iPhone pictures. I came back with my SLR when we put the quarter round around the top, but they had bundles of paper computers and office supplies across the top.
Attachments
-
 IMG_0390.jpg1.8 MB · Views: 278
 -
 IMG_0393.jpg1.6 MB · Views: 240
 -
 IMG_0394.jpg1.7 MB · Views: 214
 -
 IMG_0395.jpg1.8 MB · Views: 209
 -
 IMG_0398.jpg574.8 KB · Views: 195
 -
 IMG_0400.jpg2 MB · Views: 195
 -
 IMG_0401.jpg1.8 MB · Views: 203
 -
 IMG_0406.JPG1.9 MB · Views: 202
 -
 IMG_0411.JPG1.8 MB · Views: 202
 -
 IMG_0429.JPG1.6 MB · Views: 229
 -
 IMG_0432.JPG1.6 MB · Views: 211
 -
 IMG_0436.JPG573.8 KB · Views: 201
 -
 IMG_0441.JPG1.5 MB · Views: 218
 -
 IMG_0444.JPG1.5 MB · Views: 226
 -
 IMG_0446.JPG1.6 MB · Views: 208
 -
 IMG_0453.JPG1.8 MB · Views: 214
 -
 IMG_0460.JPG1.1 MB · Views: 286
 -
 IMG_0464.JPG975.6 KB · Views: 220
 -
 IMG_0465.JPG1.1 MB · Views: 220
 -
 IMG_0466.JPG2.1 MB · Views: 389