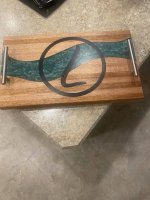
I am making some epoxy boards for serving trays or display. Final dimensions are roughly 18" x 10" x 1-1/2". I have made one before and included a picture of the final result. What I will be discussing today is the "river edges" (the wood that shares and edge with the green epoxy. I decided to try a new method to try and optimize labor time but I ran into a snag. In the new method I need to be able to flush trim odd shaped parts without cutting my fingers off or having a board flying through the wall. The parts have at least one curved side and are 1-1/2" thick. You can see how wide and narrow the curve could potentially get in the picture. Some of my boards now are even more narrow.
I have seen small parts holders for the router table but can they do 1-1/2" thick wood? Also I saw they are setup more to clamp the ends of square stock which is not going to work since my pieces are curved on one or more sides. Coping sleds might do the trick if they had 18 inches of capacity but most are only setup for maybe 4-6 inches at most from what I saw. I will probably cleanup the jigsaw marks with a spindle sander this time if one of my friends has one and figure out something for future batches of boards.
In my first board I set mt Shaper Origin cnc router to the inside setting of the two curved edges and worked my way, a shallow pass at a time, until I was through the entire 1-1/2" thickness of the board. It worked but was very slow. It took maybe half a dozen or more passes.
In my current boards I tried a new method hoping to save some time. The goal is to get the labor down so I don't have a ridiculously expensive board if I ever get around to selling them. My thinking was I could route a shallow pass with the Origin, use the shallow pass as a guide with my Carvex jigsaw, and flush trim to cleanup after the Carvex. Every board I make has a different "river" design and some of the parts can get quite small. I was having issues where the router table was wanting to throw the pieces esspecially on the starting end of the board. I was getting concerned that things were getting too dangerous.
Does anyone have any ideas on how to cut out the river portion safely without taking the amount of time it took to Shaper Origin the entire thing? Would it be safer to forego the jigsaw and do effectively the equivalent of a through dado? I am currently using a 1/2 inch diameter Woodpeckers ultra shear flush trim bit in my old porter cable 7538 setup in my Benchdog cast iron router table. I am using MicroJig Grip Blocks when I can. I would be open to a completely new method of cutting out the river too if it saved time and was safer.