FS rail positioning jig

bbeaulant

Member
Joined
Jul 4, 2014
Messages
35
Hi,

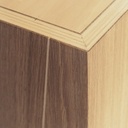
In a current projet I would like to use this kind of joinery to build boxes under a desk :

d00227d8bf2e4330de6a74ee82b592ac167a1ecd.jpg
f698dee7abd9f0d6ea1b90802753276bd02e42f8.jpg


I would cut the bevel on panels with my TS55 plunge saw.
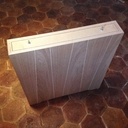
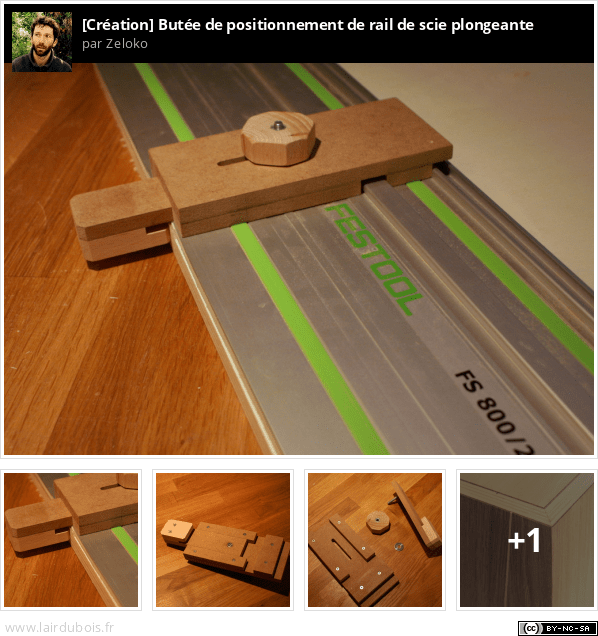
But, in order to cut them, I build a small jig to place correctly my FS plunge saw rail.

This jig permit a first cut at 90° with the table saw and after cut the 45° bevel with the plunge saw without changing the panel width.


You can view it in action in this video. But sorry, it's in French.


Je ne sais pas ce que vous venez de dire, mais vous avez une très belle zone de travail et je ai fait un gabarit bien pensé. (appareils)
Merci de poster ce sujet.
-Charlie
 
Nice. I made a simple pair of these years ago after struggling with the exact same problem. Mine don't have any moving parts but are the same otherwise and give me perfect mitres. I tried using the edge stops included with the LR32 kit but they never seemed to be as accurate. Working with really thin veneer ply there's almost no room for error.

Your YouTube channel is great. Really nice workpieces.
 
bionicus said:
Your YouTube channel is great. Really nice workpieces.

Thank you Bionicus ;)

bionicus said:
Mine don't have any moving parts but are the same otherwise and give me perfect mitres.

The moving part permit to consider the blade width variation or to have a positive or negative translation of the cut line. In this case the jig is a little more versatile.
 
Just awesome.

I could see that jig ending up as one of Woodpecker's 'onetime tools'. You should send them an email. Who knows maybe they like it.
 
I realize this thread is older, but I'm adding this in case others are still interested in the original topic.
A fellow named Huy in Alabama (he has a YT channel "The Alabama Woodworker") with a number of interesting videos, including one for what he calls his MOAT: MOAT video, which has track/rails built into the long sides of the table.

While not a "build" video, he does provide details, including specifications, about the Misumi parts used for the rails.
An interesting approach that I'm considering for my (first) assembly, etc. table.
 
Thanks Mario but that is still not what he has in his table. Did he saw away all the stuff that surrounded the channel? Why didn’t he just use ordinary T-track instead?

In the video, look at the close-up at 1:15.
 
Michael Kellough said:
Thanks Mario but that is still not what he has in his table. Did he saw away all the stuff that surrounded the channel? Why didn’t he just use ordinary T-track instead?

My bad, I didn't notice untill you point out the video  [embarassed]


Attachments

  • singleslot.PNG
    singleslot.PNG
    91.7 KB · Views: 271
  • fourslots.PNG
    fourslots.PNG
    97.1 KB · Views: 257
In the video, look at the close-up at 1:15.

The extrusion he used is only about 18mm x 12mm. Didn’t see anything close to that in Series 6
 
I wrote Huy and got an immediate reply.

“ I bought the extrusion directly from Misumi. I included part numbers and links in my "Precision Miter Saw Fence" video. Check that out and your questions will be answered. ”

I’ll check that out later.
 
What am I missing?  Can’t you just slide the rail and feel the edge of the board to be mitered and align it with the cut strip on the rail?

Sandy
 
sandy said:
What am I missing?  Can’t you just slide the rail and feel the edge of the board to be mitered and align it with the cut strip on the rail?
Sandy
I can't speak for the OP, but I think most track saws cut slightly away from splinter guard when tilted 45 deg. This is especially true for Mafell MT55. The jig might compensate for that offset.
 
Svar said:
sandy said:
What am I missing?  Can’t you just slide the rail and feel the edge of the board to be mitered and align it with the cut strip on the rail?
Sandy
I can't speak for the OP, but I think most track saws cut slightly away from splinter guard when tilted 45 deg. This is especially true for Mafell MT55. The jig might compensate for that offset.

Also compensates for a worn down splinter guard and can be set to allow a specific thickness of stock to remain above the bevel. But all that can be achieved with a combination square registering between the stock’s edge and the right side of the rail spine. Except if you want the bevel to be well below the top of the stock. Then you’d need the jig and add a shim or spacer to allow the jig to slip under the rail.
 
My understanding, and my experience, has been that the TS55 when "tilted" to make a bevel cut will cut along the splinter guard the same as when it is set to 90 degrees.  I understand that if you are using a "worn down" splinter guard you may need to adjust something, but that would also be true if you use the same worn splinter guard to make a 90 degree cut, so the (obvious) solution is to replace the splinter guard.

To the extent that you want the bevel to not extend all the way to the top of the piece being cut, you can readily do the offset by simply making a couple of marks on the surface of a sacrificial  board having the same thickness, and using the sacrificial to push the board to be cut under the trim edge of the rail.

Unfortunately, to me, anyway, this is a "solution" to a non-existent problem.

Sandy
 
Back
Top