Greene and Greene style mirror

mrFinpgh

Member
Joined
Oct 30, 2015
Messages
568
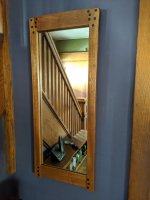
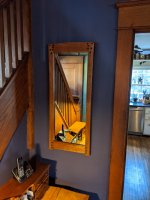
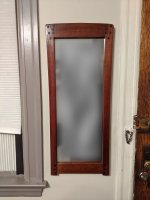
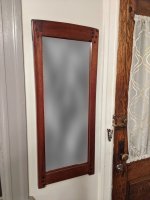
I'm building a couple of mirrors that closely imitate the style of the Greene + Greene Blacker house mirror. One is a birthday gift for my mother, although it's going to be about 1/3 of a year late.. the other will be for me to hang on to.
https://collections.lacma.org/node/246347

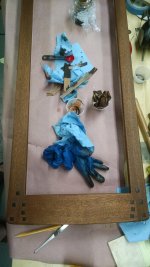
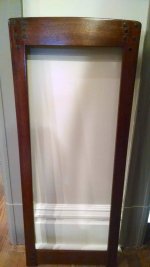
I thought I would record some of the process here. Because of constraints, I'm building them from laminated 4/4 Sapele instead of 6/4 (the yard only had 4/4 and 8/4.  I didn't want to take .75" off the boards by hand and my bandsaw is tiny and limited).  Most of the joinery is by hand using chisels saws, and shooting boards.
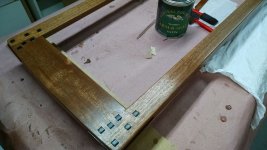
I'm almost complete with the assembly and should be able to start the finishing process this weekend.

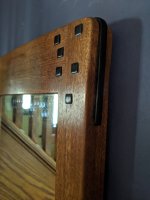
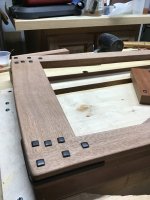
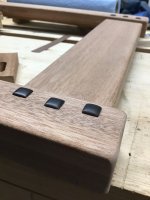
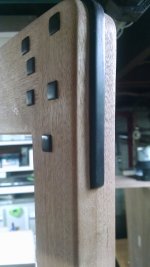
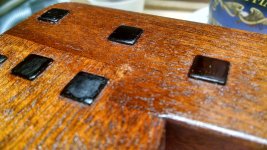
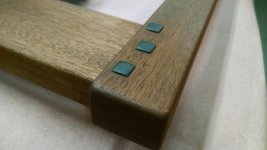
I'm currently at the step of making and installing 3/8" ebony plugs, which are supposed to be pillowed and stand proud of the face of the mirror by a little bit.  According to Darrell Peart, the original spec was 1/64" - pretty subtle.

Thus far, mine have come out considerably chunkier and more pronounced.

View attachment 1

View attachment 2

While not consistent w/ Greene and Greene, I'm not sure if it's aesthetically problematic.  The issue I have run into is in my understanding of what a pillowed face should properly look like.  I've been through several iterations:

1. Twirling on sandpaper w/ a soft backer - slow and inconsistent
2. Hand drill on sandpper w/ Soft Backer (William Ng has a great video on this) - pretty good but my drills don't quite accomodate the oversided 3/8" ebony rod
3. Drill press on sandpaper w/ soft backer - easy but the perfect rotation leaves a concentric swirl in the middle w/  a flat spot.  Also, it seems to take off more than I want, creating more of a rounded over effect.
4. By hand using the 'pendulum' motion - I thought this was where I landed and it seemed to give a less pronounced pillowing effect, particularly at the corners. 

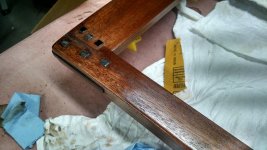
It looked really good until I installed it, at which point even this had too much rounding over at the corners.  Because the corners need to stay proud of the face to maintain the shoulder, if they are rounded too much the plug overall has to project out further. 

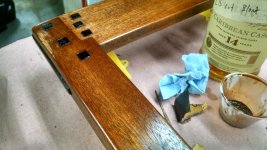
Now I'm working on deciding whether to mess with these or let them be as they are.  To tweak them, I could try to sand them a little flatter and then finesse the corners a little bit.  The surrounding frame has already been sanded up to 600 and I've raised the grain twice.  So there is a risk of creating some scratches unless I mask around them.There's also the possibility that I can't effectively round them in situ like that.

Other option would be to remove the plugs by drilling them out and then chiseling the waste.  I don't really like the thought of that for a couple reasons:
1. I'm dimensioning the ebony by hand and it takes a while as i need to make shallow cuts to dodge tearout.  It is hard on my plane blades.  I would need to mill up some more to .388 inch square. I wish I had a drum sander for things like this!
2. The plugs are oversized so that the Sapele is forced to compress around them to accomodate the harder ebony. This helps a lot with avoiding any gaps.  Now that Ive installed them, I would run the risk of gaps or need to mill up slightly bigger plugs.
3. It would be a shame to waste all that ebony.

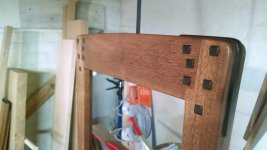
For the second mirror, I'm going to see what I can do to improve on this.  I think that the arc needs to be about half as much on the plugs, now that I see the relationship between the degree of pillowing and the projection of the plug overall.


Attachments

  • IMG_0043.jpeg
    IMG_0043.jpeg
    1.4 MB · Views: 446
  • IMG_0044.jpeg
    IMG_0044.jpeg
    1.3 MB · Views: 392
Beautiful wood and joinery!

I too think the ebony plugs are too thick. I’d pare them down with a chisel using a side to side shearing motion. I’m pretty sure authentic G&G plugs are very shallow pyramid shape.

This won’t help you but in G&G furniture the ebony bits are actually drawbore pins rather than caps so it’s end grain that is sheared into a pyramid and therefore at little risk of chipping under the chisel.
 
Michael Kellough said:
Beautiful wood and joinery!

I too think the ebony plugs are too thick. I’d pare them down with a chisel using a side to side shearing motion. I’m pretty sure authentic G&G plugs are very shallow pyramid shape.

This won’t help you but in G&G furniture the ebony bits are actually drawbore pins rather than caps so it’s end grain that is sheared into a pyramid and therefore at little risk of chipping under the chisel.

Good call w/ the chisel.  I tried it out last night and took a plug down to about 3/64" with the chisel.  I just need to put some tape around the plug and sand it until it looks right.  I probably have another hour and a half to bring them all down.

This afternoon, I did the plugs for the other mirror - because i had cut them out previously after rounding them with my initial attempt,  I softened the back of the plugs and used those instead.  Definite improvement using a much less significant arc.  I suspect it's still not necessarily 'period perfect' but to my eye it looks much nicer.

View attachment 1

Hopefully tomorrow I can steam out a couple dents and begin finishing.  I have two different finishing schedules: one will be the more typical orange/brown dye and varnish combo, while the other will be shellac, gel stain glaze, and varnish. 


Attachments

  • IMG_20191109_173415947.jpg
    IMG_20191109_173415947.jpg
    1,005.3 KB · Views: 341
Yesterday, I was able to finish chiseling the ebony plugs down to a much less pronounced height and began the finishing process.

This phase of a project is always both exciting (nearing the final stages) and anxiety inducing (still plenty of opportunity to make a mess of it).  I'm doing two frames with two different finishing schedules, which means twice the fun..  right?

The mirror for my mother is a little easier - seal the wood w/ Shellac (a few coats), scuff with 600, a coat of Antique Walnut gel stain (wiped on and then mostly removed), more shellac, and then Arm-R-Seal varnish.  The shellac/gel stain/shellac/varnish combo is one I've used a lot with my house and it tends to be fairly foolproof, as the color sits on top of the wood without covering the grain like it does if you use it on raw wood.

Here is that one with shellac, prior to gel stain:
View attachment 1
View attachment 2

And then with Gel Stain.  The difference is subtle, but it's there:

View attachment 3

For the mirror I'm keeping, I am doing a pretty typical G+G style finish: 2 rounds of dye consisting of 7 parts orange and 4 parts medium brown, followed by 3-8 coats of arm-r-seal varnish.  The only thing I do a little differently is a couple sealer coats of shellac between the dye and the oil.  Usually around a 1lb cut although I just eyeball the alcohol to shellac ratio from a bottle of 2lb super blonde shellac.

Sample board on left, crest rail on right:

View attachment 4

I made some errors in judgement today, though.  I noticed that the dye-ing process raised the grain in some spots, despite having ben raised and cut back twice before.  Since I didn't want to sand with the dye stain already on there, I opted to do a few coats of 1lb cut shellac over the dye to 'encapsulate' the grain before sanding it back w/ some 600.

Sadly, 600 was still too aggressive for such thin coats:
View attachment 7

Yikes!  Aparently that dye stain I'm using (general finishes) sits on top a little more than the transtint stuff I have used in the past. While I had seen pigment coming off with the shellac application, I didn't think that it would go that far so quickly.

I tried a couple things to touch it up, but I think that those thin coats of shellac effectively sealed it off from absorbing much color.  Even letting some dye sit for 5 minutes didn't do a lot to bring the color back.  At this point, i'm resigned to mixing up some univrsal colorants in shellac and toning the area until it blends in.  :-\  It's just as well, as there is a glue spot in a corner where I dd a repair w/ Super glue and apparently failed to sand it quite enough:

View attachment 6
In the meantime, I need to decide if I want to try sanding the shellac again after building up some more body or waiting until I'm applying the varnish.  At some point, things need to get leveled out.
 

Attachments

  • IMG_20191111_210354444_HDR.jpg
    IMG_20191111_210354444_HDR.jpg
    1.2 MB · Views: 229
  • IMG_20191111_210411774_HDR.jpg
    IMG_20191111_210411774_HDR.jpg
    1.2 MB · Views: 230
  • IMG_20191111_210354444_HDR.jpg
    IMG_20191111_210354444_HDR.jpg
    1.2 MB · Views: 409
  • IMG_20191111_210825478.jpg
    IMG_20191111_210825478.jpg
    580.4 KB · Views: 220
  • IMG_20191111_204259997.jpg
    IMG_20191111_204259997.jpg
    491.9 KB · Views: 238
  • IMG_20191110_214906974.jpg
    IMG_20191110_214906974.jpg
    1.5 MB · Views: 265
  • IMG_20191110_214830559.jpg
    IMG_20191110_214830559.jpg
    1.4 MB · Views: 200
Today was promising to be a good day.

I was able to varnish one of the mirrors and it looks really nice.  Everything went smoothly and I was done within 25 minutes.

The other mirror, the one with the sanded through spot, I needed to work on repairing the color/finish in the corner.

I had previously gotten a close match with some transtint dye and shellac, but found my cheap artist brushes were not quite up to the task, leaving ridges and uneven distribution of shellac.  Today, some new Taklon brushes arrived for me, and wow are they nice.

So I proceeded to start to build up the color in the corner, layering what seemed like a pretty good match and blending it in with the existing.  After a while, I felt pretty good about it - the color was very close to the original.  So I reached for a rattle can of lacquer to seal in the repair, shake it up, and spray a little. 

That lacquer wasn't clear.  [scared]

I had  grabbed a can of white pigmented lacquer and sprayed the corner with it.  [mad]  Maybe it was a lack of sleep, or a sign that I need to organize my finishes better. 

I was able to clean almost all of it off by scrubbing vigorously with some mineral spirits and a white scotchbrite pad, plus some 800g sandpaper. However, the price for that was that I also scrubbed off all my repair work plus a little more.  [sad]

Being a perseverative type, I dried the piece w/ a heat gun and proceeded to try and restore the color once more. This is where my evening ended - working up the orange/gold undertones which I'll then layer on some browner colors to blend w/ the rest of the piece.

View attachment 1
 

Attachments

  • repair.jpg
    repair.jpg
    797.4 KB · Views: 342
I've begun applying varnish to both frames now, after almost 5 days of delay due to sanding through the color in one of the corners of the darker frame.

In the attached photos, you can see the results of my touchup efforts prior to the first coat of varnish.  I'm hoping that the Satin varnish will help to mitigate some of the sheen difference between the touched up area and the other area.  This was my first 'repair' experience where I tried to actually match an existing color rather than just refinish something altogether.

The other photo (lighter one) is the third coat of varnish.  I'm following the method Darrell Peart used to follow (he uses Livos oil now): brush on and wait about 10 minutes, then wipe off with rags until they are clean.  It's pretty easy but obviously doesn't form a film the way that some other techniques do.


Attachments

  • IMG_20191117_241806202.jpg
    IMG_20191117_241806202.jpg
    385.9 KB · Views: 371
  • IMG_20191115_160459936.jpg
    IMG_20191115_160459936.jpg
    489.1 KB · Views: 392
With the holidays coming to an end, I'm updating this thread as both mirrors are now installed.

First, the one I made for my mother.  In this case the finish is Shellac, walnut glaze, and then 5 coats of arm r seal.  Seen installed.  It was very well received, which is about the best I could hope for.  :-)

View attachment 1

View attachment 2

View attachment 3

The that i kept for myself is finished with a blend of orange and brown dye, as well as a bunch of touchups where I had made numerous finishing errors.  In this case, it's replacing another mirror I had made a few years ago which had more of a mid century/Aksel Kjersgaard look to it. 

View attachment 4

View attachment 5


Attachments

  • IMG_20191222_091803.jpg
    IMG_20191222_091803.jpg
    998.8 KB · Views: 320
  • IMG_20191222_091825.jpg
    IMG_20191222_091825.jpg
    909.1 KB · Views: 201
  • MVIMG_20191222_091935.jpg
    MVIMG_20191222_091935.jpg
    947.9 KB · Views: 236
  • IMG_20200101_191712.jpg
    IMG_20200101_191712.jpg
    702.3 KB · Views: 226
  • IMG_20200101_191623.jpg
    IMG_20200101_191623.jpg
    783.5 KB · Views: 234
Both are very nice (one is even better  [wink]).

Your Mother’s mirror frame suits the setting beautifully!
 
Do you have any pictures from behind the frame?

Sent from my iPhone using Tapatalk
 
Thanks for the feedback, guys!

I don't have any pictures of the back of the mirror I gave my mother. It does have more 'detail' to it, as I had to fix a spot where my router went astray.  Inlaid a patch of east indian rosewood with a couple mother of pearl dots.  The backing board on hers is a bit more interesting - I laid up some eucalyptus veneer in a chevron pattern just for the heck of it.

With mine, I will take a photo sometime - it's less interesting. I just used a piece of 1/4" birch plywood and rounded the corners to fit the routered out rabbet. 

 
Back
Top