Guide Rail Positioning - On or Next to Cut Line?

newbirdhunter

Member
Joined
Apr 18, 2013
Messages
51
Ok guys, I realize this is probably a very newbie, probably stupid, question but here goes: Where are you supposed to put your guide rail's splinterguard edge in relation to your cut line?

I have a TS-55REQ with 55" guide rail. I have watched numerous videos (produced by Festool and others) on saw setup. My guide rail's splinterguard is cut as instructed. I think I have setup the saw appropriately.

The only issue I have is getting consistent cuts. Videos i've seen and write-ups i've read say to either put your guide rail's splinterguard on the cut line or align the splinterguard to the cut line (which I take to mean butt it up on the waste side of the line).  I have tried both locations and both have produced inconsistent results, almost always leaving me short (occasionally my piece is the intended width but not often).

Clearly I am doing something wrong or missing something. All help is greatly appreciated.

Frank
 
I personally almost never line up with a cut line.  If the piece is not too wide of a cut, then I set my combination square to the desired length, minus 7.25".  I then place the track on the material, and place the locking part of the square against the end of the material, and the metal ruler part pointing towards the track.  I then butt up the track against the end of the ruler.  I do this on both ends of the material, adjusting the track to the right position, and I usually go through this 2 or 3 times.  After I am certain both ends of the track are the right distance, I clamp both ends.  I whole point is to never rely on your eye lining up the cut line.

If the material needs a much wider cut. I try to find some long strips of wood (2) and then cut them to the desired cut length, minus 7.25" (usually the width of the track with cut splinterguard -yours may be slightly different).  I make sure I cut both strips of wood at the same time on a miter saw, so they are exactly the same length.  I then clamp one to each end of the material, so the the end of the wood strip aligns exactly with the end of the material.  The other ends of the sticks butt up against the track, and I clamp the track and then cut.
 
Well I like to butt the rail to the line. That way I can tell if I have it set accurately. If you put it on the line it I harder ( for me at least) to know how much of the line is under the rail.  It would really be a matter of personal preference and  if the mark has been made left / right or split in relation to the mark on the measuring device.

Frank,  what method are you using to make your marks?

Seth
 
We're talking about just a guide and a saw right?  No extra gizmos.

Let's talk about rips first.

I never use a cut line.  In fact I rarely use a mark.

At each end of the cut I stretch out my tape and stick a razor blade in at the distance I need.  I bump the guide up against the razor blades and then remove the blades.

It's not "repeatable" of course because you have to measure before each cut.  But it is consistent and it doesn't cost very much.

It does depend on the splinter guard so over time it will change a few thousandths.  You may need to adjust the razor blade placement just a hair to compensate for splinter guard erosion.

Now for crosscuts.

You've got to have some kind of square right?  An accurate framing square will work.

Measure over and make your mark.  Put the square on the mark and stick razor blades in at each end of the leg of the square that's out over the work piece. 

If it's a framing square you'll be using the inside of the leg because it will be touching the work surface.  Which is what you'd naturally do if you were drawing a line.

There is a limitation using any kind of square.  The length of the leg of the square touching the reference edge is limited.  Any little bit of something will affect the outcome.  But that's life.

Give it a try.  I bet you'll be pleased with the results.  I've built cabinets using this method and they go together just as well as using an MFT and the parallel guides.  Just slower.

 
A simple and yet complicated question... consider, for example, how sharp is your pencil when you marked your line. If the line is from a dull pencil, things change, because the line will be thicker. I try to lay the track so that I can just see the line, keeping the track on the measured side of the line (thereby discounting any changes in the width of the pencil mark).

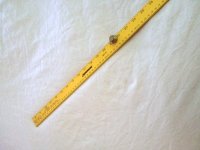
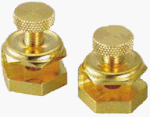
Better yet, I use a metal yardstick from which I cut a section equivalent to the width of the rail. Using a stair marking gauge, I mark on the yardstick the desired cut width, use it to push the rail to the right place and cut. This is an iterative process until both ends of the rail are the correct distance from the edge.  Here's pix of the gizmo.

[attachthumb=#]

[attachthumb=#]
 

Attachments

  • photo.JPG
    photo.JPG
    115.2 KB · Views: 574
  • 41GQ6GJBDDL.gif
    41GQ6GJBDDL.gif
    20.2 KB · Views: 1,089
Can't you guys just tell me what to do so I can do it? I don't want to think for myself. Sheesh!  [tongue]

Just kidding! Thanks for the replies.  [big grin]

Seth - My usual way to mark involves measuring each end of the board and marking with a pencil. I try to mark with a sharp pencil but usually it's less than sharp but not overly dull/thick. Wouldn't a thicker line actually help since it would force the guiderail further away and thus not leave me short?

fshanno - Yes, talking just the guide rail and the TS-55REQ. Shouldn't matter that these discrepancies occur on the MFT/3, right? The gist is the alignment of the cut mark and splinterguard. The razor blade concept is intriguing, not sure I have ever read about someone doing that before. I have taken a combination square and placed it such that the end is on my mark then butted up the guiderail to the square's end but that also has fallen short.

I am not allowing for the width of the blade - is that the problem? I never hear anyone say that in videos but maybe it's assumed and that is what I am missing?

Thanks again guys.

Frank
 
I measure my cut at both ends, and put a carrot at my measures, where the verry point of my carrot is my desired cut.

Put each end of the rail on the very point.

Kind of like the razor blade method above, which is a good one, buy using just the pencil.
 
      On the pencils ......  I use .9mm mechanical pencil with HB lead in Woodpeckers T-squares  for this type of marking. The pencil is held vertically through the marking hole in the T-square. Giving a very consistent width  line. Coupled with the  T-square the mark is very accurate ,consistent, and repeatable. I use the .9mm  because it nearly fills the 1mm holes  removing almost all "slop".   This marking method gives a very easy to see consistent line. A line that is easy to butt the rail against.  Using this method a thicker line is better because it adds to the repeatable consistency.  It is waaaaay more repeatable , consistent, and accurate than making a pencil mark along a rule or tape measure.

      The thickness of the line doesn't harm the accuracy because the pencil is "locked" into the hole for positioning. When the rail is aligned you are using the edge of the well defined line not the whole line the thicker line makes this easier. The opposite of using a pointed pencil along a rule. Where you have to place the mark introducing additional human error.  A well pointed pencil is definitely needed when marking at the edge of a rule.  But then you end up with a very nice thin mark, which is fine for accuracy but much harder to get the rail perfectly butted against.

     I find the newer clear anti-splinter strips help with butting the rail to the line.

     The razor blade trick actually goes back  many years now. I use it sometimes. One thing I have found though  is that you need to be careful that you don't push  (tilt) the blade  when placing the rail against it. That will throw the cut off too.

     Frank, the blade  / kerf thickness is all on the waste side. If you are ending up short then something is off with the marking and rail placement. I suspect that you are making an accurate mark on the measurement. When you place the rail butted to that mark , you are cutting the mark off  leaving you a bit short.

    When you place the rail against a combination square be careful the end of that square blade is going under the  guide rail. The rails are slightly elevated  (by the grip strips) and have a small radius at the back edge. If you push the relatively thin square tight to the rail it may be tucked under a smidgen.  If this is a consistent amount you could compensate when you set the square length.

Seth

 
pugilato said:
Better yet, I use a metal yardstick from which I cut a section equivalent to the width of the rail. Using a stair marking gauge, I mark on the yardstick the desired cut width, use it to push the rail to the right place and cut. This is an iterative process until both ends of the rail are the correct distance from the edge.  Here's pix of the gizmo.

It doesn't have to be iterative.  I think it's been called the two ruler method. 

I have two rulers each with a stair gauge and I clamp one at each end of the cut.  Then set the guide down and bump against the ends.  I find that the razor blades are a bit faster though.

 
amt said:
I personally almost never line up with a cut line.  If the piece is not too wide of a cut, then I set my combination square to the desired length, minus 7.25".  I then place the track on the material, and place the locking part of the square against the end of the material, and the metal ruler part pointing towards the track.  I then butt up the track against the end of the ruler.  I do this on both ends of the material, adjusting the track to the right position, and I usually go through this 2 or 3 times.  After I am certain both ends of the track are the right distance, I clamp both ends.  I whole point is to never rely on your eye lining up the cut line.

If the material needs a much wider cut. I try to find some long strips of wood (2) and then cut them to the desired cut length, minus 7.25" (usually the width of the track with cut splinterguard -yours may be slightly different).  I make sure I cut both strips of wood at the same time on a miter saw, so they are exactly the same length.  I then clamp one to each end of the material, so the the end of the wood strip aligns exactly with the end of the material.  The other ends of the sticks butt up against the track, and I clamp the track and then cut.

I'm headed down a similar road nowdays when I want accurate cuts. But rather than use a measurement for the rail (which may vary slightly depending on the blade used) I have cut guide blocks the exact size of the rail. I made these blocks simply by putting my level against the edge of a board, putting the rail on top of the board and butting it to the level, clamp and cut. When I change blades I'll make new guide blocks for that blade and mark them according to their corresponding blade.

Now when it's time to cut a panel I'll lay the guide block next to the sheet to be cut and measure from the back of the rail to the outer edge of the guide block. No more marks to eyeball align my rail to.
 
fshanno said:
It doesn't have to be iterative.  I think it's been called the two ruler method. 

I have two rulers each with a stair gauge and I clamp one at each end of the cut.  Then set the guide down and bump against the ends.  I find that the razor blades are a bit faster though.

I had not thought about that... I have two of these rulers, but typically have different measurements on each as I go cutting along for different pieces. I saw a Guido video with a jig that is similar to the parallel guides and I might try that sometime.
 
More info:

I did some sleuthing by penciling a 1" cut line on some wood and then running the blade (unplugged) into the wood to leave a mark where the blade would cut. I found that when I butt the splinterguard up against my cut line, the cut is about 1/16th short, when it's on the cut line it's 1/8th short.

Maybe my splinterguard isn't cut right?
 
Francisco DelValle said:
More info:

I did some sleuthing by penciling a 1" cut line on some wood and then running the blade (unplugged) into the wood to leave a mark where the blade would cut. I found that when I butt the splinterguard up against my cut line, the cut is about 1/16th short, when it's on the cut line it's 1/8th short.

Maybe my splinterguard isn't cut right?

Are we correct in assuming the keeper piece is the one under the rail in your analysis?
 
Paul G said:
Are we correct in assuming the keeper piece is the one under the rail in your analysis?

No, the waste side is under the rail.    [eek] Could that be the whole issue?
 
Francisco DelValle said:
Paul G said:
Are we correct in assuming the keeper piece is the one under the rail in your analysis?

No, the waste side is under the rail.     [eek] Could that be the whole issue?

Yup, that's your problem right there. Waste goes outside the rail.
 
Francisco DelValle said:
Paul G said:
Are we correct in assuming the keeper piece is the one under the rail in your analysis?

No, the waste side is under the rail.     [eek] Could that be the whole issue?

Reread all the previous input with the assumption that the keeper piece is under the rail and you'll be making accurate cuts in no time.
 
Rail on cut line, keeper piece under the rail, when doing measurements add 2mm to measure for blade thickness
 
ugh  [embarassed] Thanks everyone! Sorry for the confusion. Appreciate all the help and the patience.

Frank
 
Francisco DelValle said:
ugh  [embarassed] Thanks everyone! Sorry for the confusion. Appreciate all the help and the patience.

Frank

No worries. It's only really bad when you know better, don't ask me how I know this  [embarassed]
 
Incidentally, I use your method to plant the track exactly where I need it (walk the blade along surface) so I don't have issues with a worn splinter guard on the track.  Works great!
 
Back
Top