Help with MFT type workbench

Steve1

Member
Joined
Jul 5, 2017
Messages
404
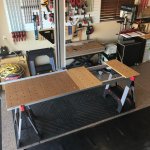
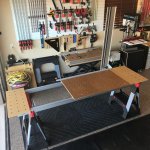
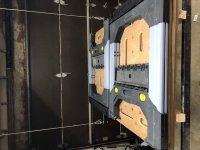
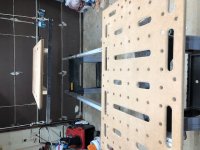
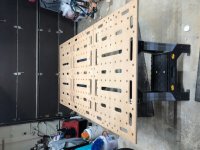
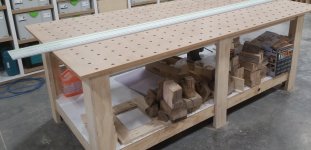
I will be building a new workbench before too long, and figuring on putting MFT tops on it.  It would be 8' long and basically look like image below, just to match the look of my other workbenches.  I would be using the Festool tops rather than making my own.  The area below the top would be storage.  My other workbenches have drawers, but I am not sure that is the best idea for an MFT type workbench.  I might put hinges doors on this one for better bottom access.  Can I please have some opinions:

1) Should I have good bottom access to the underside of the MFT tops ? 

2) Dust build up.  You think it would be a good idea to put a sheet (possibly removable) to protect dust falling through the holes ?

3) I am playing with the idea of putting a flip-down rail in the center, for cross cutting.  but I already have a fair sized table saw with a good miter guide.  For those with both, do you commonly go to the table saw or the flip down rail ?
 

Attachments

  • MFT Workbench.JPG
    MFT Workbench.JPG
    576.6 KB · Views: 863
I recommend putting a removable sheet (1/2" ply?) under the top, otherwise everything bit of dust you make will end up on what is stored underneath.  Leave enough of a gap to allow clamps to be inserted from the top.  I made mine like a drawer without sides, that slid in from the end.  Also handy for recovering screws and other small bits that drop down the holes.

I don't think you need access to the underside, but then on the occasions I do, I use my free-standing MFT.  It's only really when you want to have a clamp upside down.

And just an idea... On mine I put 1" diameter dowels , front to back between the legs, on the outside recesses as clamp storage.

Andrew
 
I think it's always a good idea to have easy access to the underside.  I know there are some people who use things like the festool clamping elements without locking them down with a knob underneath, but if you ever wanted to incorporate something like the kreg automaxx clamps mounted on a bench dog base (which are really useful for workholding when dominoing boards), those can only be used while locked down.

As to the rail vs table saw question, the real advantage of the MFT when cross-cutting is the batched cut capability with the flag stops off the fence.  For one offs it's not necessarily more efficient than other methods (provided the board is not too big for something like the table saw miter gauge).  So if you were able to incorporate a fence system or some other method of making repeat cuts, then I feel like it would be a useful to add the rail. 

As for the dust collection question, I think it's about your tolerance for mess more than anything.  The underside of my bench, which is 1.5" maple but with MFT hole pattern, does get funky over time from falling dust, but I don't really mind as long as I vacuum it up every few days.
 
Some don’t use a table saw anymore, others use both systems. I always have my cross cut system in place and my table saw. Do look at the feeds for others who have been down this path. There are many good ideas floating around out there. Check out dashboardpws.com for cross cut rail brackets that are second to none.

Sent from my iPhone using Tapatalk
 
Maybe you are familiar working with MFT tops but I wasn't when I made three fancy MFT slabs for a 4'x8' workspace. I purchased several bench dogs to start utilizing the MFT. At the same time I discovered the TSO square and parallel guides and have never used the MFT tops for their original intention. I do find them very handy for clamping and assembly. You may want to look into making your own tops with less holes and maybe clamping slots.
 
I am basically in the same position as you were Mike.  I have never lived with an MFT table, so not sure what to expect and what will be most useful to me.  But I just finished another bench, with a small number of 20mm holes on/around my front-vise, and already finding them handy as stops.

From the feedback received here, I think I would put in a removable dust sheet under the surface.  And put drawers on the bench rather than hinged doors.  The bottom of the MFT sheet would still be accessible, just that I would need to remove the dust sheet and at least open the drawer, possibly remove the drawer.   

I will hold off on the flip down rail for now.  I have the HK 55 EQ with the 420mm rail, but no other rails right now.    Possibly get a longer rail, and get some experience using it manually before deciding if its beneficial to make it flip down. 
 
Steve1 said:
I am basically in the same position as you were Mike.  I have never lived with an MFT table, so not sure what to expect and what will be most useful to me.  But I just finished another bench, with a small number of 20mm holes on/around my front-vise, and already finding them handy as stops.

From the feedback received here, I think I would put in a removable dust sheet under the surface.  And put drawers on the bench rather than hinged doors.  The bottom of the MFT sheet would still be accessible, just that I would need to remove the dust sheet and at least open the drawer, possibly remove the drawer.   

I will hold off on the flip down rail for now.  I have the HK 55 EQ with the 420mm rail, but no other rails right now.    Possibly get a longer rail, and get some experience using it manually before deciding if its beneficial to make it flip down.

Also, if you are new to MFT tables I have learned from others to use a waste board under your workpiece so as not to score the table. I use cheap 1/4" (ha-3/32") ply.
 
After retiring, I gave up my dedicated shop and now work in my garage, so portability was important. I really liked the MFT concept, so I purchased a couple Festool MFT tops and set them up on my sawhorses.  It's incredibly stable and gives me the work area of a full 8 ft.  I have built rolling cabinets for all my Festool tools, so depending what task I'm working on I can roll the cabinet under the work top for convenience. I like having the flip-up guide rail at times, so I made a bracket to hold the guide rail bracket I use.  If using the MFT top, I would recommend keeping 3" to 4" of space under it for access.  Also, if building a bench, I recommend drawers vs. doors also. Finally, I've never had a real problem with dust.  I use the Festool vac hooked to most my dust creating tools and then just vacuum and blow the garage out when I'm done.  Works good for me ... good luck with your decision.
 

Attachments

  • IMG_0284.jpg
    IMG_0284.jpg
    670.8 KB · Views: 1,013
  • IMG_0285.jpg
    IMG_0285.jpg
    671.5 KB · Views: 923
Grev said:
After retiring, I gave up my dedicated shop and now work in my garage, so portability was important. I really liked the MFT concept, so I purchased a couple Festool MFT tops and set them up on my sawhorses.  It's incredibly stable and gives me the work area of a full 8 ft.  I have built rolling cabinets for all my Festool tools, so depending what task I'm working on I can roll the cabinet under the work top for convenience. I like having the flip-up guide rail at times, so I made a bracket to hold the guide rail bracket I use.  If using the MFT top, I would recommend keeping 3" to 4" of space under it for access.  Also, if building a bench, I recommend drawers vs. doors also. Finally, I've never had a real problem with dust.  I use the Festool vac hooked to most my dust creating tools and then just vacuum and blow the garage out when I'm done.  Works good for me ... good luck with your decision.

To pile on Glenn's post. I work out of my garage. I have three 32"x48" MFT slabs that are placed on TrackTubes & saw horses (borrowed someone's idea.). I store them on a cable lift system and can be ready to work in 5-minutes. This with TSO products has been the most efficient/accurate/fun process I have ever had and I've been into this hobby for over 30 years.

[member=63307]Grev[/member]  Can you show more details on how you attached the rail hinge to the top? - thanks

[attachimg=1]

[attachimg=2]

[attachimg=3]
 

Attachments

  • IMG_0437.jpg
    IMG_0437.jpg
    88.8 KB · Views: 2,302
  • IMG_0435.jpg
    IMG_0435.jpg
    87.4 KB · Views: 2,297
  • IMG_0434 - Copy.jpg
    IMG_0434 - Copy.jpg
    94.1 KB · Views: 2,652
I would think about the type of cuts you will be doing and where you will tend to do them. I have found I have no real need for all the holes in my top. I set a up 2x4 piece of MDF half iso and half normal pattern on a bora centipede. Generally I use the same few paths to cut and as they wear I will route a channel there and replace with a sacrificial piece of 1/4" MDF when needed. A lot of mess goes down those holes so if you have the top open to below you'll have a constant mess to clean up. I don't remember ever using the screws to clamp a dog down but I do need a bit of room to get clamps in from the top. The amount of room will vary based on what your needs are. If you use a small piece of tarp under the top slightly hanging down you will have a temporary dust catch that with a few taps will get the debris moved to the low point. Once you know your actual in practice needs you can put in something more permanent. Just a few thoughts good luck.
 
I'm curious, how sturdy are the Track Tubes in the saw horses ... if you were clamping wood and hand planing or something aggressive like this would it be wobbling around where you could mess up some precision work?
 
Bugsysiegals said:
I'm curious, how sturdy are the Track Tubes in the saw horses ... if you were clamping wood and hand planing or something aggressive like this would it be wobbling around where you could mess up some precision work?

This work table has worked out great. One of those things you wish you did years ago. The table has been steady to work on except for one thing. The Dewalt sawhorses are not very wide (I'm spanning a 4' slab across them). If I leaded on the edge without much load on it I could feel a panel wanting to tip. I solved this issue not too long by replacing them with a pair of ToughBuilt sawhorses  that have a much wider stance. I also plan to add some Domino connectors so when needed I can draw the tables together tight to act as one.

Only thing I would change is the slots in the tops. I looked around and combined some ideas that looked great on paper but not in practice. My next slabs would have less holes and slots. The slots are great for clamping since I made them wide enough to accept my parallel jaw clamps but I lose too many tools and especially pencils in them.
 
I'm planning to build a 36" x 72" table over the top of my 8020 sys cart and was planning to build it out of 8020 also until I stumbled upon these track tubes today.  Eventually I want to get the Festool VAC clamps so I thought the 8020 would be good for that but perhaps some adapter can be made to mount it to the MFT top like Ron Paulk does with his portable table saw.  Anyways, the main issue I see is the sys cart is 60" so I've only 1 foot of clearance and these saw horses easily take up 2 feet.  Are there any other support systems for these people are using which would take up less space and yet remain stable?
 
I have lived with a 4' x 8' MFT style table for over 5 years. It has a supporting framework around the outside and a couple of stretchers across the middle. I don't have any kind of catch sheet under it. I just let the blow out  the dust occasionally rather than make it too difficult to find things that might drop through the holes. After living with it for a while though, you will let fewer things fall. You just get more aware of it. Also, on that note, be aware that things do catch on the holes when sliding. Smooth flat things are fine, but anything with a point will snag, even your fingers.
 

Attachments

  • MFT.jpg
    MFT.jpg
    1.4 MB · Views: 1,705
Back
Top