Home office desk and hutch

rnt80

Member
Joined
Mar 30, 2008
Messages
953
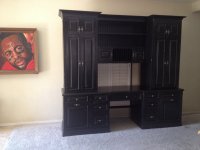
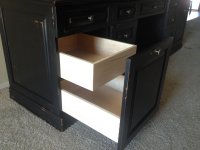
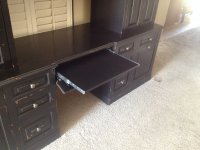
I just wrapped this up yesterday.  It is getting shipped to College Station, TX today and should be at the customers house by Tuesday.  There are alot of custom features that, had they not been requested, I might have changed.  This piece is for a home office and the customer needed space for file storage, accounting supplies, etc.  The finish is Target's black lacquer with a coat of dark brown briwax.  
 

Attachments

  • image.jpg
    image.jpg
    1.8 MB · Views: 491
  • image.jpg
    image.jpg
    1.6 MB · Views: 382
  • image.jpg
    image.jpg
    2.5 MB · Views: 442
Nice. Your distressing is pretty cool looking.

Seth
 
rnt80 said:
I just wrapped this up yesterday.  

Looks good.

rnt80 said:
The finish is Target's black lacquer with a coat of dark brown briwax.  

I hope you had luck with the Target black. My supplier is reporting that there are inconsistencies can to can so he is shifting users to General's black poly. He also advised that EM 9000 is also very inconsistent can to can.
I had a new can, sprayed some on a project and it fish eyed.
Opened another can, tested and it was fine.
I have some concerns about Target coatings and will test every can before final application.
Tim
 
Funny you bring that up, Tim.  I loved the black, it sprayed well and laid down nice.  I initially was going to go over it with 9000, typically my go to topcoat over pigmented finishes.  I sprayed the middle part of the hutch with the 9000 and it turned it navy blue.  The change in color from the black to blue was stark.  I had to sand it all down and decided to go with the wax instead.  The wax is actually better for this distressed finish anyhow, especially for this job since the customer didn't want a perfect looking piece.  I posted my concerns on Target's forum but didn't get any responses.
 
Nice job on the distressing - it looks quite natural. How did you do it?
 
wow said:
Nice job on the distressing - it looks quite natural. How did you do it?

The chipped paint look is achieved by placing chunks of paste wax in the places that I don't want the lacquer.  I spray two coats of black lacquer and then remove the wax.  I sand the whole piece down and sand through on some obvious places like corners and edges.  Depending on the severity of the distressing that's desired I then use some old keys and a chisel to rough it up a bit.  The final step was the application of the dark brown Briwax.  The wax settles in the indentations/marks I've made and once buffed off does not leave a perfect surface, which is exactly what I'm after.
 
rnt80 said:
wow said:
Nice job on the distressing - it looks quite natural. How did you do it?

The chipped paint look is achieved by placing chunks of paste wax in the places that I don't want the lacquer.  I spray two coats of black lacquer and then remove the wax.  I sand the whole piece down and sand through on some obvious places like corners and edges.  Depending on the severity of the distressing that's desired I then use some old keys and a chisel to rough it up a bit.  The final step was the application of the dark brown Briwax.  The wax settles in the indentations/marks I've made and once buffed off does not leave a perfect surface, which is exactly what I'm after.

This reminded me of a guy years ago that did his distressing with a 12 gauge shotgun and #9 bird shot from a range of 25 yards. 

 
Back
Top