Hi!
Would like to share my first "big" project as a beginner hobbyist, and that would be my take on the MFT-table. As a student, my budget is limited, so I wanted something cheaper than the original MFT, I dont need the portability, and I wanted something bigger. Any feedback is appreciated, but keep in mind that I'm a beginner")
--
I wanted the functionality of the alu-profiles on the ends of the MFT, so I bought 4 profiles (about 200$). I also got this hardware kit of Amazon:
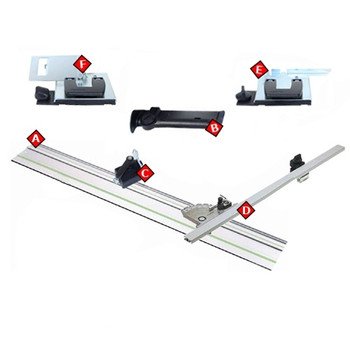
Unfortunately I got the new MFT/3 profiles, and the kit is for the old 800. This meant I had to make a small adjustement to the rail support units with the Dremel (they fit perfectly now), and that the fence clamp does not fit. Not really that big of a deal. I'm not gonna use the 800 rail for my table, but its always nice to grab
For the top itself I'm lucky enough to know who to ask at the university. And an engineer was kind enough to help me do it with a CNC for free (I provided the MDF). A short clip of it here.
Finally, for the legs I got 4x4, and then structual support with 2x4. I routed the mortises with my old Bosch POF1400, and started the tenons with my OF 1400. Unfortunately I miscalculated when I did the mortises, so the tenons will be "one-sided".


Unfortunately I have to more or less reset between each cut, re-measure the mortise and cut each tenon by itself. The two reasons being the 4x4 is rough lumber with up to 2mm difference in size, and I'm working of an old IKEA-table that is not stable at all.
I hope to finish the table within next week, I'll be sure to update back here when I continue!
Would like to share my first "big" project as a beginner hobbyist, and that would be my take on the MFT-table. As a student, my budget is limited, so I wanted something cheaper than the original MFT, I dont need the portability, and I wanted something bigger. Any feedback is appreciated, but keep in mind that I'm a beginner
--
I wanted the functionality of the alu-profiles on the ends of the MFT, so I bought 4 profiles (about 200$). I also got this hardware kit of Amazon:
Unfortunately I got the new MFT/3 profiles, and the kit is for the old 800. This meant I had to make a small adjustement to the rail support units with the Dremel (they fit perfectly now), and that the fence clamp does not fit. Not really that big of a deal. I'm not gonna use the 800 rail for my table, but its always nice to grab
For the top itself I'm lucky enough to know who to ask at the university. And an engineer was kind enough to help me do it with a CNC for free (I provided the MDF). A short clip of it here.
Finally, for the legs I got 4x4, and then structual support with 2x4. I routed the mortises with my old Bosch POF1400, and started the tenons with my OF 1400. Unfortunately I miscalculated when I did the mortises, so the tenons will be "one-sided".
Unfortunately I have to more or less reset between each cut, re-measure the mortise and cut each tenon by itself. The two reasons being the 4x4 is rough lumber with up to 2mm difference in size, and I'm working of an old IKEA-table that is not stable at all.
I hope to finish the table within next week, I'll be sure to update back here when I continue!


