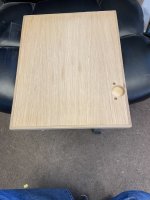
How are slim shaker cabinet doors and drawer fronts made?

Packard

Member
Joined
Nov 6, 2020
Messages
4,747
I like this look:

narrow-shaker-cabinet-black-walnut-1024x536.png

https://superiorcabinets.ca/trends/slim-shaker-cabinets-are-not-a-trend/

According to the article, the MDF doors are made from 7/8” thick MDF which his CNC machined to create a 1/16” reveal.

The wood doors have a 1/8” reveal. 

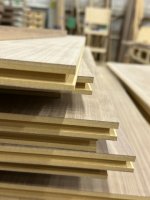
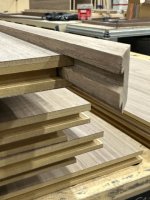
I can envision several ways to make this.  I could cut an L-shaped molding 7/8” thick with a 1/8” thick lip on one end and maybe 3/8” on the other side.

Or I can take a 7/8” x 3/4” strip of wood and take a tiny slice off one side of the 7/8” height leaving 1/8” at the top.  The small lip would make registration easy. 

I could simply glue a 7/8” x 3/4” strip around the perimeter of the door/drawer front.  The drilled cup from the cup hinge would slide partially through that wider strip around the perimeter. 

I have a tongue and groove router bit set.  I could cut the groove in the center and the tongue on the rails and stiles.  That would make for a stronger glue up. 

I suspect that there is some incredibly easy way to do this or why are the cabinet makers pushing this design?

I don’t have access to a CNC machine and 7/8” thick MDF would be impossible to find anyhow. 

Any ideas?

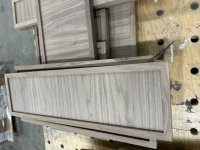
This guy just glues a strip around the perimeter of the board using a band clamp.  I dont like that.  It only clamps the corners and does not guarantee good contact along the perimeter,
 
It seems I asked the same question the last time I started a cabinet project.

My issue remains the same.  The 35mm cup will intrude partially in the perimeter molding. How will that affect the mounting integrity of the hinges?

I liked the look back then, and I still like the look.  But I will probably skip it again over the strength of the hinge mounting worries.
 
Packard said:
It seems I asked the same question the last time I started a cabinet project.

My issue remains the same.  The 35mm cup will intrude partially in the perimeter molding. How will that affect the mounting integrity of the hinges?

I liked the look back then, and I still like the look.  But I will probably skip it again over the strength of the hinge mounting worries.

Are the cabinets euro or face frame.

There are no hinge mounting worries. Use a 3/4 panel with a 1 or 7/8” side leg depending how much “back set” look you want. The moulding can be made easily with the equipment you have. How is your choice. The face return looks good at 3/4”. The 3/4 panel will accept a Blum Clip Top or Clip Compact.

We recently did a job with 1-1/4” rails and stiles with a panel. They did not want the panel/moulding look. We had to use Blum 26mm cup hinges with add on Blumotion for the soft close. The 2 glass door cabinets I had to use Sugstune edge mount hinges and mount them to the filler. This was due to the routing for the glass.

Go for it, it will be fine if you take your time and do a couple of mock-ups.

Tom

Tom
 
Drilled for a Blum 110+ w/Blumotion. Hinge mount with this bore can be, Inserta, press or Expando.

[attachimg=1]

Tom
 

Attachments

  • IMG_5589.jpeg
    IMG_5589.jpeg
    89.6 KB · Views: 8,491
Packard said:
It seems I asked the same question the last time I started a cabinet project.

My issue remains the same.  The 35mm cup will intrude partially in the perimeter molding. How will that affect the mounting integrity of the hinges?

I liked the look back then, and I still like the look.  But I will probably skip it again over the strength of the hinge mounting worries.

The mounting strength of the hinges is in the cup itself, the screws are just there to keep the cup in the door. There isn't much force against them. The clip version don't even have screws. They rely on a lever to expand a ring that fits in the 8mm holes.
7/8" thick slabs would be easy enough, using 3/4" MDF and 1/16" veneer on each side.
 
Crazyraceguy said:
Packard said:
It seems I asked the same question the last time I started a cabinet project.

My issue remains the same.  The 35mm cup will intrude partially in the perimeter molding. How will that affect the mounting integrity of the hinges?

I liked the look back then, and I still like the look.  But I will probably skip it again over the strength of the hinge mounting worries.

The mounting strength of the hinges is in the cup itself, the screws are just there to keep the cup in the door. There isn't much force against them. The clip version don't even have screws. They rely on a lever to expand a ring that fits in the 8mm holes.
7/8" thick slabs would be easy enough, using 3/4" MDF and 1/16" veneer on each side.

There are some model Blum hinges that do not have devices that go in the side holes, just shallow indexing bosses to keep the hinge square. The cup of the hinge itself expands.

Tom
 
Packard said:
I like this look:

Any ideas?

If it's just the look you are after why not use hardwood panels ( core of your choice ), edgeband the sides, then apply the 1/8" frame to the front and leave the back of the panel smooth. 

Unless you are trying to replicate the 7/8" panel with 1/8" frame, 3/4" panel should be fine.  Also check your euro hinge hardware to ensure it will handle the thicker doors and allow the proper swing/clearance. 
 
 
Another revisit on my part….

We are currently building a walnut kitchen with narrow rail/stile look. The panels were grooved to accept the corner cap. This gave us more glue surface and easier alignment. All of the profiling work was done on a shaper.

Man made panels are the better choice for this in my opinion.

[attachimg=1]

[attachimg=2]

[attachimg=3]

[attachimg=4]
 

Attachments

  • IMG_0216.jpeg
    IMG_0216.jpeg
    75.5 KB · Views: 8,042
  • IMG_0217.jpeg
    IMG_0217.jpeg
    108.4 KB · Views: 8,119
  • IMG_0218.jpeg
    IMG_0218.jpeg
    105.5 KB · Views: 8,060
  • IMG_0220.jpeg
    IMG_0220.jpeg
    97.4 KB · Views: 7,870
I don't know how I missed this at the time, but that's a good looking design you have going there [member=4105]tjbnwi[/member]
Is that a specific bit? or did you do it in 2 passes, with the groove and rabbet cut separately?

I have rail & style bit set (Freud) but the cutters for the ends are way too thick to make that groove.
Maybe swap the groove cutter to the top, replacing the thicker one? I never thought about using them together like that......now on to experiment. Thank you for the inspiration, but still awaiting your solution.

Also, as an aside, I would not call that rail & style, since those parts are clearly mitered. Rail & style shows end grain on the ends of the vertical parts (styles)
I suppose they could be coped to fit, but that would be a giant pain for no good reason. Mitering works well and the strength of the spline is there to help it.
 
[member=58857]Crazyraceguy[/member];

The groove in the panel is 1/4” wide. The F style cap was run using 2 1/4” wide cutters with a 1/4” spacer between them. Again, these were run on a shaper.

Tom
 
Mitered corners?  Any additional joinery going on in the corners?

I use mitered corners on my Shaker doors, but with 2-1/2” rails and stiles, I have sufficient room for two 3/8” x 1” dowels per corner. I would have to make a mock-up to see if even one dowel would fit on these narrow frames. I was thinking splines.

 
Wouldn't need additional joinery on the corners, with that type of construction, just a tight glue join.
 
Just some glue in the corners. With the profile there is a lot of glue surface.

Tom
 
I have two different tongue and groove sets.  The first is fully adjustable, but the setup is so complicated and the instructions so deficient that I never used it.

The other one is fixed, I only have to adjust the height of the bits.

The non-adjustable is designed to work on 3/4” stock.  I could could use 3/4” plywood for the center panel and 1” x 3/4” hard for the rails and stiles and end up with a 3/4” wide x 1/4” deep reveal.

I will try a mock-up.

Thanks for all the replies.

 
Would love to see how it comes out. Thinking about doing the same. No shaper so they would be done on the router table in multiple operations. Actually did something similar for all the door and window trim but only an L shape. Still in the visualization stage at this point.

Packard said:
I have two different tongue and groove sets.  The first is fully adjustable, but the setup is so complicated and the instructions so deficient that I never used it.

The other one is fixed, I only have to adjust the height of the bits.

The non-adjustable is designed to work on 3/4” stock.  I could could use 3/4” plywood for the center panel and 1” x 3/4” hard for the rails and stiles and end up with a 3/4” wide x 1/4” deep reveal.

I will try a mock-up.

Thanks for all the replies.
 
I’m in the middle of a few projects now.  I will mock up one soon though.

I use a Blum drilling jig for the cups.  I’m not sure how it will clamp on with the 3/4” wide frame. 

Also, while I use miters for all my shaker cabinet doors, the lengths of the rails and stiles are very forgiving as they float. 

But If I am gluing along the border, then the lengths have to be very precise.  Too long and they will fit loosely and won’t allow for glue-up.  Too short and the miters won’t meet.

I think I would miter the frames first and then cut the panels to fit on the table saw.  That seems like it would be easier. 

I have used tongue and groove for edging on shelves.  It makes for a very robust edging.  For those I make the tongue on both edges of the stock and rip apart to make the edging.  The last time I glued two shelves at a time with the double wide edging and then ripped the panels apart.  That proved to be the easiest. 

Running tongue pieces just 3/4” wide is a bit difficult to handle.  Running the tongues on both edges of a 2” wide strip is much easier.  Then I rip those to width. 

I have a picture framing miter saw with stops.  It is very precise.  So cutting the rails (which are typically just one size) all at once is easy.  The widths are more variable, so those have to be sized carefully.  I do have a Lion Miter trimmer that allows me to trim mites by just a couple of thousandths at a time.  The slivers come off so thin that you can see through them. 

I’m sure once I have the process down, it will go smoothly.
 
One approach is to use an L-shaped molding, as you mentioned, to create the reveal. Another option is to use a strip of wood, like a 7/8"" x 3/4"" strip, and carefully trim a tiny slice off one side to create the reveal.
Using a tongue and groove router bit set is another idea, as it can create a strong glue-up for the rails and stiles of the door or drawer front.
If you don't have access to a CNC machine or 7/8"" thick MDF, you can still achieve a similar look using these methods. It might take a bit more effort, but with careful measuring and cutting, you can create slim shaker doors and drawer fronts that look great.
 
Back
Top