How Do I Make an Angled Dado?

deepcreek

Member
Joined
Apr 20, 2009
Messages
1,000
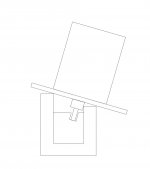
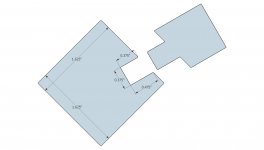
I need to make an angled dado in a table leg to accept a 3/8" panel.

It is set at a 75 degree angle to the face of the leg.

Please note it is actually a stop dado on both ends so I can't use a table saw.

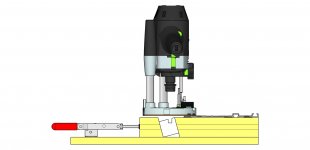
I'm thinking I should cut it with a router but I'm not sure how.

I have a 1010, 1400, and 2200.

Any suggestions?

Thanks!

Joe

[attachimg=1]
 

Attachments

  • Leg Panel Dado.jpg
    Leg Panel Dado.jpg
    71.8 KB · Views: 3,547
Cut a long wedge on the table saw under the proper angle and use it to run the router on.

Just a rough sketch to show the idea.

[attachimg=1]
 

Attachments

  • Leg-Panel-Dado.jpg
    Leg-Panel-Dado.jpg
    52.9 KB · Views: 3,611
I figured a wedge would be part of the solution.

I'm trying to figure out how to use a guide rail with the guide stop adapter unless there's a better way.

The combination of the angle and the narrow stock has me stumped.
 
Make the wedge longer than your leg so it sticks out on both ends, and then you have a way to clamp the guide rail to the wedge.

You can make the wedge stick to the leg with double sided tape. Or clamp it.
 
Begin with the side of the leg angled, so that the mortice is square to this side. Rout the mortice. Now saw away the side of the leg to create the angle you want to end with.

Regards from Perth

Derek
 
I would build a 3 sided plywood box that the leg would fit into with 1 leg 1/16 longer than the leg width so 1 + 11/16 and the other side long enough to bring the router base to the angle needed to route the mortise.

You can add stops and shims to make the mortise where you need it. A template guide would needed on the bottom of the router.  Just a clamp on the side of the box would hold the leg in place.

I hope that makes sense. It would be a lot easier to demonstrate than to explain for me ;)
 
derekcohen said:
Begin with the side of the leg angled, so that the mortice is square to this side. Rout the mortice. Now saw away the side of the leg to create the angle you want to end with.

Regards from Perth

Derek

That would be an straight forward solution if I hadn't already milled the legs to size!    [embarassed]
 
I’d use the MFS, a wedge, a router and then square the corners.
 
Cheese said:
I’d use the MFS, a wedge, a router and then square the corners.

I guess I should have bought an MFS.  [blink]

I am thinking along the lines of building a template.
 
deepcreek said:
I guess I should have bought an MFS.  [blink]

I am thinking along the lines of building a template.

FWIW...there’s an MFS 400 for sale on the FOG for $275.  [big grin] [big grin] [big grin]

I still think your chaps schtik is super cool. I wish I was that creative.  [big grin]
 
Cheese said:
I’d use the MFS, a wedge, a router and then square the corners.
[member=44099]Cheese[/member], you are one hardcore MFS can. Someone would ask how to drive a nail and you'll suggest MFS.  [big grin]
I would do what Alex suggested and on a router table. Not necessarily a long wedge, perhaps pair of small ones.
 
LOL...old habits die hard Svar.  [big grin]

Great alternative thought on the MFS though, a hammer.

Maybe I should purchase that extra MFS 400 after all?
 
A thousand-and-one things a clever boy can do with an MFS!

Any solution depends, obviously, on what equipment one has access to - and this probably won’t help Joe with his particular arsenal of routers…

But for someone to do this with limited resources… using the three(?) other leg components, or any other spare stock that is also 1.625” thick, there should be enough material upon which to lay a rail/straightedge/guide-of-some-sort (or possibly two, one either side of the dado line); could the dado then be made with a small palm router with a tilting base?

Assuming that any such tilting base would not also be plunging, it would mean beginning with the cutter already inserted into a pre-drilled hole; sounds rather awkward but with some care taken, could that work? My experience with routers is limited, so am curious to know if such a procedure would be advisable, or would it be asking for trouble?
 
Here is a sketch of what I was trying to describe. If you make the box long enough you can have the leg reverse in the box to do lefts and rights. The template guide would align the router bit with the mortise and you could put stops on the top of the box for the length of the mortise.
 

Attachments

  • Template drawing.jpg
    Template drawing.jpg
    26.9 KB · Views: 860
How about a drill to remove most of the waste and a sharp chisel to clean up the mortise. Assuming this is a one off project, I’d have it done with hand tools in about as much time as building a jig. If this is a prototype for production, go ahead and build a jig as others have described.
 
Euclid said:
Assuming that any such tilting base would not also be plunging, it would mean beginning with the cutter already inserted into a pre-drilled hole; sounds rather awkward but with some care taken, could that work? My experience with routers is limited, so am curious to know if such a procedure would be advisable, or would it be asking for trouble?

[member=42852]Euclid[/member] I've been down that road and while it is possible I wouldn't recommend it.  [smile]  Until about 10 years ago Milwaukee never offered a plunge base for their routers so at times I was forced to use the method you've outlined. The drilled hole needs to be substantially larger than the router bit because you can only hold the router in position with one hand while the other hand operates the on/off switch and then immediately the torque of the motor also kicks in. The process can be exciting to say the least.  [smile]
 
Thanks Cheese; that all makes sense - especially the 'one-handed' limitation. A foot-switch might be useful (!), but it does sound like a bit of an awkward procedure anyway. There are some things that I'm quite happy to learn my means other than from my own mistakes and experiences! 
 
How many of these do you have to do?

Wedge / template set up is probably the best way.

Or just a wedge with the router edge guide instead of guide rail.

Or attach a wedge base to the router base.

Seth
 
I have six angled stop dadoes to complete.  Two on each side of three legs.  I'll post a photo of the table when it's done.

I really appreciate everyone's advice on this.  Seriously!  Great folks on the FOG.

Several people suggested wedges and that got me thinking in the right direction.

I seriously considered a variation of [member=7143]Oldwood[/member] 's sketch but was already well along on a different template.  (See below)

And [member=44099]Cheese[/member] almost had me convinced I needed to pick up an MFS.  Hmm.  Maybe I should anyway?

I will be using the guide stop adapter with micro adjust (not pictured) on a 1400 router with the support foot (not pictured).  An inline toggle clamp will allow me to release the wedge and change out the legs.

Fingers crossed!

Joe

[attachimg=1]
 

Attachments

  • Jig Leg Dado Festool.jpg
    Jig Leg Dado Festool.jpg
    92.5 KB · Views: 3,031
Your solution looks good. If I were doing this I’d rather adapt Oldwood’s idea to the router table. As usual, many ways to get something done.
 
Back
Top