How to mark out domino placement in this angled chair?

gearhound

Member
Joined
Oct 12, 2016
Messages
149
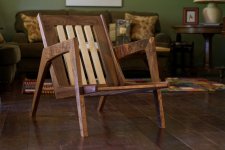
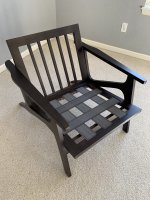
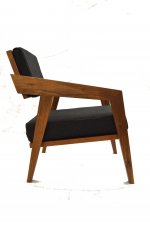
I came across a YouTube woodworker's channel and really like this design of chair he made in one video:=2s

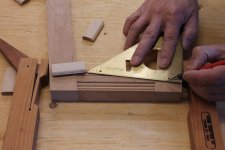
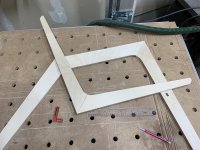
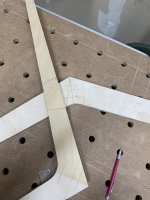
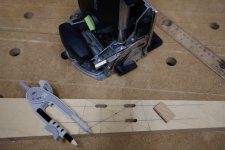
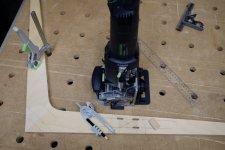
I'm in the process of making something really similar and I've got all the parts of my plywood prototype made and just need to attach the legs to the seat, but not sure how to accurately cut the dominos in the legs and seat? I asked the guy who made the video and he got back to me, but I'm still struggling with how to accurately layout where to cut the mortises. At the 6:28min mark in his video he starts this process so you can clearly see what I'm talking about.

Does anyone have suggestions or videos I can watch to learn how to mark out the domino placement in joints like this?

Thanks! (btw, if you're into watching youtube woodworkers I've found this fellow to be really inspirational and love his general demeanor) [attachimg=1]
 

Attachments

  • IMG_7781.jpg
    IMG_7781.jpg
    1 MB · Views: 3,293
Like as shown in the image below. For some parts, consider cutting the mortises while the stock is still rectangular, then shaping it.

The joinery angles don't matter as long as your placement lines are straight across the members to be joined. Use double dominoes where needed.
 

Attachments

  • Photo 13a.JPG
    Photo 13a.JPG
    3.9 MB · Views: 1,705
I've already got the splayed leg domino joint completed and glued up [member=57948]ChuckM[/member]. I'm trying to figure out how to accurately mortise into the legs and attach them to the seat portion of the chair.

Do you have a link to where that photo is from though? Looks like it could be a fun read!
 
Ok for the seat (back, too?) portion. Do you know the technique of using the milled flats and scribed line on the baseplate to position the joiner against two intersecting lines?https://www.instagram.com/p/BS3s0jcjHSH/

You can layout your tenon placement lines on the legs and the seat, and mortise them as long as you have two intersecting lines. If the stock was mortised before shaping, the job would have been much easier.

I've PMed you the link to that project.

 
Thanks for the link to Sedge's video...hadn't seen that one yet.

Here's where I'm currently at and am trying to figure how to scribe the lines necessary on both the legs and seat. Thinking I just need to measure each off the scribe about an inch or so? I'm definitely overthinking this, but glad I've got a plywood mockup and templates to play with before making this out of walnut

[attachimg=1][attachimg=2]
 

Attachments

  • IMG_4520.JPG
    IMG_4520.JPG
    3.9 MB · Views: 3,217
  • IMG_4369.jpg
    IMG_4369.jpg
    1.9 MB · Views: 2,987
Heading out...will come back to give my opinion if you haven't got an answer by then.
 
I'm wandering from your question but I'd consider using a different seat construction, something with some give. I did a version of Jory Brighams Hank chair and will change that in the next version, even with a thick cushion you max out onto the hard wood.

 
That's a good point [member=12487]duburban[/member] ! The YouTube'r I linked actually used to work for Jory, which I found pretty cool...been learning a lot watching these two guys videos the past year.

This is my 1st ever chair build and 1st time ever making templates for a project so I've got a lot to learn. On my next build I'm planning on making a similar walnut version of this chair my wife bought from Room & Board and incorporate this stretchy seat material they used.
 

Attachments

  • IMG_3482.jpg
    IMG_3482.jpg
    2.3 MB · Views: 585
Yes, something just like that. I’ll post mine when I get to my data storage. I’d really push to get that done on this chair though, makes it that much more valuable to have around for the coming years
 
gearhound said:
Here's where I'm currently at and am trying to figure how to scribe the lines necessary on both the legs and seat. Thinking I just need to measure each off the scribe about an inch or so? I'm definitely overthinking this, but glad I've got a plywood mockup and templates to play with before making this out of walnut
You already have form of the respective other piece marked, so on both you have the identical area (just mirror'd).

I would use a precision compass to construct the positioning, using the diagonals from the corners of the area with their intersection as the center point for the compass. That way you could easily replicate the measurements onto the other pieces or a jig.
 
Gregor said:
gearhound said:
Here's where I'm currently at and am trying to figure how to scribe the lines necessary on both the legs and seat. Thinking I just need to measure each off the scribe about an inch or so? I'm definitely overthinking this, but glad I've got a plywood mockup and templates to play with before making this out of walnut
You already have form of the respective other piece marked, so on both you have the identical area (just mirror'd).

I would use a precision compass to construct the positioning, using the diagonals from the corners of the area with their intersection as the center point for the compass. That way you could easily replicate the measurements onto the other pieces or a jig.

That's an interesting way to do it...I haven't used a compass since high school almost 20 years ago. What's the difference between a "precision" compass and one of the cheap metal ones I used in school? I assume accuracy, but would that matter if firmly held since I'm only making two or 3 marks for mortises?

Once I've marked the intersection, then I would set it at say 1 inch and reference off that/make marks and then draw a perpendicular line from there to the angled scribe lines? Have you seen any photos of this being done so I can get a better grasp of how it would work?
 
gearhound said:
That's an interesting way to do it...I haven't used a compass since high school almost 20 years ago. What's the difference between a "precision" compass and one of the cheap metal ones I used in school?
I assume accuracy, but would that matter if firmly held since I'm only making two or 3 marks for mortises?
I guess the threaded bar between the legs that keep it at a setting makes it 'precision'.
No clue how well yours holds his setting, the precision ones arn't that expensive and have the upside that you can set them aside for a moment without having to worry...

Once I've marked the intersection, then I would set it at say 1 inch and reference off that/make marks and then draw a perpendicular line from their to the angled scribe lines? Have you seen any photos of this being done so I can get a better grasp of how it would work?
Basic concept to construct a geometry for where to put the dominos (numbers are order of drawing):
[attachimg=1]
Should be no problem to reproduce that on both faces as long as you correctly marked the contact surface between the two.

Certainly you could also use the other direction (which in the example would be vertical green lines), just make sure to place the dominos in a manner that they intersect the ones in the joint of the leg as little as possible.
 

Attachments

  • FOC Zirkel.jpg
    FOC Zirkel.jpg
    28.2 KB · Views: 2,783
Thanks for taking the time to make that sketch [member=53905]Gregor[/member], really appreciate it! Seeing it drawn out makes a lot more sense. I'm going to pick up a compass tomorrow and see how it goes and will keep you posted!
 
Picked up a compass and got the dominos in! Great tip [member=53905]Gregor[/member]! I did a dry fit and the joint is incredibly tight....actually too tight and I needed a mallet to get it fully seated. Doing vertical plunges I think I'm getting just a tad of vibration slop, wondering if there's a good way to eliminate that? Maybe it's just user error trying to line up the plunge just right. I used Festool Sedge's tip of referencing off the lines and using that black faceplate connector along with scraps taped along the sides to aid in balancing the tool. 

[attachimg=1][attachimg=2]
 

Attachments

  • IMG_0967.JPG
    IMG_0967.JPG
    716.3 KB · Views: 2,785
  • IMG_0966.JPG
    IMG_0966.JPG
    719.8 KB · Views: 2,655
Vibration slop can be avoided by clamping the machine to the workpiece after aligning it or (easier to handle) you make yourself a jig (that you can clamp to the workpiece) that gives you a reference corner to push the machine into which keeps it from moving/vibrating.

To make dry fit easier you can either microwave/oven the dominos to dry them (so they get a bit thinner) or sand some down a bit (and reduce the fins on the sides a little) and give them a highly visible paintjob (so you don't accidently use them for a glueup).
 
Gregor said:
Vibration slop can be avoided by clamping the machine to the workpiece after aligning it or (easier to handle) you make yourself a jig (that you can clamp to the workpiece) that gives you a reference corner to push the machine into which keeps it from moving/vibrating.

To make dry fit easier you can either microwave/oven the dominos to dry them (so they get a bit thinner) or sand some down a bit (and reduce the fins on the sides a little) and give them a highly visible paintjob (so you don't accidently use them for a glueup).

Thanks, yeah I need to come up with a good jig to limit that slop. Have you seen any good examples of one of these jigs in action? Definitely going to be sanding the dominos for dry-fit on the next leg.

Marking out these scribe lines has proven to be the most tedious part of this build and has me wondering if people ever incorporate where to place the dominos into their templates? I'm planning on making at least two of these chairs out of hardwood once I get this plywood mockup finished and see if I like the angles and overall form. If I could somehow speed up this step for future builds it would be quite the timesaver! 
 
Hm.

Let's say you take a piece of sturdy paper, the form of the contact surface, do the drawing on that once to get the center points of the dominos, put it aligned onto the contact surface, apply a small center punch on the 4 marked centers, remove the paper and use a ruler + pencil to draw lines through the 4 marking holes so you can align the Domino machine on them?
Just flip that marking template over for the mirror side, now that is has the 4 locations you need to punch marked by holes.
 
As I pointed out, it is easier to lay out the mortise placements before the stock is shaped, but I have not studied the chair to see if that is also the case.

If the stock is already shaped as in your case, I would use a sliding bevel gauge (something like this:http://www.leevalley.com/en/wood/page.aspx?p=32594&cat=1,42936,50298,43508) to draw the angled lines (use a pair if the angles are different for the two rows of mortises), and then a flat squarehttp://www.leevalley.com/en/wood/page.aspx?p=66573&cat=1,42936 (even better, if a flat body T-square can be found, looking like this:https://www.homedepot.ca/en/home/p.4-inch--zinc-t-plate.1000773686.html) for the perpendicular lines (90* to the angled lines).

If the plan is to make multiples of the same chairs, a placement template (for laying out only) or, even better, an actual jig* (for mortising with an angled fence to butt against the registration edge of the stock) can be made.

By the way, cradle the work on the width side with spacers (of same thickness) to enlarge the registration surface for the joiner. The cradle will allow you to use the base support that is shop-made or when TSO releases its version:http://festoolownersgroup.com/festool-jigs-tool-enhancements/right-angle-adapter-for-domino-700-xl/  I use cradles (as well as the trim stop) in a lot of my narrow joinery work.

* Your jig may need to have a fence on both the top and bottom sides to cater for the left- and right- chair arms, unless you make two jigs.
 
ChuckM said:
As I pointed out, it is easier to lay out the mortise placements before the stock is shaped, but I have not studied the chair to see if that is also the case.

I'm not sure that is possible with the tapers on this chair design and different angles needed. I think it would get really complicated trying to make sure I attached the square stock exactly to my templates to have the pre-cut mortises in the places they need to be. Maybe I'm wrong, but this seems to be the easiest way get the seat attached at the angle and placement it needs to have on the legs. 
 
Found a photo of my Hank chair knock off. Even with this massive cushion I wish the seat was webbing instead of hardwood.
 

Attachments

  • Chair.jpg
    Chair.jpg
    3.1 MB · Views: 528
Back
Top