How to route multiple curves in a large sheet

Acrobat

Member
Joined
Jun 30, 2008
Messages
471
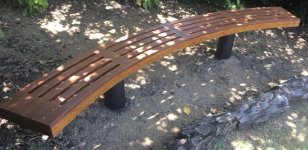
Hi, a while ago the local council were tossing these large seats away as the wood was rotten and the seats were in disrepair having been in a local park for years. I replaced the timber with ply and routed the gaps to follow the seat frame curves by hand as best I could. I am hoping the brains trust here can point me in the direction of a router jig with a bearing and extendable rod so I can adjust the curve as required.
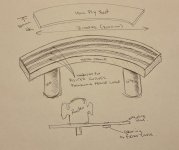
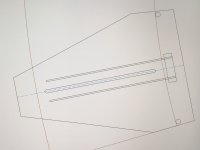
Here’s a sketch of what I am doing and thinking of regarding a jig.
 

Attachments

  • 69059387-3251-462B-85BA-15B59FACB69F.jpeg
    69059387-3251-462B-85BA-15B59FACB69F.jpeg
    1.8 MB · Views: 475
Here is one I have done by hand so am hoping a guide jig of some sort will help and speed up the process as I have 3 or 4 more to do.
 

Attachments

  • Outdoor seat.jpeg.jpeg
    Outdoor seat.jpeg.jpeg
    104.1 KB · Views: 478
The length of rod and size of table you need to make it work in a sweeping radius may be pretty large; I can't tell quite how big the radius is.

Technically you just posted your jig in your reply post, right?  [wink]

Using the new piece as a template to make a routing jig out of MDF may be a good way to go, if you're happy with the first piece and still have access to use it for such purposes.
 
I'd try the template (made of 1/8" or max. 1/4" thick material) & guide bushing approach.

 
Looks like the bench in the photo is about twice as long as the drawn bench...

The safest way to do this is with a very long trammel arm. This will keep you from over cutting and undercutting. The next best way is with a rig sorta like you drew but with two bearings and two rods. I have a picture but...The bearings should be as big and tall as practical. Wax the bottom of the rig.


Attachments

  • 7FB3ED9D-4971-4C40-BC1D-88F3C19C8F79.jpeg
    7FB3ED9D-4971-4C40-BC1D-88F3C19C8F79.jpeg
    969 KB · Views: 371
As Michael pointed out, a trammel is the best way to do this, the first time. But what I would do is make an over-sized template/pattern to cut your actual parts with a guide bushing. This takes much of the fussy aligning out of the mix. You do the layout once, then you can make as many of the as you want/need.
 
Not really relevant but you could make that curve template with the Shaper quite easily although expensive solution unless you own the Shaper.  Being the the crazy that I am I bought into the Shaper pre-production so now own a tool worth 25% more than I paid.
 
Make a template, then use a copy ring / bit with bearing.

I would create the template by bending a flexible strip of wood along the curvature I desire, fix it to the template sheet and route along with a copy setup.

Basically like this:
just fixing it with to the sheet, then skipping the pencil.

Or pull out the Shaper Origin.
 
rst said:
Not really relevant but you could make that curve template with the Shaper quite easily although expensive solution unless you own the Shaper.  Being the the crazy that I am I bought into the Shaper pre-production so now own a tool worth 25% more than I paid.

I was trying to keep in in the realm of normal/attainable, (even for a FOGer)..lol
If I actually needed to do this, it would be on a CNC.

Even with access to 5 x 12 CNC machines, I still see the usefulness/advantage of the Origin. One day, I will get around to getting one, especially after seeing so many creative ideas/uses on Youtube videos.
 
Back
Top