Someone recently told me the 90 degree positive stop on the fence is a hair past 90 degrees. I checked and indeed the stop does not set the fence square to the base!
What it means is that when I make a perpendicular/vertical cut, the mortise may not be dead perpendicular to the face/surface, if the fence is locked in its positive stop.
Instead of checking the fence every time for squareness, I used the precision square to set the base square to a flat surface, locked the fence, and then reset the angle pointer so I know when the pointer "splits" the incised 0* mark, I am mortising perpendicularly.
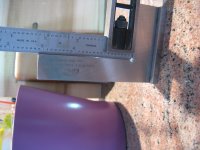
The first photo shows the precision square was checked against my reference square (0.00055" tolerance) before it was used.
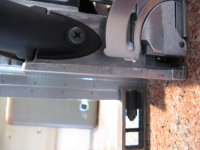
The second photo shows that when I set the angle point to the 0* (split the mark), the base was verified to be perpendicular to the surface.
What it means is that when I make a perpendicular/vertical cut, the mortise may not be dead perpendicular to the face/surface, if the fence is locked in its positive stop.
Instead of checking the fence every time for squareness, I used the precision square to set the base square to a flat surface, locked the fence, and then reset the angle pointer so I know when the pointer "splits" the incised 0* mark, I am mortising perpendicularly.
The first photo shows the precision square was checked against my reference square (0.00055" tolerance) before it was used.
The second photo shows that when I set the angle point to the 0* (split the mark), the base was verified to be perpendicular to the surface.