Island

mystry tour

Member
Joined
Mar 16, 2007
Messages
9
Here is the next to last thing I made
shoptable022.jpg
shoptable025.jpg
shoptable023.jpg

and heres the last thing I made
cradle029.jpg
sharp009.jpg
sharp010.jpg

Altho I have a domino I still use these
mortiser
myrtelwoodtbltop111.jpg

tendoner
myrtelwoodtbltop110.jpg

I will be useing the domino on my daughters blanket chest soon
Tour
 
Tour,

Great projects and nice pics.  Thanks for sharing.   But...

Did you know that you can make your pics show up in your post?  First select the URL text.  Then, click the Insert Image button above the text editing box.  The Insert Image button looks like this:
6_09_04_07_10_33_08.gif
.   Then, your pics will show up in your post instead of links.   

When you select the URL text and click the Insert Image button, your URL will have img tags wrapped around it like this:

Code:
[IMG]http://i33.photobucket.com/albums/d99/male_man/shoptable022.jpg[/IMG]

That pic will show up like this:
shoptable022.jpg


Give it a try by editing your post above.

Best regards,

Dan.
 
mystry tour,
Thanks for sharing the project!  I happen to be putting together a new kitchen counter top right now made of slabs of hard maple, similar in design to your project, so this is a welcome discussion for me!

I have a question or two...

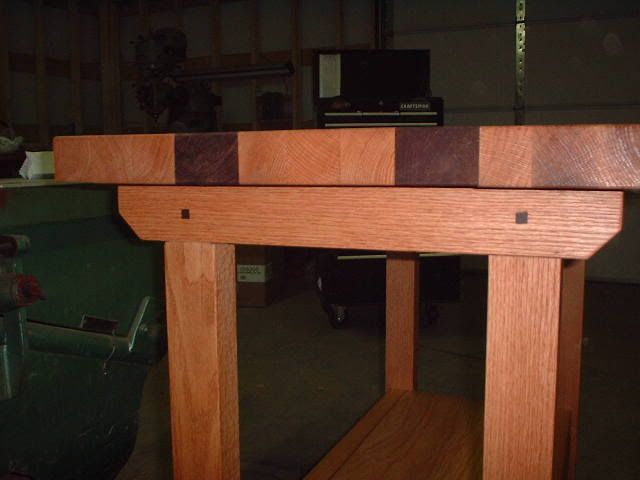
For my project, I'm planning to cut slots in the support beam under the top, about  one every 12".  Then I'm going to drill pilot holes through the center of each slot, into the top itself.  Then I plan to run #10 1/4" lag bolts up into the top, about halfway into it's thickness, with a washer underneath to allow the lag bolt to shift.

The other thing is about wood movement.  With my project, I glued all the slabs face-to-face, so the end grain is up.  Based on my knowledge of wood movement, it seems that the shift would be in the thickness of the top, not the length or width, since wood movement occurs across the face.  But I've read a different opinion elsewhere.

By the way, Dan offered some good advice about photos.  You have the advantage here of being able to have your photos appear in your posts, if you want.

Thanks,
Matthew

PS: Why do I always hear Beatles songs when I see your name!
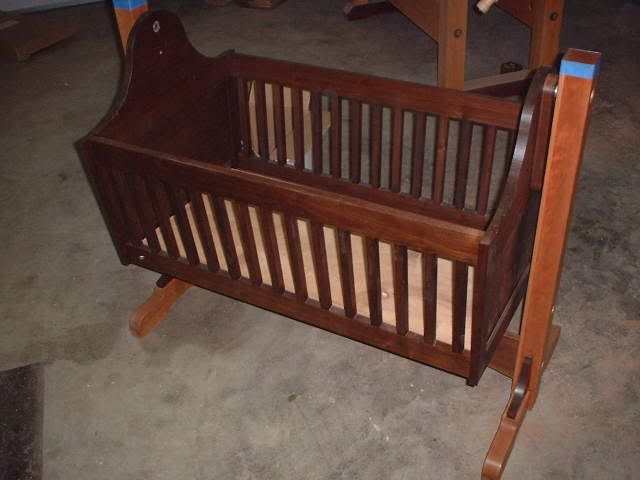
 
Matt,

I am a little confused concerning your maple top project. You said the end grain will be exposed but is it possible you mean edge grain? From your previous descriptions about planing the stock I got the feeling you were planing the face grain for gluing together, thus exposing edge grain. For you to expose end grain your boards would need to be crosscut at about 1.5 inches, or whatever the thickness of your top. This is usually done on thicker butcher block type surfaces, maybe 4 inches or more. The reason I ask is, while end grain is very durable for butcher block type uses, it needs more thickness to be stable as the end grain can drink up moisture very quickly. For a relatively thin top, 1.5 inches or so, edge grain is probably better and certainly better than face grain. Best I can tell, mystry tour's top is edge grain.
 
Greg,
Yes, I meant to say edge grain up!  I jointed and planed the rough maple, then crosscut them into slabs 1.5"x1.5" square and glued them face-to-face.

With the leftover maple slabs, I am creating some circular cutting boards that are, in fact, end grain up.

Matthew
 
I'm still learning about wood structure and I want to be sure I understand the definitions here.  For example, I made my maple workbench top by ripping the boards to 2", turning them 90 deg and gluing the face of each cut board together.  Would this be an example of edge grain?  Would an end grain example be cutting off lets say a few inches of a particular board and then gluing them together with the end of each cut off sticking up, like you see in some butcher blocks?  Sorry to be so dense but I want to make sure I am doing things correctly when I glue them up.
 
HowardH said:
I'm still learning about wood structure and I want to be sure I understand the definitions here.  For example, I made my maple workbench top by ripping the boards to 2", turning them 90 deg and gluing the face of each cut board together.  Would this be an example of edge grain?  Would an end grain example be cutting off lets say a few inches of a particular board and then gluing them together with the end of each cut off sticking up, like you see in some butcher blocks?  Sorry to be so dense but I want to make sure I am doing things correctly when I glue them up.

You got it right. 8)
 
Matthew Schenker said:
I have a question or two...

The other thing is about wood movement.  With my project, I glued all the slabs face-to-face, so the end grain is up.  Based on my knowledge of wood movement, it seems that the shift would be in the thickness of the top, not the length or width, since wood movement occurs across the face.  But I've read a different opinion elsewhere.

Thanks,
Matthew

Matthew,

Although I am not clear as to the orientation of the wood grain in your laminated maple top, please keep in mind that all natural boards regardless of wood species have three different growth/shrinkage possibilities - lengthwise, i.e. parallel to the height of the tree (usually length of the board), radial (corresponding to the direction of the diameter of the tree) and tangential (corresponding to a tangent to the outer circumference of the tree).  Of these three, lengthwise sensitivity can be ignored for almost all applications because it is not likely to exceed 1/10th inch in 10 ft length.  But for most woods, including maple, radial and tangential shrinkage rates and sensitivity to seasonal moisture changes cannot be ignored in design.  Tangential shrinkage and sensitivity to seasonal moisture change is generally the greatest of these three types.  Radial is second greatest.  Of considerable importance is the ratio between the tangential and radial shrinkage, and this ratio varies considerably among wood species.  A log cracks after the tree is cut down because the tangential rate of shrinkage is greater than the radial rate.  Quartersawing reduces moisture sensitivity movement problems, but does not eliminate them entirely.  When I made some countertops of laminated maple strips that were mostly quartersawn, there was still at least about 3/8 inch seasonable movement movement in the 32" nominal width of the top between summer and winter in NE Ohio in a house that was air conditioned in the summer and humidified in the winter.  Bruce Hoadley and others have published some useful books, article and tables describing wood movement for various species in detail and accomodating these facts when designing products of natural wood boards.

Before I fully understood this moisture movement phenomenon and how to account for it when designing something to be made out of natural wooden boards [We have plastic and composites today which are much more stable against moisture], I once popped the M&T frame of a headboard for a single bed I was making.  The headboard was made of 5/4 hard maple with two stiles and two rails.  Within this frame were a series of ~3/8 thick T&G maple slats.  Everything was glued up but not yet sealed with any finish coating.  Although I allowed some room for expansion, it was not enough when a sudden late Fall thunderstorm spike of filled my garage, and caused those thin slats to rapidly expand.  The movement over the ~3' of slats was nearly 3/4 inch.

Dave R.

 
Dave,
Thank you for taking the time to help me out here!

I've dealt with wood shifting before, but usually with edge-to-edge glue-ups, or smaller face-to-face glue-ups.  This is the first time I've dealt with such significant face-grain glue ups.

The orientation of the wood is with the edge grain up.  The edge grain forms the cutting surface.  The thickness of the counter top is formed from the height of the face grain (about 1.5").

From what you are saying, I need to create slots that account for wood movement across the slabs, not along the slabs.

I've attached a photo of one of the sections.  It still needs to be planed and glued to another section, but you can see the basic orientation.

I've indicated the direction of the wood movement that will occur.

Tell me if I am getting it right!

Thanks,
Matthew
 
Hi Mat.
All I do is glue the pieces together. In the borrom of my framework I put a singel lag bolt to allow the wood to swell in both directions without the problem of cracking.
The idea you have with the lage screws is a solution that is recognised to allow the wood to swell as not to crack the joint. Anothe is to    'dovelail ' the streacher piece you are refering to and this will allow it to expand also with a natural slide in the wood expantion
Tour
I guess you might need some therpy for that music thing Matt  ;D
 
Thanks Dan. Was a hurry up project for a expecting moth of a good friend. Thought, sure why not whouldn't take too long....... ::) took me a week to get that thing built
cradle028.jpg

sharp010.jpg

sharp009.jpg

cradle029.jpg

Tour
 
Matthew Schenker said:
Dave,
Thank you for taking the time to help me out here!

From what you are saying, I need to create slots that account for wood movement across the slabs, not along the slabs.

I've indicated the direction of the wood movement that will occur.

Tell me if I am getting it right!

Thanks,
Matthew

Your understanding is correct, Matthew!  Sorry for the very belated reply.  I have been busy with my normal work and trying to figure out some of the IT, PC, DSL, VISTA, Wi-Fi and iMAC stuff - I got a long way to go.  Any way, I glued and pinned the center portion of my breadboard end to the laminated maple top and let the front and rear edges float by forming elongated hidden slots into the tenons for engagement with the pin near to each edge.

Dave R.
 
Back
Top