martin felder
Member
- Joined
- Dec 17, 2019
- Messages
- 125
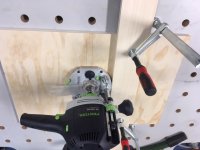
I found a new way to make dados (could also apply to rabbets). I can take and post pictures. I like the option of making a mark-scribe on the workpiece using some of the Woodpeckers squares as to where I want the dados. I can be sure it is square and I like the marking being visible.
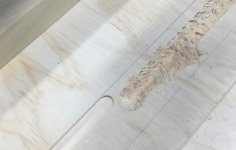
Then, I use a Festool 1400 loaded with a 7/16 downcut spiral. It is my experience and understanding that the downcut spiral has the least plywood tearout, but not as good of a chip evacuation as the uncut (benefit of the dust collection on the Festool). I set the bit for 1/4 depth (could be adjusted).
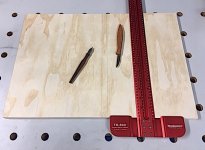
I place a rectangular block of wood up against another block of wood (the simple "jig" that is exactly the width of the distance between the edge of the rounded part of the base plate and the bit.
I line up the 2 pieces of wood to the marked line. Very precise. Then I clamp the block farthest from the line to my workpiece (hold down clamps) and then remove the "jig" block.
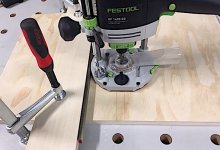
When I run the router along the edge of the clamped block, no tearout, and the cut is right on the marked-scribe line. However, then I need to make another pass if I do not want it to be 7/16. That is where these come in!
https://www.metals4uonline.com/tool-steel-flat-bar-stock-o1-SFLTSO1932x932
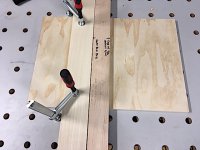
You can get metal bars in 18 inch length that are whatever thickness you want. Say I want to make a dado for 3/4 plywood. I use a 9/32 metal bar along the "fence" of the clamped bar, and on the second pass, the final width is the width of 3/4 plywood. I can use different metal bars for different widths. For example, 5/16 for a true 3/4.
Very easy. Very accurate. Not too much wood removed on a single pass. Also, I could not find a downcut spiral in plywood sizes, and so with this 1 bit, I can made dados from 7/16 to 3/4 with anything in between. Just a couple blocks of wood, 1 bit, a couple clamps, and some metal spacer bars.
For me that is better than a Festool track guide, Micro-fence, dado blades and shims.
Just a personal preference. FYI.
Then, I use a Festool 1400 loaded with a 7/16 downcut spiral. It is my experience and understanding that the downcut spiral has the least plywood tearout, but not as good of a chip evacuation as the uncut (benefit of the dust collection on the Festool). I set the bit for 1/4 depth (could be adjusted).
I place a rectangular block of wood up against another block of wood (the simple "jig" that is exactly the width of the distance between the edge of the rounded part of the base plate and the bit.
I line up the 2 pieces of wood to the marked line. Very precise. Then I clamp the block farthest from the line to my workpiece (hold down clamps) and then remove the "jig" block.
When I run the router along the edge of the clamped block, no tearout, and the cut is right on the marked-scribe line. However, then I need to make another pass if I do not want it to be 7/16. That is where these come in!
https://www.metals4uonline.com/tool-steel-flat-bar-stock-o1-SFLTSO1932x932
You can get metal bars in 18 inch length that are whatever thickness you want. Say I want to make a dado for 3/4 plywood. I use a 9/32 metal bar along the "fence" of the clamped bar, and on the second pass, the final width is the width of 3/4 plywood. I can use different metal bars for different widths. For example, 5/16 for a true 3/4.
Very easy. Very accurate. Not too much wood removed on a single pass. Also, I could not find a downcut spiral in plywood sizes, and so with this 1 bit, I can made dados from 7/16 to 3/4 with anything in between. Just a couple blocks of wood, 1 bit, a couple clamps, and some metal spacer bars.
For me that is better than a Festool track guide, Micro-fence, dado blades and shims.
Just a personal preference. FYI.