When you do get around to adjusting it, I'll share some tips from my very long, frustrating ordeal when I did mine.
It started as a simple, let me check my 45's and see if they're perfect. You set up a stop and cut all left hand 45's flipping the piece after each cut to make 4 triangles that go together. That makes any gaps 8 times the actually error of your saw. Mine was 3/8" off so I knew I needed to adjust it. I'll save all the problems I worked through and figured out (with a few phone calls to a great guy on here) and tell you what I ended up doing.
I spent 6 hours on a Saturday working on this and never finished it and learned a lot of stuff. The next Monday at work I did the whole process in about 40 minutes.
All material must be perfectly parallel on two sides for this to work properly (one of my mistakes)
I started with a piece probably 10" wide by 2' long. Cut it in half, and then flip one piece over, and cut again. Then you flip it back and butt the two pieces together and this shows you the error of the 90° cut multiplied by two because of the flip. You must start with getting 90 perfect, then do the 45's. Loosen all 3 screws but keep the outer two lightly snugged. Then you bump the saw left or right to adjust the error (very, very small bumps) and repeat all this till there is no gap. It took me 6 or 7 cuts the second day I tried this.
Tighten all 3 screws.
For the 45's I used material that was about 4 5/8" wide by usually 4' long. (Day one I almost filled a Brute trashcan with scrap...)
Set the saw to the left 45 and make a cut, then flip the board, slide it down, and make it that when you cut the next 45, you have around a 1/2" flat spot between the short point of the miters. This is helpful for assembly at the end. Set a stop block at this dimension and cut 3 more blocks. Then lay them all on a table and clamp the ends with Collin's clamps or the like and see if you have gaps at the long point or the short point.
If you need to adjust the 45, loosen the left screw and push the miter scale towards the saw if the gap was at the long point and pull it away from the saw if the gap is at the short point. Again, very small adjustments are needed.
I didn't adjust either of my 45's because one was almost perfect with no measurable error (I didn't have feeler gauges at the time, I do now.) and the other was close enough that since it was multiplied by 8 it wasn't worth touching.
Again, the second time I did this, it took under 40 minutes start to finish.
The first time was a long frustrating process but a very good learning experience for me. Hopefully this post will help somebody out a bit or save someone a bit of time.
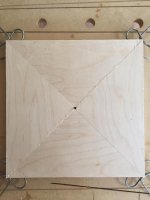
This is the left side 45.
[attachimg=2]
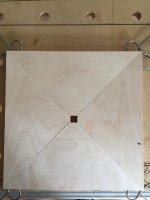
This is the right side 45.
[attachimg=4]