Kapex dust extraction not up to snuff

jeff.chandler

Member
Joined
Feb 4, 2014
Messages
7
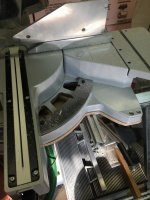
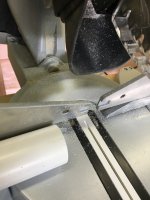
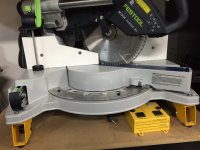
One of the reasons I purchased the Kapex was for its integrated dust collection capability.  I have mine normally connected to a CT mini, but also tried it with my CT 36.  In both cases I have a lot of dust in front of the blade and scattered around the sides and behind the saw.  I expected that there would be some dust, but certainly not this much.  Is there something I'm missing?  Hoping there is since I'm not satisfied with the current performance.
 
This is a recurring topic. Have a search on here and you'll find a few ideas and gripes on how best to rectify the issue. I think one of the best was an addition to the rubber boot of some broom type brushes, flexible and helped guide the dust better in the rubber boot to be sucked away. Also saw a pic of a cut out plastic pail placed behind the fence to capture it. Looks like it's a simple and easily made jig. An expensive saw with a cheap fix, seems necessary to some, others seem to happy with the amount of dust it gives, indeed praising it highly. Me I'm of the opinion whilst it's ok, its no better or worse than others I've tried that are hooked up to a vac. I'm thinking of cutting up a plastic bucket effectively making a scoop to capture it, and placing it behind the fence, at least it won't be all over the place then.
 
If you really want to know just how good the dust collection is on your Kapex try removing the vac and make a dozen or so cuts.
 
The cutting technique makes a lot of difference. You should pull the saw head towards you so it is in front of timber before plunging it down then push it back through the timber. This seems to send more of the dust in to the rubber boot then if you just use it like a chop saw dropping the blade straight down. Also the size and shape of the timber make a difference.

Doug
 
90% of your issue will be a combination of hose and cut technique.

A damaged or missing dust collection shroud will cause a real mess!

If you get really frustrated, put a video up of your cut process and result and hopefully we'll be able to provide some positive input.
 
Brice Burrell said:
If you really want to know just how good the dust collection is on your Kapex try removing the vac and make a dozen or so cuts.

Not to argue the point, but this would be true with any miter saw when disconnected from a vac.... in my limited use of my Kapex I have found it leaves behind about the same amount of dust as did my DeWalt miter saw.

I think it's quite difficult / impossible for any miter saw to collect all of the dust, including the Kapex. The bottom line is Festool sets a high expectation for the dust free environment, markets the Kapex with this high expectation, and as a result many end users find that expectation coming up short.

The fact so many people have jumped on the after market add-on of the bristle attachment further supports that issue.  I'm sure my old DeWalt's dust collection would greatly improve with the bristle add-on.

Some end users should perhaps place more weight on how the Kapex handles operationally; weight, function and features, rather than solely on the dust collection. 

Gary
 
Hmmm ... still think if you're not getting extremely good dust extraction with the KAPEX over most other mitre saws you may be doing something sub optimally!

No, it'll never be 100% with any mitre saw simple due to their nature ... but I have a very modest amount of clean up after using my KAPEX.

It is definitely relative to expectation ... but I'd say it collects ~95%
 
An "after market add-on of the bristle attachment" was mentioned above. Where is this offered?

I'm satisfied with the dust collection on my Kapex, but would welcome even better.
 
Birdhunter said:
An "after market add-on of the bristle attachment" was mentioned above. Where is this offered?

I'm satisfied with the dust collection on my Kapex, but would welcome even better.
[member=15289]Birdhunter[/member]

There was a thread here on FOG .  Erock did a review and you can order it from FastCap.

Also, if you do a bit of research, you can find other suppliers that sell the stuff.  I think McMaster-Carr lists it.

Mike A.
 
Thanks everyone for the replies.  I'll search for the remedies discussed and even consider the saw-stach type addition.  Since I work in my basement workshop, dust collection is a priority for me and when the dust collection on the Kapex was worse than my DeWalt, I was a bit deflated.  I agree with Baremeg55 about expectations.  Shame at this price point one has to pay for upgrades to improve a highly touted feature.
 
jeff.chandler said:
Thanks everyone for the replies.  I'll search for the remedies discussed and even consider the saw-stach type addition.  Since I work in my basement workshop, dust collection is a priority for me and when the dust collection on the Kapex was worse than my DeWalt, I was a bit deflated.  I agree with Baremeg55 about expectations.  Shame at this price point one has to pay for upgrades to improve a highly touted feature.

Which deWalt model?
(I have so little need for that sort of saw, so I would probably go with second best and save some $)
 
When I first started using the Kapex I was disappointed in the dust collection.  I thought that this isn't much better then the Ridgid I had been using.  So I broke out the Ridgid and connected the Festool vac to it, let it rip, and there was far more dust thrown into the air. 

I then realized, the Kapex does a pretty good job of collecting the dust and not allowing it to go all over the place.  Sure there is dust after using it but it's the larger pieces that fall in the immediate area and aren't blown all over the place.  Every other miter saw I've used makes a cloud of dust, has to be used outside, and hope that the wind doesn't blow it back in my face.  Not so with the Kapex.

Sure the Kapex isn't nearly as good as other Festool tools in dust collection but it gets the dangerous dust and does a better job then other miter saws.  I like being able to use a miter saw inside.
 
So, when I arrive at this stage of engagement, I usually put up the FWIW moniker because it means I'm probably starting to drift into the engineering netherworld which is great food for the engineers but boring for the mass populace. My wife just looks at me and scowls [tongue] and then tries to turn the discussion to golf.  [big grin]

So FWIW...I've been putting in some pvc plumbing and after cutting many 1 1/4", 1 1/2" and 2" sections of pvc, this is the amount of dust on the Kapex. This is pretty incredible considering what happens to positively charged tools and negatively charged pvc particles.
 

Attachments

  • 2661.jpg
    2661.jpg
    2.7 MB · Views: 749
  • 2662.jpg
    2662.jpg
    2.4 MB · Views: 613
This past weekend, I added the zero clearance insert (Betterly) made an auxilliary fence.  I had a sheet (yes you can buy 4x8 sheets now at Orange box store) of 1/2 Azek PVC left over from a project for an outdoor trailer, and decided I'd use it.  Planed it down to 10mm so the clamp foot would clear, and did roundovers on the outside edges.  Came out nice and won't be affected by moisture in any way, but boy it was a mess to clean up in my planer. 
Anyway, after adding these two things, I was pleasantly amazed how much the dust collection improved over not having the aux fence.  If you're worried about dust and haven't made one yet, add a fence. Doing this also totally  eliminated any tearout on cuts.
Fig
 

Attachments

  • IMG_0151.JPG
    IMG_0151.JPG
    548.1 KB · Views: 1,345
How does the auxiliary fence eliminate tear out?

Is it adjustable so that when you change the angle you can move the pieces in and out and align them with the edge of the cut?
 
because the workpiece being cut is supported all the way to the edge of the kerf on both sides by the aux fence, there is no tearout from the blade coming out the back side (or the bottom with the ZCI).  For a miter cut, just loosen the fence and slide it back when the angle is set.  For bevels, you'll have to move the fence out of the way, but you could make fences for common bevel cuts like flat 45 degree cuts; i.e make the two halves to join in the middle, lay the saw over, then slide through.  That would cut the appropriate matching angle on both fence sides. 
 
Yes, I realised not long after posting that the fences could be moved to give zero clearance.

Your pic threw me a bit, because of the angle of the blade you can't see that it is acting as a zero clearance fence.
 
Back
Top