I've wanted to make a pair of these for a while. I don't really need them, but I have always been drawn to the design and thought it would be a good opportunity to experiment with using some new-to-me techniques as well as trying a couple finishes out. I made a good number of mistakes along the way but they are still decent and the whole process was valuable.
The design on these is a basic trestle style, with a notched joint at the top to hold a replaceable upper part. The joinery is mostly mortise and tenon, some hidden and some through with wedges. I made them out of some ash i had picked up earlier this summer.
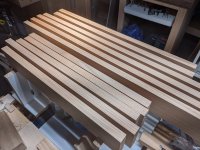
After some work to get a good face and edge, I ran everything through my planer to take it to final dimensions. I stood the parts on edge with lots of airflow around everything. My bench is a mess.
View attachment 1
Not captured here was the minor tedium of shooting the ends of every board w/ my plane. While I'm not trying to do an all handtool project, I don't really trust my miter saw at the moment and it's too noisy/dusty in the basement anyways. So some quality time spent w/ my low angle jack plane, shooting board, and the occasional stop to resharpen.
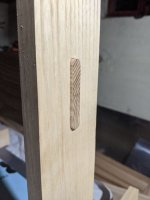
I've never done a mortise with a router before, so this was new to me. I used my OF1400 with the edge guide and a whiteside upcut bit. This bit was excellent and the dust collection was superb. I had built a small jig to create positive stops for the router, but I didn't account for the vacuum hose hitting it first. Since I didn't have the materials at hand, I just routed to the lines by eye. Another first for me. It went fine - perhaps 1/2 a mm over the line at most.
View attachment 2
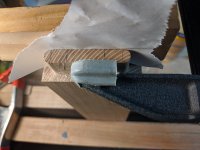
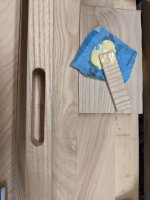
Next up was the tenons. I don't particularly enjoy cutting tenons by hand, as I don't have a proper tenon saw. My setup is a moxon vice and a veritas 14ppi dovetail saw. I recently filed it, so it was sharp, but ripping through 2.25" of ash is still not a great time. I mostly cut to the line, but there's always some cleanup to do and I think I may have been conservative w/ the marking gauge - they were all a bit fat. In one case, my chisel must have gone with the grain, as I ended up paring in about .06" too much on the side of one tenon cheek. I had some veneer on hand, so I built the cheek back up.
I also erred by being a bit too conservative with my tenon shoulders. I really should have made a deeper knife wall and just cut to the line. I wanted to avoid my crosscut saw chewing the shoulder with it's teeth, but a deeper knife wall would have mitigated that, and made the shoulder line more defined. Cleaning up shoulders with a chisel is a hassle, and I inevitably end up bruising the shoulder line somewhere.
View attachment 3
You can't see it well, but there's 2 layers of veneer being glued to the cheek, covered by wax paper, covered by some cork shelf liner, and then a piece of pine to distribute the pressure.
Some of the joints were a bit too tight. I didn't realize it at first, as they went together without a mallet and a bit of wiggling. I erred on the side of tightness because most of the time these joints end up a little looser than they should be when I cut them. I realize they were a bit too tight when I noticed the outside of one of the mortises bulging out slightly when the joint was together. I'm reasonably sure that's too tight. Some time with a rasp got me to a place where the joints went together firmly but no bulging... at least for now.
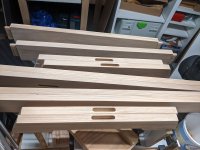
After all the joinery was done, I did some shaping with my very low quality bandsaw and my very high quality block plane. I am really looking forward to the day I can accommodate a nice bandsaw in my shop (or having a real shop, for that matter). Everything sanded to 150. I used the pro5 with 120 where I could get away with it, and then a mirka sanding block connected to a vac with some 150 abranet. I have some suspicions that the abranet might be at the end of it's useful life, which is a bit of a concern since I'm going to be using Rubio color oil for these, and that tends to be very dependent on consistent sanding.
View attachment 4
Yes, there is a bit of chipout on one of the feet.
A test fit:
View attachment 5
Not bad.. the through mortise looks pretty decent too:
View attachment 6
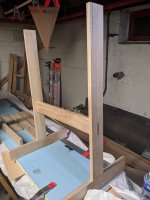
Lastly, during glueup. This glue up went well for the most part. Clamping the legs was easy enough - one clamp per foot/leg. I was able to almost completely avoid squeeze out by applying glue to the mortise walls completely, and only the first half of the tenon cheeks. However, a couple of my tenons definitely needed persuasion once the glue was one - they weren't going to seat completely with a clamp applying pressure. What I noticed after is that the bulging I mentioned earlier returned - so the side wall of the mortise on two of the feet is under some stress. I don't know whether this is going to be a blowout waiting to happen, or if the wood will eventually just .. conform.. we're talking about maybe a few thousandths of an inch, but it is noticeable if you run your finger over the outside face of the foot. I also dont know whether that tight of a fit means the glue joint ended up starved. I doubt it, my tenon cheeks are not that smooth.")
View attachment 7
It might be clear here, but the one wall of the mortise is just slightly thinner than the other. Not much, but apparently enough.
I didn't capture it, but I definitely had some tough luck with wedging the tenons. Most of them didn't drive in very far, and a number of them snapped while I was tapping them in. I have done wedged tenons before, but only with rectangular mortises, and usually without much (any) tapering. A couple things which I think contributed to this:
The design on these is a basic trestle style, with a notched joint at the top to hold a replaceable upper part. The joinery is mostly mortise and tenon, some hidden and some through with wedges. I made them out of some ash i had picked up earlier this summer.
After some work to get a good face and edge, I ran everything through my planer to take it to final dimensions. I stood the parts on edge with lots of airflow around everything. My bench is a mess.
View attachment 1
Not captured here was the minor tedium of shooting the ends of every board w/ my plane. While I'm not trying to do an all handtool project, I don't really trust my miter saw at the moment and it's too noisy/dusty in the basement anyways. So some quality time spent w/ my low angle jack plane, shooting board, and the occasional stop to resharpen.
I've never done a mortise with a router before, so this was new to me. I used my OF1400 with the edge guide and a whiteside upcut bit. This bit was excellent and the dust collection was superb. I had built a small jig to create positive stops for the router, but I didn't account for the vacuum hose hitting it first. Since I didn't have the materials at hand, I just routed to the lines by eye. Another first for me. It went fine - perhaps 1/2 a mm over the line at most.
View attachment 2
Next up was the tenons. I don't particularly enjoy cutting tenons by hand, as I don't have a proper tenon saw. My setup is a moxon vice and a veritas 14ppi dovetail saw. I recently filed it, so it was sharp, but ripping through 2.25" of ash is still not a great time. I mostly cut to the line, but there's always some cleanup to do and I think I may have been conservative w/ the marking gauge - they were all a bit fat. In one case, my chisel must have gone with the grain, as I ended up paring in about .06" too much on the side of one tenon cheek. I had some veneer on hand, so I built the cheek back up.
I also erred by being a bit too conservative with my tenon shoulders. I really should have made a deeper knife wall and just cut to the line. I wanted to avoid my crosscut saw chewing the shoulder with it's teeth, but a deeper knife wall would have mitigated that, and made the shoulder line more defined. Cleaning up shoulders with a chisel is a hassle, and I inevitably end up bruising the shoulder line somewhere.
View attachment 3
You can't see it well, but there's 2 layers of veneer being glued to the cheek, covered by wax paper, covered by some cork shelf liner, and then a piece of pine to distribute the pressure.
Some of the joints were a bit too tight. I didn't realize it at first, as they went together without a mallet and a bit of wiggling. I erred on the side of tightness because most of the time these joints end up a little looser than they should be when I cut them. I realize they were a bit too tight when I noticed the outside of one of the mortises bulging out slightly when the joint was together. I'm reasonably sure that's too tight. Some time with a rasp got me to a place where the joints went together firmly but no bulging... at least for now.
After all the joinery was done, I did some shaping with my very low quality bandsaw and my very high quality block plane. I am really looking forward to the day I can accommodate a nice bandsaw in my shop (or having a real shop, for that matter). Everything sanded to 150. I used the pro5 with 120 where I could get away with it, and then a mirka sanding block connected to a vac with some 150 abranet. I have some suspicions that the abranet might be at the end of it's useful life, which is a bit of a concern since I'm going to be using Rubio color oil for these, and that tends to be very dependent on consistent sanding.
View attachment 4
Yes, there is a bit of chipout on one of the feet.
A test fit:
View attachment 5
Not bad.. the through mortise looks pretty decent too:
View attachment 6
Lastly, during glueup. This glue up went well for the most part. Clamping the legs was easy enough - one clamp per foot/leg. I was able to almost completely avoid squeeze out by applying glue to the mortise walls completely, and only the first half of the tenon cheeks. However, a couple of my tenons definitely needed persuasion once the glue was one - they weren't going to seat completely with a clamp applying pressure. What I noticed after is that the bulging I mentioned earlier returned - so the side wall of the mortise on two of the feet is under some stress. I don't know whether this is going to be a blowout waiting to happen, or if the wood will eventually just .. conform.. we're talking about maybe a few thousandths of an inch, but it is noticeable if you run your finger over the outside face of the foot. I also dont know whether that tight of a fit means the glue joint ended up starved. I doubt it, my tenon cheeks are not that smooth.
View attachment 7
It might be clear here, but the one wall of the mortise is just slightly thinner than the other. Not much, but apparently enough.
I didn't capture it, but I definitely had some tough luck with wedging the tenons. Most of them didn't drive in very far, and a number of them snapped while I was tapping them in. I have done wedged tenons before, but only with rectangular mortises, and usually without much (any) tapering. A couple things which I think contributed to this:
- These tenons had flared rounded mortises. Flaring the mortise with a file was a bit of a struggle.. perhaps if I had a 3/8" round file, it would have been easier. With a 1/4" round file, it was a lot of work not to start creating grooves.
- I used my dovetail saw to cut the slots in the tenon for the wedges. Previously I have always done this with a bandsaw. I suspect the difference in kerf probably would have helped get a deeper seated wedge.
Attachments
-
 IMG_20200722_222820.jpg417.7 KB · Views: 219
 -
 IMG_20200730_214915.jpg246.7 KB · Views: 218
 -
 IMG_20200730_214821.jpg298.2 KB · Views: 198
 -
 IMG_20200801_153136.jpg341.8 KB · Views: 261
 -
 IMG_20200730_214655.jpg517.5 KB · Views: 250
 -
 IMG_20200730_214634.jpg518.8 KB · Views: 258
 -
 IMG_20200801_160148.jpg546.9 KB · Views: 224