latest cutting board creation - updated photos

HowardH

Member
Joined
Jan 23, 2007
Messages
1,572
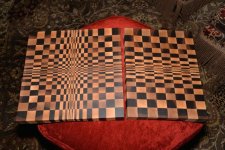
Well, I didn't come up with the idea, I got it from the Russian fellow, MTMwood.  Sorry about the color, I didn't have the chance to use my Nikon and used my iPhone instead so the color and WB is all messed up.  Used maple and walnut.  I couldn't have done it without my new Supermax 19-28 sander.  It worked like a champ to level it.  The cool thing about this design is once you have the boards cut, you can arrange the strips in different ways to change up the look.  Titebond III is the only way to go because you need the open time to get all these strips glued, aligned and clamped up before the glue begins to set.


Attachments

  • xlatest board.jpg
    xlatest board.jpg
    219.5 KB · Views: 630
Great job!!

I wonder what the hazards are of cutting on a board that makes you dizzy while you stare at it...  [eek]
 
live4ever said:
Great job!!

I wonder what the hazards are of cutting on a board that makes you dizzy while you stare at it...  [eek]

Ditto on the great job.
I have an eye problem and the darned board was actually moving and fluctuating as i looked at it.  The darned thing would not stay still.  I am glad somebody else had the same problem.  I know now that somebody else is seeing what i see.  :o
What a job it must have been to lay out, cut, glue and clamp and not make a huge gloppy mess.
Tinker
 
It WAS a big sloppy mess!  [big grin] [big grin]  What helped keep it all aligned was the Peachtree wall panel clamp system.  I set up a melamine table right next to it and I'd apply the glue to 5 or 6 strips and then transfer them to the panel clamp.  Probably only took 5-6 minutes but it seemed like forever as panic would begin to set in over the last few strips.  I haven't figured out who to give it to yet but I hope it doesn't make them throw up on it.  That would be bad news! [blink] [blink]
 
Howard,
Check first.  I bet it could happen.
I have had eye problems all my life.  Since age twelve, when I got them partially corrected, i have been seeing double.  That board really does make me dizzy.  For the last few years since getting rid of my cadilacs, i have a new sensation.  Every once in a while, I get a situation where my eyes act like a kaleidoscope and everything in the periphery begins to spin in several directions at once. The Eye Doc tells me I am having a migraine.  No headaches, but the spinning is there.  I will look at that board when I am having one of those and maybe i will put the spinning into reverse. :o ::)

I think we will just blame it all on your camera.  [mad] [dead horse]
 
Great job Howard!  I think I came across his YouTube Channel a week or so ago and have resigned my self to trying at least one of his designs.  Not your average cutting board for sure.

Peter
 
This design isn't all that much different than Marc Spagnoulo's design.  The twist was after you cut the first glue up and then turn them on edge.  Then you cut them again to create the different thicknesses of the other sides.  I learned two things from this designer that made it go together much easier:  1.  Cut all the strips 2 mm wider than necessary at the table saw then plane them down to the final size.  That way, each one is perfect in relation to its mate.  It's essential to get the edges to line up right.  Mine aren't perfect but pretty close.  2.  This goes back to #1 a bit and is more a safety issue as I started using the band saw to cut strips when the width of my primary strips got to narrow to safely do on the table saw, even with my slider.  Having that 2 mm cushion meant I didn't have to have a glue ready surface after the cut which is hard to get with a bandsaw.  It also helped to have the drum sander as I could run the 4mm and thinner strips through that to arrive at my final thickness.  I wasn't comfortable going that thin through my A3-31 with the very expensive spiral head.  It also allowed me to get the board absolutely flat after each glue up.  I want to try out a few more of his designs.  Funny thing is after I give them away no one ever uses them!  They don't want nick them up.

Tinker, I know what you mean.  I get vertigo once in a while and it's not a pleasant feeling.  This guy has some other designs that would really get your head spinning.
 
Nice job, Howard!  Do all the crumbs roll into the middle of the board?  [big grin]
 
That looks awesome!  I've been watching MTM's channel for quite a while. It's impressive stuff!
 
Got my Nikon D610.  Much better photo!  This is how it really looks with it's sister board.  All kinds of ways you can change it.  I love building cutting boards!  No one ever seems to use them.  Can't seem to get that across that they built to be used, not looked at. 


Attachments

  • new boards.jpg
    new boards.jpg
    71.9 KB · Views: 346
HowardH said:
I couldn't have done it without my new Supermax 19-28 sander.

It's hard to explain to people how much you'll use a SuperMax drum sander once you have one. I think I use mine more than any individual Festool in my shop - except maybe the DE, since that gets used with all of the Festools and some others as well.

They are amazingly versatile machines, and they're actually FUN to use! It's even more fun to sand with the SuperMax than it is with the ETS! Of course, I *might* be a bit biased.

If anyone is contemplating a SuperMax purchase, send me a PM and I'll 'hook you up'.

 
I agree.  It's a fantastic machine!  Everything comes out perfectly flat.  I only got up to 120 grit and it definitely leaves scratches but the RO150 takes care of those.  The paper loads up really fast so you have to use a rubber cleaning block after a couple of passes. 
 
HowardH said:
I agree.  It's a fantastic machine!  Everything comes out perfectly flat.  I only got up to 120 grit and it definitely leaves scratches but the RO150 takes care of those.  The paper loads up really fast so you have to use a rubber cleaning block after a couple of passes.

The paper should NOT be loading up like you're indicating. If the paper is loading up, you're either taking too big of a 'bite' or not using the right paper. I'm assuming you're using their paper, so I'd back off on the depth of the cut you are taking.

I do use a rubber cleaning block on my abrasives, but it's generally if the wood is dirty (think old flooring boards) or contaminated (think paint or poly finish) or has a lot of resin (think pine or other sapwood). BUT - I maybe use it once every 25 passes or something like that.

If I'm working with new, decent quality hardwood (oak, walnut, cherry, etc.) I can go the whole day and never use the 'magic eraser'.
 
thanks for the tip.  I am using their pre-cut paper and I wrapped it as tight as I could.  I'll try a smaller bite.  I have been using about 16" of it at times so that may have something to do with it. 
 
Also, since I can't see what you're doing, be sure that you run the boards through at a slight angle when you are sanding along the grain. Instead of feeding them 90 degrees to the drum, run them maybe 60-75 degrees - i.e., slightly off from a straight feed.

Wood fibers cut best when they are sliced at an angle. (Sandpaper is really a cutting surface, with hundreds of renewable cutting edges per inch.) If you run at 90 degrees (i.e. with the grain) you're essentially 'peeling' the fibers instead of cutting them. That alone can cause the abrasive to clog, since it's building up strings that are not being cut. Think of trying to cut a banana peel lengthwise - you just end up with strips and strings.

When you're sanding end grain, though, this is not a concern since you're ALWAYS cutting fibers instead of peeling them.

Let me know if either of my suggestions help, and if there is anything more I can do.
 
Back
Top