LR32 Work Bench Ideas

I’ll be using my LR32 in the near future and hadn’t considered making any jigs to simplify things but this thread has me thinking ...

I was considering mounting the holy rail to my Incra fence rails, zeroing out the magnetic scale, drilling the first holes at 37mm, zeroing the scale again, and then easily moving the fence in precise increments of 32mm.  While this could work well, assuming I can print some mounts and get things to stay square, I thought about another idea ...

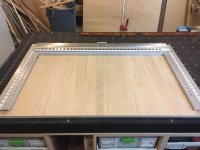
I like the idea of using the MFT/3 with its 96mm spacing which is divisible by 32mm. I’m thinking I can replace the regular rail with the holy rail (since it’s 55” I’d buy an extra swivel and mount it so the regular rail and holy rail could easily be swapped), raise it up just above the material, square it with dogs/triangle, and clamp the front raiser. I’d then space some dogs in the holes in front of the fence and keep the material pushed up against the dogs. I’d then put dogs parallel with the fence and keep the material pressed to it. Holes would be drilled, the board would be moved Right, dogs moved Right, and more holes drilled. This seems rather easy but would require a few things ...

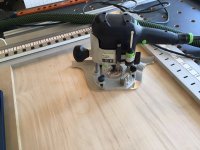
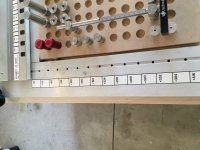
The holy rail would have to be aligned Left/Right so that the router bit lands on 37mm from the front of the board with the board butted up against the vertical dogs. Since the Left/Right position is arbitrary it seems this could be set and used for regular cutting as well as for making shelf pin holes. The next thing would be the fence would need to be aligned Front/Back so the holes have the correct offset in relationship to the Top/Bottom of the board which is pushed up to the horizontal dogs in front of the fence. This is also adjustable to some degree and I assume is feasible. Other than aligning the holy rail, it seems you may want 2x 32mm width boards in case you desire some holes which don’t fall on increments of 96mm.  If your offset from the Top/Bottom of the board always stays the same, it seems this would be very repeatable and is easily adjustable for various board thicknesses...
 
Im not sure I fully followed but that method sounds like it will limit the panel size you are capable of doing.  Not sure what an "extra swivel" is so Im not 100% sure im picturing this in my head correctly but... Another option to drilling all the extra holes in the MFT is to take 2 scraps of plywood and drill a 25mm eccentric hole so it fits over the shoulder of the dog.  You could either drill the hole off center so it would give you 4 different setbacks simply by rotating the block or trim the blocks after (which would probably be easier).  One side would be the the odd dimension to get the first row at the 37mm mark ( the other poster mentioned 22mm) and then add 32 and 64 to 22 to get the increments between the 96mm holes the 4th side you could make to give the correct setback for the cup hinge. I had thought about doing this instead of using the infinitely adjustable stops I currently use and truthfully I probably still would for doing true 32 stuff, if I was going to continue using the LR32 system.  However there are some times you might not always need or want everything based on 32mm or set back 37mm . I also prefer to have the stops to the back of the piece not at the front and no rail dogs that could make it more difficult or slow the swapping of the gable.  However that's just my personal preference. If you did do the eccentric stop block you would have to reference the doors from the front since they will vary and not follow the 37mm setback which will require different sized spacer or more custom dogs. 

 
savsuds said:
tsmi243 said:
savsuds said:
I started adding a row of 20 mm dog holes spaced 32 mm apart at each end of my 4'x8' MFT (I have 60+ mm spacing from the edges of the top due to the 4080 extrusions acting as the top's framework). I have plenty of guide rail dogs to play around with the idea. I would need a 5 mm spacer to make the first row 37 mm off the front.

EDIT: Added two rows of 32mm spaced dog holes in the middle so I can use my 1400mm LR32 rail. When I receive the 7mmx7mm flat bars I will update again.

Definitely keep us posted on this.  Great idea.
It turned out much simpler than I thought. I only need a 7mm spacer or 22mm spacer depending on what I am using as a reference stop. I need a 7mm spacer when I use my TSO TDS-10 to set the panel 37mm away. I use guide rail dogs and put the LR32 1400 rail into the 7th 32mm dog hole. If I use a UJK Guide Pup, I need a 22mm spacer the set the panel. Shift the rail how ever number of dog holes for your next row. since they are 32mm apart.

I am looking to get a local CNC shop to chop half of the top off a couple dogs to move the rail to the 6th row to get the first row 37mm.

couple questions.  How are you handling the back holes?  I see how the front 37mm holes are done.  If i'm understanding correctly you then move the rail "X" holes back (away) from you to get the desired 32mm increment.  doesn't this place the rail so its hanging off the back of the gable?  Im assuming you slip some scraps under it to keep it flat and supported.  Also doesn't that put the rail somewhat rearward (about mid table) requiring leaning over the bench ? Not a big deal if you are young, but anyone who has batched out a half dozen or so tall 8'ish gables will be much happier working 6" back from the front instead of leaning way over. A few panels would be ok but anything more forget about it.  Or are you flipping the gable so the back side is facing you? but if so won't that affect the custom spacer dimension since the last row is rarely the same 37mm from the back?  Oh and then what about the doors since those arnt 37mm.  Do you do your doors on the LR32 too? 
 
afish said:
Im not sure I fully followed but that method sounds like it will limit the panel size you are capable of doing.  Not sure what an "extra swivel" is so Im not 100% sure im picturing this in my head correctly but... Another option to drilling all the extra holes in the MFT is to take 2 scraps of plywood and drill a 25mm eccentric hole so it fits over the shoulder of the dog.  You could either drill the hole off center so it would give you 4 different setbacks simply by rotating the block or trim the blocks after (which would probably be easier).  One side would be the the odd dimension to get the first row at the 37mm mark ( the other poster mentioned 22mm) and then add 32 and 64 to 22 to get the increments between the 96mm holes the 4th side you could make to give the correct setback for the cup hinge. I had thought about doing this instead of using the infinitely adjustable stops I currently use and truthfully I probably still would for doing true 32 stuff, if I was going to continue using the LR32 system.  However there are some times you might not always need or want everything based on 32mm or set back 37mm . I also prefer to have the stops to the back of the piece not at the front and no rail dogs that could make it more difficult or slow the swapping of the gable.  However that's just my personal preference. If you did do the eccentric stop block you would have to reference the doors from the front since they will vary and not follow the 37mm setback which will require different sized spacer or more custom dogs.

Panels would be laid down on the MFT/3 with their Front/Back facing the fence and butted up to dogs in the back row of holes which allows for around 26" deep panels.

Since the holy rail is 55" and the MFT/3 rail is 42", I'm saying that if you do not wish to have an extra 13" of rail permanently hanging off the MFT/3, you could buy an extra rear swivel bracket, mount it to the holy rail, and then as needed, slide off the stock rail, slide on the holy rail up to the end stop, lock it down, and you're ready to go.

Since the rail can be adjusted Forward/Backward when loosened from the rear swivel bracket, the Front/Rear starting hole locations can be adjusted in this way.  In my case, I'd have the first hole at 5mm from the top of the board so the 2nd hole would give me 37mm offset but you could set it up for a different offset, use the block method for various different offsets, with ability to flip the panel Front/Back orientation.

The point of the LR32 is that drawer slides, hinges, etc. are spaced 32mm apart ... what hardware are you using that isn't in increments of 32mm?

With regards to using dogs, swapping the gables are as easy as lifting the rail, laying down a new panel, and sliding it up to the dogs by the fence.  The only thing which would be slow or inconvenient about using dogs is you have to continually move the horizontal dogs which are parallel to the fence, as you want to move the panel Left/Right to drill out the next drawer slide.  This isn't so bad for drawer slides but if you're just making a bunch of holes for adjustable shelving it would become tedious.  In this case I suspect it would be better to set the rail up with rail dogs so it can be used both horizontally and vertically and may require various blocks to quickly get the correct offsets.

At the end of the day, it's nice to have a process which is easily repeatable months or years later without a lot of thinking involved ... while this can speed things up, it's definitely got its quirks about it.
 
I dont use an MFT/3 only a 4x8 workbench with 20mm holes thanks to parf guide.  So Im not familiar with how the festool bracket adjusts or works. sounds similar to how I use the the adjustable wood stops.  Yes you are right all hardware is based on 32mm spacing.  My main complaint with using the LR32 was with those adjustable setback guides that give you the 37mm from the front edge or whatever distance you need be it for the back row or mid panel row if needed.  However depending on what you are making the back row and mid row if you are doing one can and will vary.  The 32mm spacing vertically never does. However some blum hardware needs an odd spaced hole at the top and bottom but typically the 37mm setback frorm the front edge is always done on the gable panel.  It might change if you where doing a bookcase or something and weren't using hinges and trying to hide the holes more.  I have done some garage cabinets that had custom depths to accommodate certain totes so the depth of the cabinet might not always be in an increment of 32 However I still try to keep the height of the gable divisible by 32mm. That way I dont need a long holly rail and if cut correctly the festool end stops lock the panel in place vertically eliminating any possibility of error.  Im not a big fan of the rail dogs as it can make lifting the rail up finicky but I guess that would depend on the fitment of the dogs but it seemed like I had to lift it just right or it would bind up.  I also dont like the just lift up the rail a little method and slide the panel out since that could scuff up or scratch a prefinshed panel.
 
afish said:
How are you handling the back holes? I see how the front 37mm holes are done.  If i'm understanding correctly you then move the rail "X" holes back (away) from you to get the desired 32mm increment.

So far I have only done cabinets 12 inches and 24 inches deep. The 12 inch ones only had shelf pin holes. The 24 inch ones I used 20 inch drawer slides. The rail dogs go into the 8th row from the front. The 17th row gets me 357 mm and the 20th row gets me 453 mm. The 17th row is basically the midpoint of my 4'x8' table. A reach of 2 feet does not hurt my back, but I am only 49 yrs old and others experiences may vary. I do however have a tilting MFT top where I can raise the front side 12 inches up and just work from the back side by flipping everything.

afish said:
doesn't this place the rail so its hanging off the back of the gable?  Im assuming you slip some scraps under it to keep it flat and supported.  Also doesn't that put the rail somewhat rearward (about mid table) requiring leaning over the bench ? Not a big deal if you are young, but anyone who has batched out a half dozen or so tall 8'ish gables will be much happier working 6" back from the front instead of leaning way over. A few panels would be ok but anything more forget about it.  Or are you flipping the gable so the back side is facing you? but if so won't that affect the custom spacer dimension since the last row is rarely the same 37mm from the back?  Oh and then what about the doors since those arnt 37mm.  Do you do your doors on the LR32 too?

I place a scrap piece under the guide rail to help support it normally only in the middle. If you look closely at the pictures, I have a BenchDogs UK collar set at 19 mm to support the rail at the holes. 1 mm over the 18 mm plywood has had little to no effect on the accuracy that I have noticed so far. The guide dogs are also from BenchDogs UK and are snug but not super tight like the TSO close fit dogs.

My doors are 37 mm from the front so far. But, I have only done frameless full overlay hinges to date.

When I made the holes for the SYS-AZ drawer cabinets, I did have to use a series of stops that I set up for the 58 mm and 286 mm rows.

I have since purchased the Schmitt 32 system AM42, but the cost is pretty high. I also added 25 mm holes in a row below the AM42 so that I can slide the board over a couple dog holes to hold it in place.

EDIT: When doing panel longer than 1400 mm since I made the right side of my MFT mirror the left. I can move the 1400 LR32 rail and continue from the other end and go right to left if my panels were cut to a length divisible by 32. That is in theory since I have never done that. I believe just by setting the right stop to 32 mm on the rail, thereby eliminating the need for a longer LR32 rail.
EDIT2: I guess I could also use 5mm steel pins to register the 1400 rail for the next section, then remove before continue cutting the next holes.
 

Attachments

  • 118001891_3246537812071526_400814049120955914_n.jpg
    118001891_3246537812071526_400814049120955914_n.jpg
    63.3 KB · Views: 340
savsuds said:
afish said:
EDIT: When doing panel longer than 1400 mm since I made the right side of my MFT mirror the left. I can move the 1400 LR32 rail and continue from the other end and go right to left if my panels were cut to a length divisible by 32. That is in theory since I have never done that. I believe just by setting the right stop to 32 mm on the rail, thereby eliminating the need for a longer LR32 rail.

Yes that theory will work. I have done many gable panels over 1400mm this way with a single 55" rail. Since festool doesnt make a 118" holly rail... It works good you just have to come up with a way to secure the one end of the rail that will be out in the middle of the gable. This is one instance were a parallel guide would come in handy.  I also make a mark on the rail so I drill up from the bottom and down from the top the same number of holes across all the panels.  This way if there is a minor difference the error would be in the same spot and wouldnt cause any issues such as rocky shelves.  Since most of my tall stuff has 4 hinges on the door and the layout break is more in the middle of the panel there's no issue but most hardware would still probably work if you ended up with one set of holes 31.5mm apart worst case scenario.
 
I would suggest checking out the Schmitt 32 System The AM 42 just flew threw some holes for me. Placed the jig on the MFT, attached the base to my OF-1010 and went to town. 187 holes in less than 10 minutes. 11 rows 17 columns.

EDIT: 15-20 dogs not shown in the picture.
 

Attachments

  • IMG_1291.JPG
    IMG_1291.JPG
    826.3 KB · Views: 351
  • IMG_1292.JPG
    IMG_1292.JPG
    819.4 KB · Views: 355
  • IMG_1293.JPG
    IMG_1293.JPG
    960.1 KB · Views: 369
Back
Top