jonny round boy
Member
- Joined
- Jul 21, 2007
- Messages
- 3,227
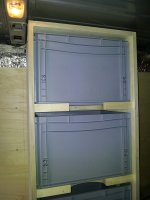
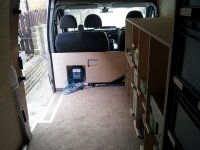
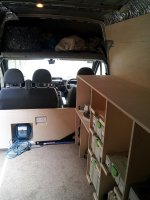
Here are pics of my van - I got it about 6 weeks ago, stripped out the existing lining, cleaned it up, and started fresh (if you think that's OTT, here's what it looked like under the old floor):
[attachimg=8]
[eek]
The van, as well as being for work, is going to serve as a part-time camper so as well as being fully ply-lined it's fully insulated, too. I haven't done the roof yet though... ...or the doors... [embarassed]
I wanted the best balance of storage vs. floor space, so decided (at least for the time being) to keep all the cabinets to one side, and as flat as possible. That way I can still fit cabinets and/or sheet materials in.
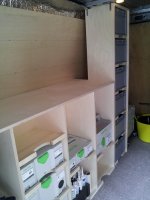
On the driver's side (that's the RIGHT side!), starting at the back, there is a floor-to-ceiling cabinet with euro containers to hold all my plumbing & electrical bits & pieces:
[attachimg=1]
This is set in from the side to allow my Little Giant ladders to slide down the back over the wheel arch:
[attachimg=2]
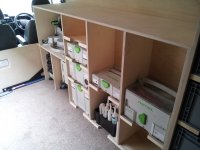
Then, further forward, is a sys-port:
[attachimg=3]
I've still to make a few more shelves for the systainers. They're fixed in place with Kreg screws from the underside, so if needed they can be quite easily moved in the future. At the back of this section, behind the systainers & under the ladders, there are a couple of small compartments to hold long-term 'van' stuff that I don't need quick access to, such as oil/screenwash, jump leads, 12v tyre compressor, etc. I didn't want much space wasted!
And then at the front there's storage for my Kapex, CT Mini (there's also room to fit a midi instead, in case I ever change it) and my plumbing kit on a roll board. The shelf for the kapex has 20mm blind holes drilled for the feet, so it can't slide around:
[attachimg=4]
[attachimg=5]
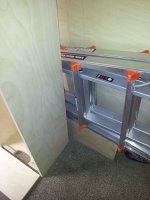
I removed the original steel bulkhead, and replaced it with a plywood half-bulkhead:
[attachimg=6]
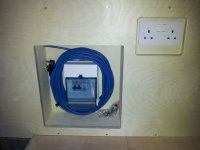
This bulkhead is re-enforced on the back (or the front, depending on which way you look at it!) and incorporates a small consumer unit and extension cable, so I can plug the van in to the house & have mains power (this will eventually have a door on it):
[attachimg=7]
The CU will also power a permanently-fitted battery charger, attached to the second battery. I did think about fitting an inverter, but to get a decent enough one to power my Festoys (ie a large capacity true sine-wave one) would be WAY too costly!
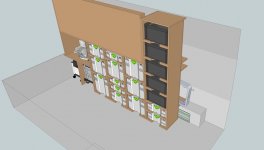
As I said above, this van will be a part-time camper, for use when working away or for the occasional weekend with the Mrs. The reason for the large, flat area above the kapex & systainers is because I'm going to incorporate a fold-down bunk. Here's the sketchup drawings:
[attachimg=9]
[attachimg=10]
Originally the bunk was going to be permanent, but it intruded too far into the space so I decided it had to be fold-away. I couldn't find any suitable fold-out mechanism that wouldn't need some kind of modification, so I've designed my own. It's very simple, but I need to make a mock-up first to make sure it will actually function correctly!
I'm not sure what to do with the over-cab storage area yet:
[attachimg=11]
I'm thinking of fitting a small microwave in there, and maybe storage for bedding & such. Don't know yet...
For when I go away in it with the other half, she'll sleep on a mattress on the floor - during the day this will then store down the back where the ladders usually live. All our camping gear will be stored in euro-containers, so we can just switch them out with the ones in the van & the systainers.
I've been careful to design all this so everything is securely fixed into structural elements of the van - don't want a kapex in the back of the head in the event of a crash! [scared] Future developments will hopefully include getting the roof insulated & lined, installing the bunk, and some nice LED lighting strips to replace the dim, feeble factory fittings. Eventually I also want to add a window in the sliding door, as well as an awning over it.
[smile]
Jonathan
[attachimg=8]
[eek]
The van, as well as being for work, is going to serve as a part-time camper so as well as being fully ply-lined it's fully insulated, too. I haven't done the roof yet though... ...or the doors... [embarassed]
I wanted the best balance of storage vs. floor space, so decided (at least for the time being) to keep all the cabinets to one side, and as flat as possible. That way I can still fit cabinets and/or sheet materials in.
On the driver's side (that's the RIGHT side!), starting at the back, there is a floor-to-ceiling cabinet with euro containers to hold all my plumbing & electrical bits & pieces:
[attachimg=1]
This is set in from the side to allow my Little Giant ladders to slide down the back over the wheel arch:
[attachimg=2]
Then, further forward, is a sys-port:
[attachimg=3]
I've still to make a few more shelves for the systainers. They're fixed in place with Kreg screws from the underside, so if needed they can be quite easily moved in the future. At the back of this section, behind the systainers & under the ladders, there are a couple of small compartments to hold long-term 'van' stuff that I don't need quick access to, such as oil/screenwash, jump leads, 12v tyre compressor, etc. I didn't want much space wasted!
And then at the front there's storage for my Kapex, CT Mini (there's also room to fit a midi instead, in case I ever change it) and my plumbing kit on a roll board. The shelf for the kapex has 20mm blind holes drilled for the feet, so it can't slide around:
[attachimg=4]
[attachimg=5]
I removed the original steel bulkhead, and replaced it with a plywood half-bulkhead:
[attachimg=6]
This bulkhead is re-enforced on the back (or the front, depending on which way you look at it!) and incorporates a small consumer unit and extension cable, so I can plug the van in to the house & have mains power (this will eventually have a door on it):
[attachimg=7]
The CU will also power a permanently-fitted battery charger, attached to the second battery. I did think about fitting an inverter, but to get a decent enough one to power my Festoys (ie a large capacity true sine-wave one) would be WAY too costly!
As I said above, this van will be a part-time camper, for use when working away or for the occasional weekend with the Mrs. The reason for the large, flat area above the kapex & systainers is because I'm going to incorporate a fold-down bunk. Here's the sketchup drawings:
[attachimg=9]
[attachimg=10]
Originally the bunk was going to be permanent, but it intruded too far into the space so I decided it had to be fold-away. I couldn't find any suitable fold-out mechanism that wouldn't need some kind of modification, so I've designed my own. It's very simple, but I need to make a mock-up first to make sure it will actually function correctly!
I'm not sure what to do with the over-cab storage area yet:
[attachimg=11]
I'm thinking of fitting a small microwave in there, and maybe storage for bedding & such. Don't know yet...
For when I go away in it with the other half, she'll sleep on a mattress on the floor - during the day this will then store down the back where the ladders usually live. All our camping gear will be stored in euro-containers, so we can just switch them out with the ones in the van & the systainers.
I've been careful to design all this so everything is securely fixed into structural elements of the van - don't want a kapex in the back of the head in the event of a crash! [scared] Future developments will hopefully include getting the roof insulated & lined, installing the bunk, and some nice LED lighting strips to replace the dim, feeble factory fittings. Eventually I also want to add a window in the sliding door, as well as an awning over it.
[smile]
Jonathan
Attachments
-
 20140313_163216.jpg273.6 KB · Views: 1,991
 -
 20140313_154658.jpg305.8 KB · Views: 1,823
 -
 20140316_090231.jpg285.5 KB · Views: 1,818
 -
 20140316_090219.jpg312.9 KB · Views: 1,852
 -
 20140316_090244.jpg298.1 KB · Views: 1,855
 -
 20140316_090302.jpg332.7 KB · Views: 1,769
 -
 20140216_172317.jpg2.4 MB · Views: 2,284
 -
 20140209_150827.jpg3.3 MB · Views: 2,638
 -
 TransitInterior02.jpg101.4 KB · Views: 1,744
 -
 TransitInterior04.jpg108.7 KB · Views: 1,880
 -
 20140316_090253.jpg330.3 KB · Views: 1,801