MFS Clamping

Joined
Oct 25, 2013
Messages
431
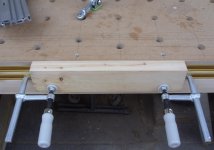
Low T-track to clamp the work piece at worktop height.

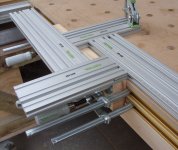
High T-track can then be used to clamp MFS on RH side 90* bracket independently of work piece while another squeeze clamp locks the back end of the MFS down to the worktable.


Attachments

  • SDC13092.JPG
    SDC13092.JPG
    561.9 KB · Views: 1,604
  • SDC13094.JPG
    SDC13094.JPG
    1.8 MB · Views: 4,322
you probably explained the reasoning and benefit of alternately off-setting that first row of 20mm holes in your worksurface - can you post a link to the explanation or show it here?
thanks
Hans
 
TSO Products said:
you probably explained the reasoning and benefit of alternately off-setting that first row of 20mm holes in your worksurface - can you post a link to the explanation or show it here?
thanks
Hans

The two rows of holes are for pressing the work piece up to so the Domino can be used. There's two rows so 2 different sizes of wood can be held in place. 69mm and 47mm overhangs the worktop 2 - 3mm so the Domino will never hit the work table regardless of cutter height.
 
More inspiring work Ian. You really do put some thought into the improvements you make to workflow and tool operations.
 
Thank you for the kind words Mr Martin.

I meant to include in the original post that it's most useful when you forget to rout in the hinge recesses and the cupboard door is assembled. But if it's used on just the stile it's still quicker than what I was doing as the piece stays clamped and the MFS jig is now very easily moved to the next hinge location. Trying to clamp work piece and MFS simultaneously to the vertical while ensuring the whole thing is level with your work surface is not easy, especially if it's a complete door. I've tried many ways to clamp the MFS, I've always managed somehow to clamp it at 2 locations, but this is the best way I've found.

 
Woodwork Wizard said:
Thank you for the kind words Mr Martin.

I meant to include in the original post that it's most useful when you forget to rout in the hinge recesses and the cupboard door is assembled. But if it's used on just the stile it's still quicker than what I was doing as the piece stays clamped and the MFS jig is now very easily moved to the next hinge location. Trying to clamp work piece and MFS simultaneously to the vertical while ensuring the whole thing is level with your work surface is not easy, especially if it's a complete door. I've tried many ways to clamp the MFS, I've always managed somehow to clamp it at 2 locations, but this is the best way I've found.

Mr. Martin???? Hey Are you trying to get a ride on his work Helicopter?

Woodwork Wizard Between you and Peter , You guys are tempting me to get one of those MFS's
 
jobsworth said:
Woodwork Wizard Between you and Peter , You guys are tempting me to get one of those MFS's

What? You don't have one...  [poke]

[attachimg=1]
 

Attachments

  • IMG_2387.JPG
    IMG_2387.JPG
    200.3 KB · Views: 4,354
jobsworth said:
You guys are tempting me to get one of those MFS's

Do it---do it now...

I've got one, wish I have a few more profiles.

Tom
 
GarryMartin said:
jobsworth said:
Woodwork Wizard Between you and Peter , You guys are tempting me to get one of those MFS's

What? You don't have one...  [poke]

[attachimg=1]

You too?????

I have been looking at them since I saw Peters video.... Might get the 400 and buy the 700 rails later
 
Back
Top