MFT/3 Measuring tape install

jafenske

Member
Joined
Mar 26, 2014
Messages
37
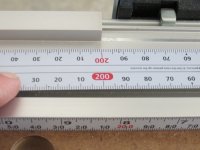
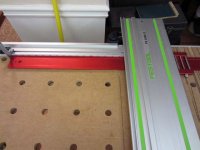
Like many of you I use Paul Marcel's method to square my MFT/3. I wanted to install a measuring tape on the MFT/3 fence. I bought a Starrett tape measure to adhere to the fence. I also wanted to find a way to repeatedly position the tape measure relative to the edge of the splinter guard. From the edge of my splinter guard to the back edge of the 1080 guide rail is approximately 186mm. From the right edge of the fence to the back raised edge is 200mm, see the picture below. 

[attachimg=#]

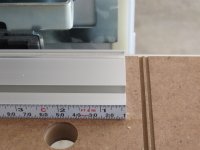
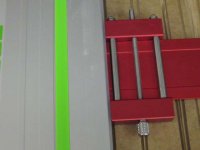
Now, I know that there is a 14mm space between the edge of the splinter guard and the back raised edge of the fence. To give myself a little buffer between the fence and the guide rail, I moved the fence 10mm to the left and installed the Starrett tape starting at 10mm as shown in the next image

[attachimg=#]

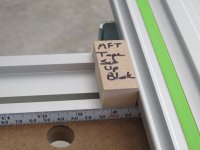
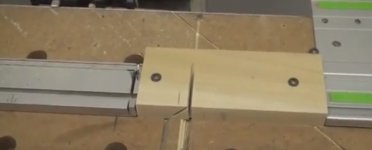
Then I cut a little block 24mm in width.

[attachimg=#]

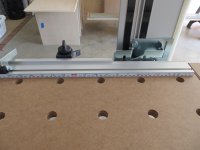
Now when I use Paul Marcel's method to square the rails, I install my little spacer and the tape measure is installed in the right spot.

[attachimg=#]


Attachments

  • IMG_1360.JPG
    IMG_1360.JPG
    2.2 MB · Views: 3,933
  • IMG_1359.JPG
    IMG_1359.JPG
    2.1 MB · Views: 3,628
  • IMG_1358.JPG
    IMG_1358.JPG
    2.1 MB · Views: 3,454
  • IMG_1357.JPG
    IMG_1357.JPG
    2.3 MB · Views: 3,982
Thanks for this! I installed tape in the similar position to allow myself the ability to cut thin strips easily, but have been rethinking the tape/fence position for my purposes because:

1) I am often cutting thin material (less than the height of the low fence, so then need to slide it to the left (and hence the measurements no longer apply)
2) Make sure you leave enough space for fence to be clear for a 45 degree bevel cut in thick material - in which case the fence needs to be futher to the left

Anyway, I wish I had found those 2 tips before I setup, so hope this helps someone out there.
 
Those are great points. The first point also occurred to me after I installed the tape measure. The 45 degree bevel problem had not occurred to me. My 10mm buffer is not going to be enough. The devil is in the details. Thank you for that tip.
 
What size starret tape did you use? I would like to install it in the same location you did, but I have 1/2" and it looks like its too large for where you installed the tape.
 
Question. wouldn't it make more sense to install the tape on the table itself (routing a slight groove to make it flush)?
 
I think the idea is to be able to remove the fence and still use the MFT as an MFT with no ruler permanently attached.
 
One could cut a 2 step groove in the table with the top groove filled with a clear strip of plastic/acrylic flush with the table surface and the bottom groove used to slide in the tape measure? This would solve the bevel issue, wouldn't it?
 
I agree if you would primarily use the fence in a mobile way. I was more thinking in a stationary way a la Paul Marcel mod. Obviously you could do both. One one the fence and one close to the fence incorporated in the surface. There is really no reason to move the fence unless you do miter cuts which you also could do without the fence (again a la Paul Marcel, watching all the videos currently).
 
All you really have to do to calibrate an MFT fence with a measuring tape on it is to follow four simple steps:
1. Set the flag stop to an arbitrary distance, say 24".
2. Set a rule stop on a rule to same distance.  
3. Slide the rule under the guide rail so that the rule stop is against the guide rail splinter strip (cut line).  See picture.
4. Position fence so that the flag stop touches end of rule.  See picture.


Attachments

  • MFT Fence Calibration.jpg
    MFT Fence Calibration.jpg
    59.1 KB · Views: 1,179
  • MFT Fence Calibration2.jpg
    MFT Fence Calibration2.jpg
    47 KB · Views: 922
Here is what  I use when I need to pull measurements when using the mft.  You could leave the block attached if you use it mobile.  You could also set up a tape referencing off the kerf and then you just have to make sure that you but the fence up to the end of the block.  My goal is make it simple and use as many of the pieces and parts that I already have.

[attachimg=#]

That is screenshot from this video:


Peter
 

Attachments

  • block.jpg
    block.jpg
    43.2 KB · Views: 2,598
Hey Peter,

I see you customized your fence to, kinda looks like mines  [oops]
 
I have a surplus of folding wood rulers so I took one and cut off 7 5/16". Now when I set my stop i put the fence down and butt the ruler up to it.
 
Back
Top