MFT/3 question Adjustable Foot

RobWoodCutter

Member
Joined
May 16, 2010
Messages
89
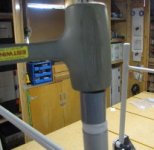
Just bought two MFT/3 tables to setup along side my L-N workbench. The MFT/3 is about 1-3/4" higher than the workbench.

I am going to cut the legs on the MFT/3 to make it the same height as the workbench. (Don't care about warranty or resale value, when the time comes to replace or get rid of it, it will be given away.)

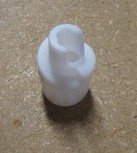
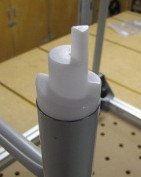
My questions is the adjustable leg has an insert. I see on the parts page I can get a replacement insert if I mess something up.

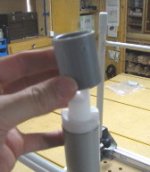
Is the insert glued in to the leg or is it just a friction fit and do you know how far into the leg it extends?

If it only extends into the metal leg and 1" or so, I don't need to pry it out first before cutting the leg. If it extends more than 1-3/4" and it is not glue, I will try prying it out before cutting the leg shorter.

Thanks. Rob
 
I would have gone in the direction of shimming up the bench rather than cutting up the MFTs.
 
I cut down the L-N workbench and re-did the draw bore legs joints to make it a more comfortable height after getting. I have zero issues with cutting down the height of the MFT/3 tables.

Shimming up the workbench to an uncomfortable height just save the cutting of the Festool legs is not an option. 

Just was hoping someone from Festool might be able to answer the question.

Thanks.
 
As far as I remember the insert is friction fit.  I have had mine out.  Go for it!

Some of my favorites on the FOG have done unmentionable things to their "stuff" to make it work better for them.

Peter
 
Thanks Peter....out comes the Milwaukee port-a-bandsaw...(or as the wife calls it.. the butter-cutter.. because it goes right through anything.)
 
The only thing I'd think about is that Festool works as a system.  So the height of the MFT can be matched by a stack of systainers, or systainers on top of a vacuum.  I find this really handy for setting up temporary work areas.  Once you cut the legs it makes it more of a hassle to do.
 
Rob,

    I think you should take it out first if you can.  I don't remember how long they are but I am pretty sure they are more than an inch.  They are a friction fit. I added an additional adjustable to the diagonally opposite on mine. If you end up breaking it taking it out or cutting it, they aren't too bad price wise as I recall. Though that was quite a few years ago now.

Seth

 
Yep, it came right out easily. It sticks in about 1 inch.

The MFT/3's will be used primarily in the shop.  Originally, in addition to the Workbench I had two metal leg/wood top assembly tables that were put together to give me a 48"x96" work surface which was perfect for laying a sheet of rigid foam on and using it to cut full sheets of plywood with TS-55. 

When got the CNC machine I got tight in space and I had to get rid of one of the 24"x96" tables and I put the other table beside the workbench which gave the same work surface for cutting a full sheet of plywood.

I am using the two MFT/3 beside the workbench to give a work surface big enough to process a full sheet of plywood. Being portable, I can take them down and fold them up and get full access around the workbench when I am not cutting full sheets of plywood down to rough size.

Since I bought both MFT/3 with all the track/hardware for both tables, I am planning a moving the long nuts that run in the side of track of the MFT and put them on the shorter sides and replacing the FS 1080/2 with a longer track to get a wider crosscut capacity on one of the tables.
Thanks all. Rob
 
Peter is right, it is a friction fit.

I cannot remember without looking at it (it is 5 am here and I am not going out to the workshop in my jim-jams in case a bogey man gets me) but I think that you may be able to put a stout piece of dowel down from the other end and push it out.

Peter
 
If you need to pound it back in don't strike the piece itself. I made that mistake and cracked one. See pics for using a PVC fitting to drive all around the edges at once.

  [attachimg=1]    [attachimg=2]    [attachimg=3]    [attachimg=4]

Seth
 

Attachments

  • IMG_3379.jpg
    IMG_3379.jpg
    20.1 KB · Views: 466
  • IMG_3378.jpg
    IMG_3378.jpg
    25.2 KB · Views: 481
  • IMG_3376.jpg
    IMG_3376.jpg
    15.3 KB · Views: 457
  • IMG_3377.jpg
    IMG_3377.jpg
    13.8 KB · Views: 457
Back
Top