MFT table extensions

air19

Member
Joined
Dec 25, 2015
Messages
43
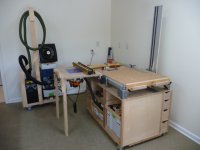
I have two shops here in South Carolina - the unconditioned large storage unit where I break down plywood into final sizes and mill hardwood into rough sizes, and the small air conditioned room under our house where I spend most of my time during the hot months.  The small shop is about 13 by 19 feet where I do all the final sizing, joinery, routing, sanding, assembly, and finishing. 

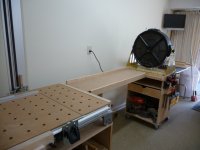
At the center of all my tasks is an MFT table that is mounted on a rolling cart with lots of storage for systainers and other drawers for misc. supplies.  My rolling MFT cart is like many here on FOG so I won't go into too much detail beyond the pictures.

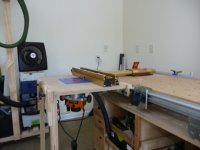
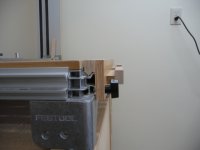
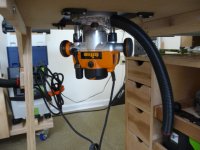
What got me thinking was how I would add a router table to do all the slots I cut for door panels and drawer bottoms.  I spent months going back and forth between the Festool router table setup or building my own.  I really liked how the CMS clipped onto the MFT and could be broken down when not in use.  But I finally decided to go with the Incra LS positioner router fence mounted on a Precision plate.  I decided the fence positioning precision was much more important to me than the sliding table of the CMS.  With the precision plate I can also set up the router in about 5 minutes and it's repeatably accurate. 

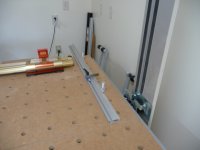
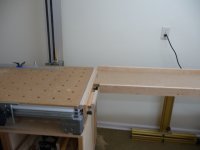
So the challenge was to create a connection between the MFT and a router table top.  Then I started thinking about other ways I wanted to extend the surface of the MFT.  Enough talk the pictures will tell the rest of the story. 


Attachments

  • P1040188.JPG
    P1040188.JPG
    167.6 KB · Views: 861
  • P1040189.JPG
    P1040189.JPG
    164.5 KB · Views: 743
  • P1040190.JPG
    P1040190.JPG
    174.2 KB · Views: 669
  • P1040193.JPG
    P1040193.JPG
    168.9 KB · Views: 608
  • P1040194.JPG
    P1040194.JPG
    168.9 KB · Views: 620
With the Incra fence and the Triton router I have all the precision I need in terms of a super accurate fence and a reasonable accurate router lift built into the Triton router.  With my clip on router table and the precision plate, I can mount the entire setup on the left side, right side, or front side of the MFT.  It just depends on where I have the MFT cart in my small shop and what other tasks I want to perform on the MFT at the same time.  In this current setup, I can still use my drop down rail and track saw.  When I fit 1/2 inch drawer bottoms, I am going back and forth between the router and tracksaw to get as tight a fit as possible. 

Another part of my adaptability is my fence setup for the tracksaw.  Thanks to a video from Peter Millard I was introduced to the Fence dogs from Benchdogs UK.  They slide into the back of my MFT fence allow me to set and remove the fence repeatably and accurately. 

Now that I had designed a simple clamp that fit into the MFT rail profile I am starting to add other uses.  Here is a long side table that I use to the right of the MFT.  It works great for supporting long boards when I'm doing cuts.  It's supported on the right side with my mobile clamp rack that has my air cleaner on top.  I created two legs to support the router table and I can reuse them on the front of this narrow table if I want to mount it on the front of the MFT.  The key is I have about half a dozen of the simple clamp profiles that I can slip in anywhere on the MFT rail profile as I move these different surfaces around. 

Two MFTs would provide similar functionality.  But for my small shop I find these custom made table extensions very handy.  The long narrow one allows me to get in much closer to the primary MFT table when I am doing saw cuts.  As time goes on I'll come up with other attachment surfaces I need.  I also have Peter Parfett's UJK parf guide system so I can cut dog holes into any of these extension tables.  Anyways, more pictures...
 

Attachments

  • P1040192.JPG
    P1040192.JPG
    156.8 KB · Views: 528
  • P1040196.JPG
    P1040196.JPG
    167.4 KB · Views: 602
  • P1040197.JPG
    P1040197.JPG
    179.4 KB · Views: 548
  • P1040198.JPG
    P1040198.JPG
    168.8 KB · Views: 559
Great setup. I am downsizing my space and will have to get rid of my dedicated router cabinet. I like your idea, and you don't lose any precision while still being able to break it down. Any detail how you created the adapter/clip?  It looks like a solid piece of wood.

Thanks for sharing.
 
Hi
You’ve really maximized Your usage of space, I like the fact that you can perform a variety of tasks and you hardly have to move your feet.
Great progressive thinking
Best
 
Nice solution.

Though a MW 1000 table does similar, at a slightly higher cost.

 
jroth - the connection to the MFT rail is made up of a couple pieces - first there is a 3/4 birch ply with the 45 degree cuts, then a 3/16 piece to build it out flush with the outer edge of the rail, then another 3/4 ply that I use to run my two bolts through.  With the bolts I can tighten them down and really secure the connection.  Then I added two more pieces to create a ledge that the tables clip into, sort of like a french cleat. 

gregor - i looked at the MW 1000 to see what their connection was to the MFT.  Even thought about ordering the part from Festool, but then decided I wanted to have a couple of tables connected to my MFT at the same time so I just went with the "do it yourself" connector. 

 
Back
Top