MFT Zero-Clearance Fence & Fenced Sled

Corwin

Member
Joined
Jan 22, 2007
Messages
2,624
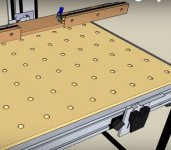
Here's my old MFT setup from 8 years ago. Something I've talked about but haven't really shown until now with the help of SketchUp.

On Edit: Turn Closed Caption ON


Special Thanks for SketchUp models:

  Brice Burrell for his MFT and TS55 model
  Jonathan S. for his Festool Clamp and Systainer models
  judedouch for the Incra Tracks and Stops
  Da Addicts for the Rockler Cam Clamps

The cam-clamp dogs were something I had made working prototypes of, but hadn't made the part as you see in the animation. This style of dog will be useful in attaching anything to your MFT's grid of 20mm holes.

The fenced sled can be used for narrow rips, pieces narrower than the Rail, and also to align your Guide Rail square to the fence. I also use this type fence in conjunction with my Parallel Jig to make those longer rips.

The zero-clearance fence is the 'old-school' type where you have a replaceable middle section. Here it can be swapped-out with one for the thickness material you are cutting. I make 'stock' to cut the various sizes from.

Initial setup of the Incra Incremental Tracks is to set the left-hand track 2" back from the Guide Rail (using a machinist's 1-2-3 block) to provide clearance for the saw.

The Incra Tracks on this fence can be swapped-out for the Tracks used with their FlipStop, Tracks that are longer, or Tracks setup with metric scales and racks. 
 
Corwin,
help me understand the added benefits of your set-up which accomplish what an MFT with benchdogs and the hinged guiderail can't do by itself?
Also: I wonder if anyone has figured out how to attach the guiderail hinge set-up to an ordinary bench without the MFT extrusion (in a non-sliding but stationary position)?  - or found a way to attach the MFT extrusion to a workbench edge.
Hans

PS: "ther you go again..." with your intimidating animation - but learned you impport object files from others - neat!
 
Klemm said:
Corwin,
help me understand the added benefits of your set-up which accomplish what an MFT with benchdogs and the hinged guiderail can't do by itself?
Also: I wonder if anyone has figured out how to attach the guiderail hinge set-up to an ordinary bench without the MFT extrusion (in a non-sliding but stationary position)?  - or found a way to attach the MFT extrusion to a workbench edge.
Hans

PS: "ther you go again..." with your intimidating animation - but learned you impport object files from others - neat!

Dogs fit into the holes in your MTS's top. They don't do much other than establish square and parallel -- and do nothing to establish length or width of your cut. There is plenty of information on using dogs here. And almost nothing on any other type setup. Go figure.

Also, there are many examples of home-made setups that do NOT use the Festool Guide Rail Brackets and Extrusion. Do a google search and you will see.
 
Corwin
I'm starting to understand the aim of your fence. Cut-off stop or repetitive custs and zero clearance.

I have had no luck after several hours of looking finding how anyone has attached the FESTOOL Track holder brackets p/n 497 022 and 497 023 to a non- MFT table  - either with the p/n 472 863 MFT Extrusion or otherwise. I am referring to the brackets which permit a GuideRail to be hinged and laid down square consistently. Let me see if I can post a snip of the brackets shown in your animation so you understand exactly what I am referring to.
 

Attachments

  • GuideRail track holder brackets.JPG
    GuideRail track holder brackets.JPG
    18.9 KB · Views: 1,633
Klemm,

Yes, I know the Brackets that you are referring to. You can use those for a home-made MFT and either purchase a couple short lengths of Festool's MFT aluminum profile, or make something yourself. Here's one home-made design on SketchUp:

Home-Made MFT

As to the Festool Brackets, you may wish to consider your own design. Their design does work well IF you pay attention to what you're doing. Too many here have had issues with these brackets not retaining their position -- however, this is almost always due to user error, as they do work IF you take care AND understand how they need to be adjusted. Another design may be an improvement, and likely a much, much less costly direction to pursue.
 
Klemm,
    Where can you buy these track holders?  I have searched the internet with the part numbers provided and I can't find any store that sells them.  Is this a secret, special order item?  I don't want to have to buy an MFT to get the track hinge thing.

Does anyone know if you can make the track hinge thing?  I made Ron Paulk's cross cut jig, but I really want to have it hinged so that it can be out of the way instead of having to find a place to hold it temporarily (same with the saw...)
 
TealaG said:
Klemm,
    Where can you buy these track holders?  I have searched the internet with the part numbers provided and I can't find any store that sells them.  Is this a secret, special order item?  I don't want to have to buy an MFT to get the track hinge thing.

Does anyone know if you can make the track hinge thing?  I made Ron Paulk's cross cut jig, but I really want to have it hinged so that it can be out of the way instead of having to find a place to hold it temporarily (same with the saw...)

Festool Parts Department
 
TealaG said:
any rough idea of how much it cost????

There is both a front and rear guide rail bracket, or 'support unit' in Festool speak. The rear support is hinged while the front support has a locating pin. Both raise and lower to adjust for height of your material.

Rear support unit; part # 488551  $80.93
Front support unit; part # 488549  $63.38

At least that's what is looks to be to me. You can access the Parts Catalog via the pull-down menu on any page of this site; Go to the 'Festool Websites' tab at the top of the screen and select 'Spare Parts Catalog'. These are parts from the older MFT1080.
 
Thanks for the info.  I was able to get to the spare parts catalog and now I understand how to read it and find the parts I need.  :)!!!  I'll give them a call tomorrow and see if they can ship me these for my new custom workbench.
 
You may want to first place a 'want to buy' ad in the classified section, as there very well may be a lot of these parts out there that are not being used by their owners.
 
Thanks for the advice.  I went ahead and got the parts from Festool and I got a side piece too, hoping to cut it in half and have genuine extrusion to mount this stuff on, then I'll build in some t-track or something so that the extrusion can slide across the entire table.  I'm hoping my parts can be here by the end of the week and I hope even more that my table will be ready to receive it by then!!!
 
Here's a question I received via a PM that I thought I would share, as others may have the same question:

Corwin said:
DrD said:
Good Morning Corwin,  the sun is finally back out down here in Mississippi; couple of nights ago we had our second session in about 4 mos, being all hunkered down in center hallway.  All of that is ok - price you pay for living in these parts, but it is tough with a Rottweiller, a South African Mastiff (Boerboel), a Maltese, and a Cairn Terrier.
Instead of hijacking someone else's thread, I'm sending you a pm - hope that's ok.  I would like to understand your logic/reasoning for doing the individual/discrete things you did with your table(s), e.g., the u-channel across the board on top of the tables, etc.  If you have the time and inclination to indulge an old, slow woodworker, I would greatly appreciate it.

Thanks, Don

Hi Don,

Good morning to you too. Nice and sunny here this morning after a rather windy and rainy day yesterday. It must be most difficult to keep up with four dogs in such a situation. Hope you all remain safe.

I can discuss this with you via PMs, or you could ask any questions in the "MFT Zero-Clearance Fence" thread that I posted a link to. Either way will work for me. But, asking in the thread may benefit others as well...

I believe the "u-channel in the board" that you are asking about is my MFT sled with its own fence. The sled consists of a large piece of MDF with a dado cut perpendicular to the rear edge. I've placed a T-track into that dado to act as a fence. With this sled up against the MFT's fence, this fence on the sled is then parallel to the Guide Rail's cut line. This way, I can easily rip pieces to a narrower width than the Guide Rail by placing the workpiece to be cut up against the right-hand side of the sled's fence and also place another piece of material of the same thickness to the left of the sled's fence to add support to the Guide Rail. This is rather similar to how I illustrate cutting narrow pieces in my other SketchUp animations.

I hope this answers your question. If not, or should you have any other questions, please do feel free to ask further questions.

Corwin
 
[member=182]Corwin[/member]

Ok, so where are you with the clamping dogs?  I looked at the Rockler ones earlier but look like one would need to drill thru an existing 20mm dog, insert a long (depending upon which dog was used) 1/4 x 20 screw and then  screw that into the Rockler clamp.  If that's the case, are you aware of any commercially available 20mm dogs already predrilled?

Thanks,

Don
 
[member=3373]Dovetail65[/member]

Thanks for the links.  I use a lot of Qwas products, and was aware of these 2; will need to add these to my A-dog purchase.

Thanks,

Don
 
I always refer to Qwas, he was the first way back when to come up with a lot of this.

I feel as a smaller company like me he really got knocked off quite a bit by larger players and dogs like this are difficult to patent.  I know a guy that came up with a great little dust shoe for CNC and so many have knocked off his design, in one case so much so it's tough to tell the difference between the two. The same has happened to me, there isn't much we can do but keep referring and  selling.

Ill always buy from the smaller one man or smaller family companies when I can and Qwas products work and are nice too.
 
DrD said:
[member=182]Corwin[/member]

Ok, so where are you with the clamping dogs?  I looked at the Rockler ones earlier but look like one would need to drill thru an existing 20mm dog, insert a long (depending upon which dog was used) 1/4 x 20 screw and then  screw that into the Rockler clamp.  If that's the case, are you aware of any commercially available 20mm dogs already predrilled?

Thanks,

Don

I haven't done anything further on the clamping dogs. I purchased a mini lather to turn dogs back in the spring of '08 after Steve (QWAS) had posted about how the MFT hole pattern could be used to square the guide rail and fence. At that time, Steve was looking for 20mm pipe to use for dogs. But, I wanted metal dogs. Problem was, those mini lathes have a lot of issues. My first lathe had issues. The second worked okay, and I did some turning with it, but it also had a defect and I exchanged that one for one final unit that, unfortunately, proved to again be unusable. But to answer your question, I haven't done any further development with these clamping dogs. However, I have made prototypes from various hardware that do work as illustrated.

The various dogs commercially available for the MFT will NOT work as clamping dogs without modification. You might be able to take something like the rail dogs and part off as needed. But, the standard dogs just won't do.
 
DrD said:
[member=182]Corwin[/member]

Ok, so where are you with the clamping dogs?  I looked at the Rockler ones earlier but look like one would need to drill thru an existing 20mm dog, insert a long (depending upon which dog was used) 1/4 x 20 screw and then  screw that into the Rockler clamp.  If that's the case, are you aware of any commercially available 20mm dogs already predrilled?

Thanks,

Don
The dogs need to be threaded so they can be screwed down from below. Otherwise as a clamp is tightened it will damage the 20mm hole in the MDF.

I use Precision dogs and clamp mounts with Kreg AutoMaxx clamps. I liked the fact that the dogs were removable from my 2 clamps should I ever need 6 dogs, as I have 4 dogs ready to go. Works for me *shrugs*
http://precisiondogs.us/products/precision-clamp-mount
 
Back
Top