Mini Ron Paulk workbench

Joined
Sep 25, 2013
Messages
149
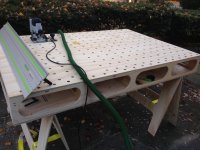
Just finished making my modified Ron Paulk workbench.  I work out of an SUV so I made one 6 feet long.  This is my first serious workbench and I'm pretty happy with it, but I want nothing more than to build another one knowing what I know now.  There are a few caveats to shrinking the plans that I would have caught with more careful study of them, but I wanted to get it done and I rushed things a little at the beginning.  I gave my new lr32 a serious workout, and I have to say that the Qwas rail dogs might be the best purchase under a hundred bucks I've ever made. 
[attachimg=#]

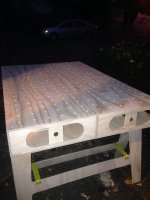
Once I had the first two lengthwise rows done, I was able to drill the remaining 187 holes in just under 15 minutes.  This was way too fast and I wanted to cut a class today, so I sanded the top to 2000. 
[attachimg=#]

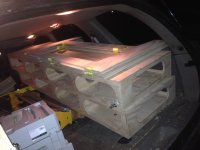
And here's how it fits in a trail blazer...  If I had to do it all over again, I would have made it closer to 5'6" and paid more attention to 32mm spacing during my initial layout.
[attachimg=#]

And here's how everything else fits around it...
[attachimg=#]

Can't wait for the weekend when I finally get to use it!
 

Attachments

  • image.jpg
    image.jpg
    888.1 KB · Views: 31,107
  • image.jpg
    image.jpg
    695.4 KB · Views: 17,440
  • image.jpg
    image.jpg
    725.8 KB · Views: 22,526
  • image.jpg
    image.jpg
    708.5 KB · Views: 15,507
So what would you change if you could do it again?

I'll be building one of a similar size soon.
 
I'd be more careful about how I took the measurements in my truck.  When my seats fold down, my headrests stick up, and I planned on having it sit on the headrest behind my passenger seat, which was a bad move.  It would be better a little shorter and sitting flat.  I'm gonna wind up building a sort of shelf for it to sit on so it stays somewhat level without having to sit on the bin that it's on now.

Second, when cutting the ovals, keep the spacing off the corners that's in the plans even though you're making your bench smaller.  This becomes important when joining the tops.  The spacing between ovals should also stay the same so only the ovals themselves get smaller.  You don't need them to be huge because you're not gonna be putting huge stuff in there anyway.

It's probably worth it to get a 5" holesaw.  Use that and a track saw to get your first oval perfect, and then copy that oval with a router.

There are pieces in the plans you won't need if you're not doing the table saw setup or router fence.  Read the instructions all the way through before you start so you know what you won't need.

I use my Kreg jig all the time, especially with 3/4" material and lately I've been using the Kreg HD on 2x a lot.  I had almost no experience using it on 1/2" ply until now.  When you're setting your stop ring, cheat it a little toward the point of the bit.  I had a couple little pokies that really pissed me off.

Make sure you have a very exact idea of how you want your table saw to mount.  I have a DW 745 and while I think it's the best damn table saw in the world, it's certainly less than ideal for this particular setup, and mounting it is gonna be more work than I'd like. 

FOLLOW THE INSTRUCTIONS, IN ORDER!  I decided to drill some of the holes needed to join the tops before it was time to do so, and that was probably my biggest mistake.

The lr32 rules.  If you have one, get yourself some Qwas rail dogs and you'll slaughter that perforated top.

Ron  Paulk recommends 1/2" AC ply, and that's a good recommendation.  I was nervous about how flimsy some of the pieces seemed, particularly the horses, but the finished product is extremely sturdy.  I was thinking of using sandeply, but that has a tendency to splinter on the edges that AC doesn't.

I think that about covers it.  It's really a great design.  Even the 6' long version is ginormous compared to any store bought bench I've ever used. 
 
Nice work!  What did you use to drill all the 20mm holes? (I'm assuming they are 20mm?)  I would like to make a top with 20mm holes and was planning on using the Festool Euro-Hinge 20mm bit (491072), but have read that the holes may be a bit loose for use with the 20mm accessories.  Wanted to make sure before I fork out the cash for that bit as well as the QWAS rail dogs.
 
I used the lr32 with the 20mm festool bit.  The Qwas dogs fit perfectly.  The rail dogs have just a hair of slop, but if you read the rail dog manual at qwasproducts.com, they tell you what to do about this.  It's not a workaround for weak manufacturing, it's an honest technique that actually makes the rail dogs slightly easier to use than they'd be if they fit tightly. 

I spent a lot of time lining up my first 2 rows of holes and making sure they were evenly spaced first off one edge and then off the first row.  Once that's done you can go to town with the lr32 and the rail dogs.  All of your middle holes will be offset from the outside rows, but they'll still be square and that's what matters.  I had to make one minute adjustment to my rail dogs to tighten everything up about 3/4 of the way through the drilling.  At a guess I'd say the adjustment was of significantly less than a millimeter.  Having one row offset loses you nothing and I'm sure I'll come up with at least one advantage to having the holes that way. 

Keep an eye on where you are over your ribs.  I had one row that wound up right on a rib but I was able to plunge deep enough with my 1010 that the bench dogs still fit even with the rib underneath.  The rail dogs don't, but the mini rail dogs might.  Either way, missing a row won't hurt.  I also hit a screw at one point when I got carried away with how fast the lr32 system works.  That one hole got a little sloppy, but all of the following holes were still dead on, and there was no apparent damage to the bit.  Steve from Qwas told me he uses a hole drilled with that bit to check his dogs after manufacture, so if you plan on buying from Qwas (which I highly recommend) there's no better bit to use.  I bought the super set which comes with 4 bench dogs and 2 rail dogs and I'm extremely happy with the purchase.
 
Back
Top