Mobile Cabinet Joinery Method Question

Bugsysiegals

Member
Joined
Mar 19, 2016
Messages
908
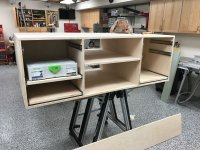
I'm building mobile cabinets for my basement wood shop and need your advice related to the joinery.

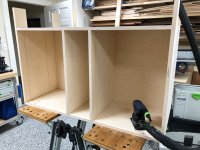
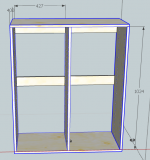
FWIW - I'll be using 3/4" plywood and they'll be frameless cabinets on castors so I can move them around easily and potentially use them for infeed/outfeed support as needed.  I'm guessing they'll be about 36" wide but am open to suggestions if this would be prone to sagging.

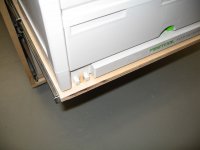
With regards to the joinery, Kitchen cabinets have the top and deck between the left and right side panels; however, I wonder whether this is the best design for shop cabinets which will need to support a modest weight and be suspended between castors rather than sitting on the floor?  Will dominoes or pocket screws support it in this configuration?  Should the top/deck be flush to the outside of the sides instead?  What about the back, should I rabbit it into the sides with butt joint on top/deck or just use butt joints all around with dominoes/pocket screws?

I don't intend to build a motor on top of them need them to be able to support a modest weight without sagging.  Thoughts???
 
No problem with 36" spacing if you put some interior support - could be a back, divider, etc.  All depends on how much weight.

I'd inset the sides between the top and bottom given the weight.  Here's a couple of photos of recent builds that might be of help.

The first photo is a base for a 'Paulk bench' and it's on four casters.  No sagging at all.  it does have an interior divider on each side and that gives it great strength.  This has drawers front and back. Center space is clear for larger items.  The paulk bench top then adds a lot more rigidity since it's screwed to this base.

This was made with dominos only, no dados for the uprights

View attachment 1

This second example also has sides captive between the top/bottom.  You can't see the final top because it has an intermediate shelf here and then an MFT type top that I added to the four uprights.  It has a solid back across the unit and then another 6" shelf behind that piece for narrow items on the back.  It uses 1/8" dados to make assembly easy, but uses Dominos for strength.  Again, also sits on four casters as a bench with the MFT type top across the top.

View attachment 2

The second bench is meant to allow 32mm adjustment for drawers.  I doubled up the holes to 16mm to give more adjustment and not waste too much space between the Systainer drawers.  Center area is a full-extension pull-out for hanging clamp storage.  Simple way of using narrow spaces.

Both cabinets used two-way locking casters, available from Amazon to give them rigidity for hand tool work like planing.

Hope these help -
 

Attachments

  • IMG_1159.jpg
    IMG_1159.jpg
    235.2 KB · Views: 403
  • IMG_0423.jpg
    IMG_0423.jpg
    172.7 KB · Views: 301
1/2" or thicker back panels go a long way for strength. And though i typically prefer frameless cabinets, a face frame would probably be a good choice for your application.

Also, rabbet and dado construction makes a very strong box, however dominoes or screws would be fine if supplemented by a strong back and face frame.

Just my 2 cents.

Sent from my SAMSUNG-SM-G890A using Tapatalk

 
This comes at a good time. I'm building this double sysport and I have the sides, top, bottom cut and haven't made up my mind on which way to go. I allowed for 18mm stretchers to go in between. I considered using the same 18mm for a back but couldn't get it and everything else out of a single sheet of 4x8. The sides are captive between top and bottom mainly to make it easy to put together and partly for aesthetics. I was thinking dominos and glue for joinery. I don't really want to use pocket screws I just don't like them. Maybe I'll use them on the stretchers so I can assemble everything else and clamp it up and install them after the fact. Since the stretchers are inset I can add a 1/4" back later if needed using brad nails.

Any thoughts? Never built a cabinet before.
 

Attachments

  • capture3.PNG
    capture3.PNG
    111.2 KB · Views: 425
I am finalizing  a design and deciding on a joinery method.

So am following Eric's design which uses pocket joinery


I am sold on this 1000/500mm mobile cabinet and the various hints contained in the video such as spacing

systainer height spacing

4= 11 32 mm holes
3=8
2=6
1=4

Also Eric recommends having the slides in hand before spacing and drilling the 33 mm holes I have some old slides and might have made the same mistake he makes in this video.

I am likely to skip the Kreg pocket holes in favor of Dominos but I considered using this project to move to the Domino 500 knock-down connectors but I can't think of that many future uses to justify the full box of connectors.
 
DynaGlide said:
This comes at a good time. I'm building this double sysport and I have the sides, top, bottom cut and haven't made up my mind on which way to go. I allowed for 18mm stretchers to go in between. I considered using the same 18mm for a back but couldn't get it and everything else out of a single sheet of 4x8. The sides are captive between top and bottom mainly to make it easy to put together and partly for aesthetics. I was thinking dominos and glue for joinery. I don't really want to use pocket screws I just don't like them. Maybe I'll use them on the stretchers so I can assemble everything else and clamp it up and install them after the fact. Since the stretchers are inset I can add a 1/4" back later if needed using brad nails.

Any thoughts? Never built a cabinet before.

Looks good.  I'd suggest the way you have it is the strongest with the bottom and top outside the sides.  I would use Dominoes and glue.  I personally am not a big fan of pocket holes where they are visible.

I'd suggest you inset a 1/4" or 3/8" back for reduction of dust, strength and aesthetics since this is a mobile cart.  If you do that, you won't need the two cross ledgers you put in place.  that would give you another 3/4" of depth for your drawers or shelves.  Not a big deal.  Alternatively, inset the back in a bit more and use the extra space on the back for clamp storage on hooks or cleats.  I would GLUE the back in the grooves for strength and lay a square on it as it dries.  That would be stronger than brads and just gluing it over the cleats you have in place.

As I suggested above, you MIGHT want to consider your holes on 16mm vs 32mm spacing as I find with Systainers it does give your more flexibility on spacing to fill it up. 

I've used 1/2" plywood for simple drawer bottoms or shelves but really like the SysAZ drawers.  If you go with the plywood drawers, an innovative way I've seen them done is to route out pockets using a jig you can make to capture the four feet of a Systainer.  Removes the need for sides or other means of holding them.  The pocket could go all the way through or just route out 1/4" deep.
 
neilc said:
.....

As I suggested above, you MIGHT want to consider your holes on 16mm vs 32mm spacing as I find with Systainers it does give your more flexibility on spacing to fill it up. 

I've used 1/2" plywood for simple drawer bottoms or shelves but really like the SysAZ drawers.  If you go with the plywood drawers, an innovative way I've seen them done is to route out pockets using a jig you can make to capture the four feet of a Systainer.  Removes the need for sides or other means of holding them.  The pocket could go all the way through or just route out 1/4" deep.

photos... please... and overall dimensions... drawer slide brand and #?
 
Here's an example of the drawer with the routed recesses.  Matt (@lilscorpion on Garage Journal) is also active here.

His thread on Shop Organization and (re)Organization are really amazing.  This is from his most recent efforts at Systainerization of his shop.

https://www.garagejournal.com/forum/showthread.php?t=381487&page=15 and scroll to post 570 in the thread.

Or if you are not a member, here is the photo from Matt's thread. 

View attachment 2

But you owe it to yourself to join GJ to see his innovations.  WARNING:  If you go through to his threads, prepare to spend about two weeks because there is a TON to absorb!  You've been warned!

[member=27782]Scorpion[/member] may have the specific runners.  I personally use the 14" ones from CSH hardware.  Good prices and really excellent service from them out of Wisconsin.

I used these full extension 14" slides - http://www.cshardware.com/catalogsearch/result/?q=39.1130.14

And these 3" locking casters - http://www.cshardware.com/57-75123b-18.html

I think Matt's approach is better than my method from years ago of using dowels to catch in the latch clips at the bottom front and sides of the Systainers.  But I like both for reducing weight and cost as well as simplifying the build.

View attachment 1

My second photo at the top of the thread shows the 16mm hole spacing.


Attachments

  • IMG_0796.jpg
    IMG_0796.jpg
    78.5 KB · Views: 263
  • base template.jpg
    base template.jpg
    117.5 KB · Views: 3,460
[member=167]neilc[/member] Very slick. I already set everything up to use sys az drawers. But I do like how Scorpion did it. Is that a single 18mm bottom the slides attach to?
 
Looks closer to 1/2”. And you’ll notice he added the cutouts in the front to easily grab the Systainers when on the shelf.  These larger pockets in the rear also enable picking up the front and pulling the Systainer out if the shelf/drawer without extending the drawer glides.

Matt has put a lot of thought into these!

Images from his thread are here.

http://www.3amcook.com/Images/Organization/ReOrganization/30%20-%20Router%20Buddies%20mk2/img_3870.jpg

http://www.3amcook.com/Images/Organization/ReOrganization/32%20-%20Systainer%20Shelves/img_3495.jpg
 
Back
Top