More about the technique than the product itself

Crazyraceguy

Member
Joined
Oct 16, 2015
Messages
4,905
One of the guys at work brings me this piece of a 2x4 with a cove kind of scribbled onto the end of it and says "Can you do this?"
I say "Sure, but we can do it on a nicer piece of wood". He says "no need, It's going outside and will get painted anyway".
"Ok, leave it with me, I'll make it happen"

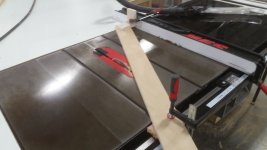
So, at lunchtime today, I set up this little fence rig and go about cutting the cove. Two different people come up to me to see what was going on during lunch and neither of them had ever seen such a set-up? A few others said the same thing later in the day after seeing the part sitting on my bench and asking about it.
I know I have done this more than a few times over the years, but apparently not recently enough for them to have seen it.
I guess it's not an everyday type thing, but I didn't think it was that odd either?
 

Attachments

  • Covefence.jpg
    Covefence.jpg
    140.1 KB · Views: 507
  • Cove.jpg
    Cove.jpg
    107.7 KB · Views: 504
Some day I'll need to understand this and come back to this thread and still wonder what was going on.

I don't understand the relationship between the jig and the cove, but I think that says more about my lack of experience than anything else.
 
He’s running it through at an angle to hollow out the bottom.

Even using push pads still makes me nervous.
 
Cheese said:
Snip.

Even using push pads still makes me nervous.

Using the kind of saw that Crazyraceguy has  (in addition to employing the push pads) to make those cuts should reduce the level of nervousness.  [tongue]
 
ChuckM said:
Using the kind of saw that Crazyraceguy has  (in addition to employing the push pads) to make those cuts should reduce the level of nervousness.  [tongue]

Good point Chuck…I did it on a Bosch 4100.
 
I'm sorry I didn't explain it better. That is the blade height of the final pass. You cannot do this in one shot. You even have to reduce the amount of blade rise as you get higher. I typically start at about 1/8" or so and go up half a turn of the crank each pass, but as you get deeper, there is much more blade contact. Take less of a cut at that point. You can feel the resistance if you take too much.
Basically, you can get any radius that is equal to or smaller than the blade itself. It all depends on the angle of attack. I have never done the full 5" radius, which would mean that your fence would be square to the blade and you would be feeding straight across it. I have gone as far as 4" radius on some cove moulding.
The one I did here was centered, but you don't have to do that either, it can be off-set.

It's a fairly simple process to set up. You just need to mark out your stock on both ends with the width of the flat spot you want and one place at finished height. First you crank the blade up to the full height mark. This will show you where the blade meets the table coming out and going back in. Then you angle the fence so that the leading edge touches the pencil mark on the front of the board and then move the board to the back of the blade and line the mark up where the blade comes out of the table. This takes some fiddling. Then clamp the fence in place, lower the blade and you are good to go. Because of how the blade moves as it rises, it may look off-center when you start. Some move forward as they come up.
As far as safety. Yes, some would call this sketchy. There is no blade guard and you cannot use the riving knife. But it is also not a thru-cut, so there is no chance of the wood pinching the blade.
In this particular case, I used double sided tape to stick it to a plywood push-pad that I use on my router table. It is a flat pad with a small hook on the trailing edge. The Sawstop does add a little measure of safety too, but I would never do anything expecting/hoping that it would save me. The first time I did this was on the old Powermatic 66 that we had before and I wouldn't be worried about doing it that way again. The main thing is, don't take too much at once and give it time to cut.
 
Back
Top