smorgasbord
Member
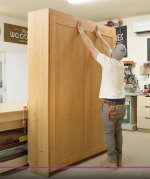
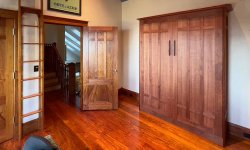
Between shoulder replacement surgery and other life events, this took way longer than I expected, but it's done now. As you can see, the style matches the doors and other stuff I've designed/built in the house:
[attachimg=1]
We actually looked locally at similar beds (some even used the same hardware), but my wife got quickly turned off not just by the salespeople, but by all the mis-matched wood color and edge chipping that we saw in practically every piece. And then my cousin has a few year old bed they bought for the grandkids, and it had warped in places and so opening was a rubbing chore.
The most challenging aspect was designing around the hardware kit. I got the queen "Elite Aluminum" kit from MurphyBeds.com, and while the hardware is high quality, and I like that it has springs instead of gas struts, the instructions they provide assume you're building the whole thing out of plywood and just edge banding everything. They don't provide key dimensions, such as pivot point location, swing arc at top and bottom, etc., so if you want to vary from their very basic design, you have to reverse engineer everything. If people are interested, I'll do a separate post on how I'd go about this if I were to build another.
Here are the variations I incorporated:
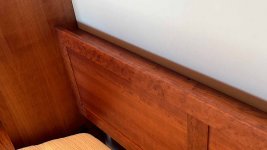
1) A frame and panel design. Unfortunately, I could not do this in solid wood because the panels (both face and side) are structural - the face panels support the mattress and the side panels support the large hinge plates:
[attachimg=2]
The panels in frame and panel aren't designed to be structural, so that would have meant designing side panels with wide frame members where the hinge plates attach, and then doing something on the face panels to be able to have them support the weight of the mattress and two people sideways. In retrospect, I could have chosen the cheaper I-Semble hardware kit, which incorporates wooden slats to support the mattress off the metal frame, since that would have unloaded the face panels. I'm not confident about gas struts holding up over time though (they leak), and overall the kit seemed of lower quality (befitting its much lower price, though).
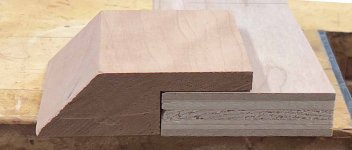
To get the frame and panel look, I glued ¼" thick cherry hardwood to the face of the ¾" cherry plywood panels. I don't have a picture, but I used cauls to apply pressure in the middle of the panels since I didn't have any 16" deep clamps. Here's an edge shot showing the construction:
[attachimg=3]
This made the face panels 1" thick instead of ¾", which affected the hinge mounting locations as well as the bottom arc swing clearance.
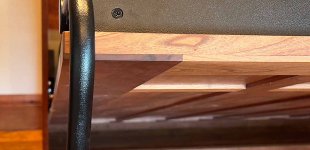
2) One problem I have with Murphy Beds is that the cabinets are really big (over 7' tall), yet they are almost always just 3/4" thick, which looks too thin to my eye. So, I did the same applique treatment on the side panels, and to keep the illusion of solid wood frame and panel I made a 1" thick solid wood piece that was rabbeted to hold the ¾" plywood and thus expose ¼" of "frame." I also chamfered the front edge at 45º to make it look even thicker:
[attachimg=4]
Getting that rabbet just right was an accuracy challenge, and to be safe I made it slightly deeper than the plywood's thickness, scraping the wood down to almost match after glue-up.
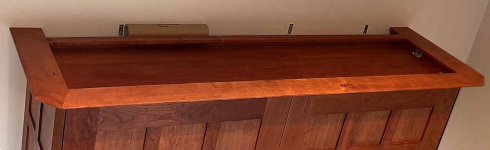
3) The headboard of Murphy Beds seems almost an after thought. If the cabinet is deep enough, they angle it, but it's still just a piece of edge-banded plywood. I did the frame-and-panel treatment here too, and incorporated a shelf recessed just below the top:
[attachimg=5]
That makes a handy place to rest pillows when you're folding up the bed, and when open you can put your watch or rings, etc there.
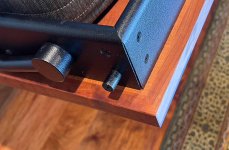
4) And then the edge treatments. No 1/32" edge banding allowed here - it's all solid wood, with mitered corners, etc.
[attachimg=6]
Since the metal frame is screwed to the face panel with multiple wood screws, I was concerned about the screw location going through the plywood/solid joint. In retrospect, I could have made the edging slightly wider and then the joint would not have been visible. As it is, it's only visible when the bed is open, if you look down when there's no blanket/comforter on the bed (see earlier photo).
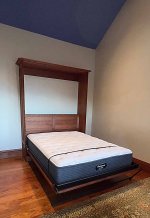
Here's a rather stark picture of the bed open with no bedding and not seeing anything else in the room:
[attachimg=7]
5) The final aspect was to add a crown molding. There's another thread here showing my progress through the design. I'm pretty happy with how it turned out, but I'm not 100% pleased:
[attachimg=8]
6) One aspect of Murphy Beds is that you may want to eventually move them. Like most beds, you don't typically glue up the whole structure, but design them with knock-down fittings. The original plans used (and provided) simple angle brackets to screw many of the cabinet panels together (putting the backets in the back where they're not seen), but I wasn't too happy about that. They also used Confirmat screws at the top, with the ugly plastic covers right on the outside - yick! I got the DF500 connectors and used those in most of the places, and that worked out well, except for - well I'll save that for the Murphy Bed lessons learned thread.
Anyway, making the crown removable was an interesting challenge. Typically, crown is attached to the vertical panels as well as to each other, but that would have prevented disassembly. Instead, I built the crown as a frame that literally fits over the complete bed carcase and doesn't technically need fixing, but I put two screws through it into the top of the side panels anyway. If you look closely, you can see the crown frame here:
[attachimg=9]
The thin piece near the back is what completes the frame. This was an interesting process. After making the crown (all from the same board, btw), I cut the front corners of the side pieces first and one edge of the chamfered pieces (both at 22.5º), then glued those up with #20 biscuits. Then I trimmed the back edge of the side pieces (a square cut against the wall) little by little until the crown glued joint lined up with the side panel joint perfectly. The usual "sneak up to the perfect fit" procedure. Then I screwed those into the tops of the side panels to hold them in place.
Then I cut the other side of the chamfered crown at 22.5º, again sneaking up until the edge lined up with the carcase. Then the front piece - cutting it slightly long again and sneaking up trimming one side until it just fit between the chamfered pieces cut edges. This wasn't a measurable thing since the 22.5º angle meant that what you measure on the overlap isn't how much to trim since those directions are angled. My last cut was like 0.25mm. My thoughts kept racing to the old joke "I've cut this board 3 times and it's still too short." Luckily, that last trim worked out well.
Then I was worried about gluing the front piece in only to have the side pieces not be perfectly aligned. And also worried about this "U" construction holding up during finishing and installation. So, I inserted a back stretcher between the two side pieces using dominos, and glued that up, screwing the side pieces in again while the glue dried. And while that was going on, I glued the front piece in as well (biscuits have enough slop and movement to enable me to slide the front piece in without spreading the side pieces apart). The next day, took the crown unit off to finish, and then reinstall.
Here's the crown with the bed open:
[attachimg=10]
For finish, I used Sutherland Welles' Mahogany stain, diluted 5:1 with their reducer, then a coat of Odie's Oil. I've been using pure tung oil for everything else I've built, and while I love the look and it holds up reasonably well (except in the kitchen), it does take forever and a day to dry. Odie's gives me the same pure tung oil look with just one coat instead of 2 or 3, and it drys much more quickly. We'll see how well it holds up, but I don't think that's going to be a problem. One set-back was I didn't dilute the stain enough the first time through. I did try some samples, but what looks OK at 4" square looks different at 32" by 82". So I had to sand the two face panels down. This was scary on the plywood portions, but I used 180 grit and took my time to get almost all the stain down, and luckily didn't sand through the thin plywood veneer. Maybe I had bought good quality plywood?
The other wood in the house is Narra, which is wonderful to work with and is very stable. This is my first piece using Cherry, and while I liked working with it, I constantly struggled with color. As you know, cherry darkens over time, but it can take years for the real darkening to happen. And when freshly cut, it can be hard to distinguish the sap wood, but once it darkens, that sap wood will stand out, sometimes in ways you didn't expect/don't like. So, I took the short-cut to stain, which I think looks great now, but my concern is whether the cherry will continue to darken and in 5-10 years I'm going to have a very dark bed on my hands.
Anyway, sorry for the long post, hope you enjoyed the pictures and story. Let me know if you have any questions, as well as suggestions. I've gotten more than a few learnings from this project.
[attachimg=1]
We actually looked locally at similar beds (some even used the same hardware), but my wife got quickly turned off not just by the salespeople, but by all the mis-matched wood color and edge chipping that we saw in practically every piece. And then my cousin has a few year old bed they bought for the grandkids, and it had warped in places and so opening was a rubbing chore.
The most challenging aspect was designing around the hardware kit. I got the queen "Elite Aluminum" kit from MurphyBeds.com, and while the hardware is high quality, and I like that it has springs instead of gas struts, the instructions they provide assume you're building the whole thing out of plywood and just edge banding everything. They don't provide key dimensions, such as pivot point location, swing arc at top and bottom, etc., so if you want to vary from their very basic design, you have to reverse engineer everything. If people are interested, I'll do a separate post on how I'd go about this if I were to build another.
Here are the variations I incorporated:
1) A frame and panel design. Unfortunately, I could not do this in solid wood because the panels (both face and side) are structural - the face panels support the mattress and the side panels support the large hinge plates:
[attachimg=2]
The panels in frame and panel aren't designed to be structural, so that would have meant designing side panels with wide frame members where the hinge plates attach, and then doing something on the face panels to be able to have them support the weight of the mattress and two people sideways. In retrospect, I could have chosen the cheaper I-Semble hardware kit, which incorporates wooden slats to support the mattress off the metal frame, since that would have unloaded the face panels. I'm not confident about gas struts holding up over time though (they leak), and overall the kit seemed of lower quality (befitting its much lower price, though).
To get the frame and panel look, I glued ¼" thick cherry hardwood to the face of the ¾" cherry plywood panels. I don't have a picture, but I used cauls to apply pressure in the middle of the panels since I didn't have any 16" deep clamps. Here's an edge shot showing the construction:
[attachimg=3]
This made the face panels 1" thick instead of ¾", which affected the hinge mounting locations as well as the bottom arc swing clearance.
2) One problem I have with Murphy Beds is that the cabinets are really big (over 7' tall), yet they are almost always just 3/4" thick, which looks too thin to my eye. So, I did the same applique treatment on the side panels, and to keep the illusion of solid wood frame and panel I made a 1" thick solid wood piece that was rabbeted to hold the ¾" plywood and thus expose ¼" of "frame." I also chamfered the front edge at 45º to make it look even thicker:
[attachimg=4]
Getting that rabbet just right was an accuracy challenge, and to be safe I made it slightly deeper than the plywood's thickness, scraping the wood down to almost match after glue-up.
3) The headboard of Murphy Beds seems almost an after thought. If the cabinet is deep enough, they angle it, but it's still just a piece of edge-banded plywood. I did the frame-and-panel treatment here too, and incorporated a shelf recessed just below the top:
[attachimg=5]
That makes a handy place to rest pillows when you're folding up the bed, and when open you can put your watch or rings, etc there.
4) And then the edge treatments. No 1/32" edge banding allowed here - it's all solid wood, with mitered corners, etc.
[attachimg=6]
Since the metal frame is screwed to the face panel with multiple wood screws, I was concerned about the screw location going through the plywood/solid joint. In retrospect, I could have made the edging slightly wider and then the joint would not have been visible. As it is, it's only visible when the bed is open, if you look down when there's no blanket/comforter on the bed (see earlier photo).
Here's a rather stark picture of the bed open with no bedding and not seeing anything else in the room:
[attachimg=7]
5) The final aspect was to add a crown molding. There's another thread here showing my progress through the design. I'm pretty happy with how it turned out, but I'm not 100% pleased:
[attachimg=8]
6) One aspect of Murphy Beds is that you may want to eventually move them. Like most beds, you don't typically glue up the whole structure, but design them with knock-down fittings. The original plans used (and provided) simple angle brackets to screw many of the cabinet panels together (putting the backets in the back where they're not seen), but I wasn't too happy about that. They also used Confirmat screws at the top, with the ugly plastic covers right on the outside - yick! I got the DF500 connectors and used those in most of the places, and that worked out well, except for - well I'll save that for the Murphy Bed lessons learned thread.
Anyway, making the crown removable was an interesting challenge. Typically, crown is attached to the vertical panels as well as to each other, but that would have prevented disassembly. Instead, I built the crown as a frame that literally fits over the complete bed carcase and doesn't technically need fixing, but I put two screws through it into the top of the side panels anyway. If you look closely, you can see the crown frame here:
[attachimg=9]
The thin piece near the back is what completes the frame. This was an interesting process. After making the crown (all from the same board, btw), I cut the front corners of the side pieces first and one edge of the chamfered pieces (both at 22.5º), then glued those up with #20 biscuits. Then I trimmed the back edge of the side pieces (a square cut against the wall) little by little until the crown glued joint lined up with the side panel joint perfectly. The usual "sneak up to the perfect fit" procedure. Then I screwed those into the tops of the side panels to hold them in place.
Then I cut the other side of the chamfered crown at 22.5º, again sneaking up until the edge lined up with the carcase. Then the front piece - cutting it slightly long again and sneaking up trimming one side until it just fit between the chamfered pieces cut edges. This wasn't a measurable thing since the 22.5º angle meant that what you measure on the overlap isn't how much to trim since those directions are angled. My last cut was like 0.25mm. My thoughts kept racing to the old joke "I've cut this board 3 times and it's still too short." Luckily, that last trim worked out well.
Then I was worried about gluing the front piece in only to have the side pieces not be perfectly aligned. And also worried about this "U" construction holding up during finishing and installation. So, I inserted a back stretcher between the two side pieces using dominos, and glued that up, screwing the side pieces in again while the glue dried. And while that was going on, I glued the front piece in as well (biscuits have enough slop and movement to enable me to slide the front piece in without spreading the side pieces apart). The next day, took the crown unit off to finish, and then reinstall.
Here's the crown with the bed open:
[attachimg=10]
For finish, I used Sutherland Welles' Mahogany stain, diluted 5:1 with their reducer, then a coat of Odie's Oil. I've been using pure tung oil for everything else I've built, and while I love the look and it holds up reasonably well (except in the kitchen), it does take forever and a day to dry. Odie's gives me the same pure tung oil look with just one coat instead of 2 or 3, and it drys much more quickly. We'll see how well it holds up, but I don't think that's going to be a problem. One set-back was I didn't dilute the stain enough the first time through. I did try some samples, but what looks OK at 4" square looks different at 32" by 82". So I had to sand the two face panels down. This was scary on the plywood portions, but I used 180 grit and took my time to get almost all the stain down, and luckily didn't sand through the thin plywood veneer. Maybe I had bought good quality plywood?
The other wood in the house is Narra, which is wonderful to work with and is very stable. This is my first piece using Cherry, and while I liked working with it, I constantly struggled with color. As you know, cherry darkens over time, but it can take years for the real darkening to happen. And when freshly cut, it can be hard to distinguish the sap wood, but once it darkens, that sap wood will stand out, sometimes in ways you didn't expect/don't like. So, I took the short-cut to stain, which I think looks great now, but my concern is whether the cherry will continue to darken and in 5-10 years I'm going to have a very dark bed on my hands.
Anyway, sorry for the long post, hope you enjoyed the pictures and story. Let me know if you have any questions, as well as suggestions. I've gotten more than a few learnings from this project.
Attachments
-
 BedInRoom.jpg70.8 KB · Views: 397
 -
 CrownBedOpen.jpg29.3 KB · Views: 345
 -
 CrownFrame.jpg26.8 KB · Views: 338
 -
 CrownCornerCU.jpg34.4 KB · Views: 355
 -
 BedDown.jpg85.9 KB · Views: 343
 -
 EdgeCornerTreatment.jpg88.2 KB · Views: 349
 -
 HeadboardShelf.jpg38.5 KB · Views: 342
 -
 ChamferNosing.jpg36.8 KB · Views: 343
 -
 AppliedFrame.jpg62.1 KB · Views: 388
 -
 HingePlate.jpg42.7 KB · Views: 384