My Magnificent failure (and recovery)

Stephen B

Member
Joined
May 6, 2013
Messages
2,749
The Butcher Block CounterTop 1650 X 800

Part 1.

As an owner builder of our country house, during the past four years I have constructed panel steps and stringers for a staircase, and three countertop panels.

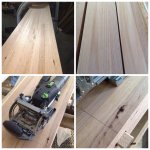
More recently, I have been  conducting repairs and some renovations to our city house.  We decided to remove a marble top and replace it with a butcher block countertop made from recycled Australian Mountain Ash.

http://festoolownersgroup.com/member-projects/recycled-australian-mountain-ash/msg260243/#msg260243

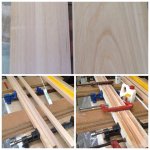
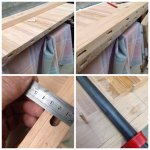
My previous experience, examples of my father and two grandfathers furniture and some research had taught me that wood movement and panel cupping could be minimised if a panel was made in sub sections and if end grain alternated. Each subsection was re jointed and all thicknessed prior to final glue up.

http://festoolownersgroup.com/festool-tools-accessories/will-buying-a-domino-help-with-glue-ups/msg262590/#msg262590

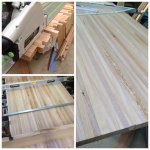
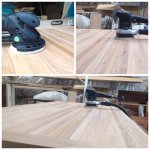
However this was to be my first butcher block panel and also my largest panel so far. Having just purchased a Domino 500, I decided to join each subsection with dominos, rather than using my 1400 router with a biscuit cutter.

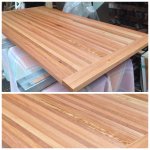
As can be seen from the photographs all went very well. There was minimal sanding required to even the surface and I felt great self satisfaction with the result.

However with two houses on the go, other projects intervened and the panel was ignored for most of June.


Attachments

  • image.jpg
    image.jpg
    1.2 MB · Views: 983
  • image.jpg
    image.jpg
    858.9 KB · Views: 989
  • image.jpg
    image.jpg
    1 MB · Views: 914
The Butcher Block CounterTop 1650 X 800

Part 2.
Shock, it has cupped!

In early July a straight edge across the width showed a cup with around 4 mm centre to each edge. Fortunately the length was still straight. More sanding and I had it all even again. Phew!

Left it for a weekend and on following Tuesday I noted that it was continuing to cup.

Reasons this had occurred?

Timber
- was from recycled upper story floor joists which had been originally installed as green, not kiln dried timber.
- had been stored under my house for three years.

I had however acclimatised it in my shed for two months and it was reclaimed after fifty years in the now demolished house. Timber from the same stock had also been successfully used on another panel.

Domino errors
This was my first domino project. Did its use introduce errors? Maybe, but at all stages edges were checked square and straight and re jointed if required.

Climate
Very possible, it has been very wet this winter following a very long dry spell.

Jinxed by the FOG
I had posted the first steps on the FOG.

Your thoughts?

I could not keep sanding, as the panel  thickness would soon be insignificant.

Breadboarding  seemed to be a solution. But I had never done this before and after watching a few one line videos, I doubted I had the skills/or equipment.

FOG to the rescue and I found -

http://festoolownersgroup.com/festool-how-to/loose-tenon-breadboard-ends-demonstration/

And then this video link -


I knew I needed at least one side flat, so sanded each end of what would be the bottom side; the side the cupping flowed towards. I also placed it under some slight clamping pressure.

I modified the techniques in these links as I used my D500 for 10x50 dominos, and a drill press and cordless drill for boring, drilling and enlarging pin holes, rather than router. I also only had the pins from bottom to 4mm through/past domino as did not want them showing through the top of each breadboard. Dowel for the pins was D6 Mountain Ash, as this is easily available [in Australia] and I did not want any significant contrast in wood tone.

The links were also very helpful in determining Domino spacing and deciding which domino routs should be at setting two.
 

Attachments

  • image.jpg
    image.jpg
    996.6 KB · Views: 784
Part 3
The big finish!

Final sanding was completed with Rotex 150, Makita 1/2 sheet and ETS150/3, moving through grits 60-400. I took it slowly, constantly checking with a straight edge, fingers and eye.

Next week I will finish it with OrganOil Hard Burnishing Oil, using green and white Vilies as if it was two coats of Festool Oil.

Stay tuned,
 

Attachments

  • image.jpg
    image.jpg
    985.2 KB · Views: 820
[quotuthor=Stephen B link=topic=28588.msg281209#msg281209 date=1381842420]
Final sanding was completed with Rotex 150, Makita 1/2 sheet and ETS150, moving through grits 60-400. I took it slowly, constantly checking with a straight edge, fingers and eye.
[/quote]

So I assume it is staying flat, is that correct?

Stephen B said:
Your thoughts?

Most likely the mixture of flat, quarter and riff swan stock has led to the cupping.
Tim
 
Yes there has been no significant change since the breadboarding.

Re reason for cupping, I think you may be on to something.
 
Stephen B said:
Yes there has been no significant change since the breadboarding.

Re reason for cupping, I think you may be on to something.
Hey Stephen,
I'm really glad the tutorial and video helped. That's some nice looking wood and a lovely countertop you have there. Sometimes, as woodworkers we are totally at the mercy of the natural properties of wood. It is still a living and moving material, which is what makes working it so interesting. It is quite rare in seeing a narrow stripped type panel warp significantly, and my thought is that it is caused by uneven moisture content in the stock itself. The pieces could have absorbed moisture differently as it was "aged" and when machined into a panel, the differences began to manifest themselves by twisting out of flat, causing the warp.

Did you let the wood acclimate to the humidity of your shop prior to working it? There's no guarantee that the lumber we buy will have the same MC from board to board, even if it's from the same tree. Equalizing that difference for some time does tend to help.

Speaking of which, how was the panel situated as it was being built? Oftentimes, folks will store panels with one face down, leading to uneven absorption, and a cup.

Would love to see pics when you have it all finished up. Are you planning on applying the same finish to both top and bottom?

Cheers!
 
thebicyclecafe said:
Stephen B said:
Yes there has been no significant change since the breadboarding.

Re reason for cupping, I think you may be on to something.
Hey Stephen,
I'm really glad the tutorial and video helped. That's some nice looking wood and a lovely countertop you have there. Sometimes, as woodworkers we are totally at the mercy of the natural properties of wood. It is still a living and moving material, which is what makes working it so interesting. It is quite rare in seeing a narrow stripped type panel warp significantly, and my thought is that it is caused by uneven moisture content in the stock itself. The pieces could have absorbed moisture differently as it was "aged" and when machined into a panel, the differences began to manifest themselves by twisting out of flat, causing the warp.

Did you let the wood acclimate to the humidity of your shop prior to working it? There's no guarantee that the lumber we buy will have the same MC from board to board, even if it's from the same tree. Equalizing that difference for some time does tend to help.

Speaking of which, how was the panel situated as it was being built? Oftentimes, folks will store panels with one face down, leading to uneven absorption, and a cup.

Would love to see pics when you have it all finished up. Are you planning on applying the same finish to both top and bottom?

Cheers!

Thanks for your thoughts.
You have certainly been a valued background contributor to the recovery stages if this project.

The panel is now oiled  both sides, with a second coat about to be applied to top this morning AEST. Photo will be posted very soon.

During construction, all assembly took place resting across three lengths of  steel. This was to allow airflow and assist clamping. It is still resting on this steel, although at this very moment is resting on painting cones to assist with drying.

Next time I build one of these, I will increase the acclimatisation time. Anyway, remaining stock of this recycled wood will soon be moved from under house to workshop shed before the summer bush fire season (we live in a country area surrounded by grassland farms - all green now in mid Spring). I think another cause of the cupping may have been that I covered it with a bed sheet for a few days back in June as I was painting nearby.

Also next time, using  the sub panel method I outlined above, these could be left longer to acclimatise before final machining and certainly final panel assembly.

I think Tom's point regarding mixture of sawn stock is also valid, however this is a feature of the panel, certainly now it is oiled. Oiling has also accentuated the recycled nature of the wood, nail holes etc.,.

 
Here it is oiled.

It's actually slightly darker/richer than photographs reveal.
 

Attachments

  • image.jpg
    image.jpg
    950.4 KB · Views: 891
NYC Tiny Shop said:
It looks OK. Hopefully, the oil will help stabilize.  Have you seen grain rising?

Thanks,

No, but hopefully will not as oil has been 'sanded in'  with  green (1st coat) and white Vilies with ETS150/3. Also sanded to 400 grit before first coat. Yet to be buffed as per oil makers recommendation. Have to wait another 24hrs. Will use Rotex for that.
 
[member=19746]Untidy Shop[/member]
Really, really nice job on the table top, I especially like the grain and color variations of the Australian Mountain Ash.  [thumbs up]

Is the color variation unique to Australian Mountain Ash?

What is the thickness of the top?
 
[size=13pt]
Thanks Cheese.

All the timber used here was air dried recycled, and therefore probably old growth. Hence the natural color variations you see in the images of my first post. Color variations are due to age, milling saw cut type, area of tree and climate etc.,.  Oiling adds another dimension.

Plantation grown Mountain Ash, which is usually kiln dried and more common in timber supply stores/yards these days, tends to have a slight pinkness and more uniform  tone. Further, if it's growth has been chemically accelerated the grain structure is wider than old growth.

I have a store of recycled Ash for use where the color and grain will be featured, but I am not adverse to using plantation timber for its structural characteristics. It is usually rated at F17.

Thickness ? Will recheck this in next few days and post here.
[size=8pt]
[member=44099]Cheese[/member]
 
Untidy Shop said:
[size=13pt]

All the timber used here was air dried recycled, and therefore probably old growth. Hence the natural color variations you see in the images of my first post. Color variations are due to age, milling saw cut type, area of tree and climate etc.,.  Oiling adds another dimension.

[member=19746]Untidy Shop[/member]
That makes sense. I just took another look at the unfinished wood and it shows shades of grey, pink, orange, brown, purple, tan etc.
As you say, the minerals in the ground indigenous to the area where it was grown, probably have a significant influence on the coloration of that tree.
I also noticed that the hue changes are more noticeable in the raw state and when oiled the tonal composition turns to a predominantly brown/beige hue.

I'm not familar with the term F17.  [embarassed]
 
[size=13pt]Thank you Chuck for your comment, and Cheese for your further interest.

Chuck, the free IPad App I use to create a photo montage is - 'PDG'.

Re the bench top.
It is 28mm thick. I was originally aiming for 35/6mm, but you know what happened to that idea!

Re F rating system for timber
You may wish to read these two articles -
[size=10pt]
http://www.woodsolutions.com.au/Articles/Resources/Grades
http://www.wpv.org.au/faq.htm
Pine for wall framing in Australia is generally rated at MGP10 which is equivalent to F5.
[size=13pt]
Here is a more recent photograph of the top taken just over 16 months since the oiling. The light is very different from the other photographs and offers another perspective of the timber variations.
[size=8pt]
[member=9356]pettyconstruction[/member] [member=44099]Cheese[/member]

[attachimg=1]


Attachments

  • image.jpg
    image.jpg
    574.2 KB · Views: 1,507
[member=19746]Untidy Shop[/member]
Thanks for the links. Interesting that Australia uses a stress grading system, didn't know that. I'll have to check and see if the US has some type of structural grading system.
 
Cheese said:
[member=19746]Untidy Shop[/member]
Thanks for the links. Interesting that Australia uses a stress grading system, didn't know that. I'll have to check and see if the US has some type of structural grading system.
[size=13pt] Hi again,
It would appear there is a NA stress graded sytem(s).
http://www.fpl.fs.fed.us/documnts/fplgtr/fplgtr190/chapter_07.pdf
But is it universally applied to all NA construction timber supplies?

Unless you are purchasing timber/lumber for construction a stress grading system my not be relevant to you, and these stress systems are quite different to systems for rating visual appearance. For example; in Australia, A, B, and C appearance classifications of Hoop and other ply utilised for visual effect in furniture and building fit outs.
http://www.australply.com.au/images/pdf/Brochure%20-%20Austral%20Interior.pdf

And for NA, I found this reference -
http://www.ahec.org/hardwoods/pdfs/IllustratedGradingGuide.pdf
[size=10pt]
[member=44099]Cheese[/member]
 
Back
Top