Need a little guidance about squaring up my TS55 blade

Joined
Jul 17, 2008
Messages
45
I have an older TS55 [not the REQ model] and I'm pretty sure I slightly skewed the blade position years ago when I first got the saw.  Can't remember what I was TRYING to adjust--my intent was definitely not to try to square up the blade--but I remember accidentally adjusting one of the stop screws on the saw.  I wasn't counting rotations of the screw so I had to "guestimate" where I needed to put the screw back.  Like I said, it's been years and I can't remember if it was the front or back stop screw.

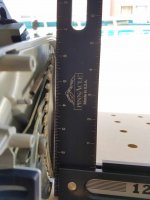
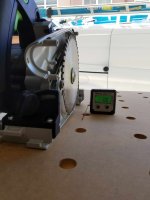
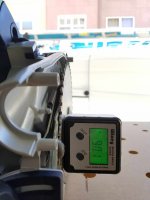
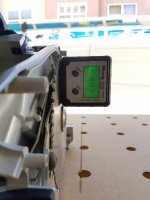
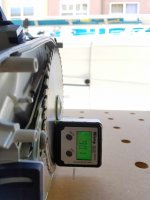
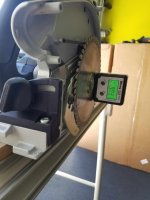
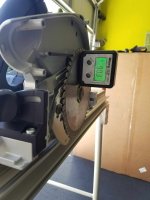
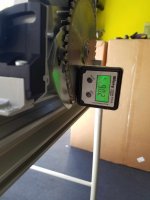
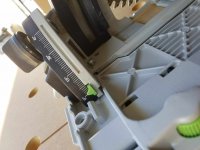
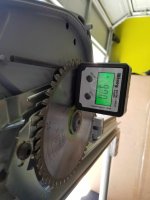
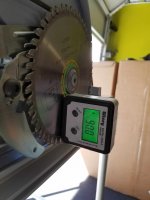
About a year ago, I tried the wood-cutting experiment set out in the TS55 supplemental guide for getting a perpendicular saw blade, ended up going through lots of wood and never quite getting it just right.  Always seemed a little off, and I'm guessing it's because one of the stop screws is not at the appropriate location as the other one.  Well, I'm about to give it another go again since I'm about to refresh my rail splinterguards, and throw on a fresh new blade.  This time, I'll be taking off the saw blade cover and using a Wixey angle gauge so I don't have to waste as much wood this time.

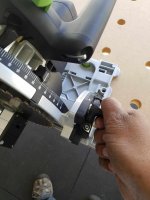
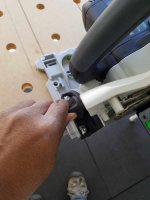
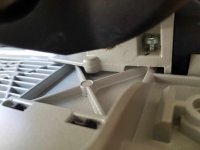
My question is: Does anyone know if there's a factory-default setting for the two stop screws on the TS55?  I know they're supposed to be adjusted together and with the same amount of deviations in either direction.  I wanna get them both back to some known position before I start making final adjustments.  Does that mean I back both screws out counter-clockwise or both screws all the way in clockwise?  Or do I not try to do this and just try to fix the one screw that was placed out of wack?

Problem is: I don't exactly know what/where the screws are affecting the blade.  What exactly are the two screws doing?  Does the front screw pull in/push out the top of the blade? And the back screw pull in/push out the bottom of the blade?  Or are they pulling/pushing a different part of the blade? Or are they not doing anything at all to the blade but actually just pushing away/pulling closer the entire saw assembly sitting on the sole plate? [this it kinda what I'm thinking]

I figured getting the stop screws back to some known reference point would be the best thing to do.

Lemme also say that I'm not a heavy user of the saw [I'm not in the woodworking trade], and that's probably why I haven't addressed this sooner.  I'm hoping I can make the adjustments myself and avoid having to send the saw in for servicing.  Any suggestions would be much appreciated.
 
Well since no one is going to post...

I have the same problem with a makita saw someone (mr nobody  ::) ) dropped at work and the only way I can think of doing it is to make a jig. A large perfectly flat square of something that goes on the spindle in place of the blade then you could square the front and back.
 
I got a few ideas running through my head right now using my precision square and some other stuff.  I'm gonna try it out this weekend and let you know how it goes.
 
If you can wait till Monday, I'll bet Festool service would be willing to talk you through the process.
 
I talked to Festool Service on Friday and they suggested I either send it in, or use a precision square of some sort.  As I started to give it some more thought, I figured I'd also use my digital angle finder....the process seemed pretty simple with the angle finder:

So, here's what I did....

1. Grabbed my TS55 and slapped it on my MFT.
[attachimg=1]
2. Then I removed the blade cover and cleaned up the blade surface.
[attachimg=2]
3. Using my precision square, the positioning seemed really good at the top and bottom points of contact on the blade teeth.  When I grabbed my Wixey angle finder, I was pleasantly surprised to see that I wasn't far off.
[attachimg=3]
[attachimg=4]
[attachimg=5]
[attachimg=6]
[attachimg=7]
[attachimg=8]
4. I then tested if there was any variance with the blade plunged down.  So, I moved my saw to the edge of the table, zero'ed out my angle finder again, and the blade was only slightly out by a tad more. [impressed with the mechanics of the saw--$$ well spent, I told myself]
[attachimg=9]
[attachimg=10]
[attachimg=11]
5.  To be honest, I debated at this point if I should even touch the adjustments at all.  Three-tenths of a degree off was not gonna cause me to lose sleep at night.  Not for the types of projects I use this saw for.  But I was feeling adventurous today.  So I loosened both my bevel thumbscrews.
[attachimg=12]
[attachimg=13]
6. Then I backed out both my front and rear stop screws.  The stop screws just move the entire saw assembly in/out in relation to the saw's sole plate.  I made sure neither screw was touching the sole plate [no need to screw it all the way out].  You can't really see the contact of the screw against the sole plate in my pics, but it's pretty easy to spot when you're doing it [at least for the rear screw].
[attachimg=14]
[attachimg=15]
7. With the bevel thumbscrews loose and the two stop screws backed off, I put my angle finder on the front of the blade and started to adjust the front stop screw back in.  Once I got it at 90, I retightened my bevel thumbscrews to confirm the measurement would hold.  Then, I loosened the thumbscrews, moved the Wixey to the back of the blade and started to adjust the rear stop screw in.  Once I hit 90.1, I backed the screw out again until it settled back at 90.  Then I tightened the thumbscrews again, and confirmed everything stuck.  Here's what I got.
[attachimg=16]
[attachimg=17]
[attachimg=18]
[attachimg=19]

Finally, I tested my blade positioning while in the upright position and there was only a tenth of a degree difference.  And contact on my square was spot on.  I don't have any scrap wood around right now to do an actual cut, but I'll pick some up over the next couple of days and review the results.
 

Attachments

  • 20161001_135237.jpg
    20161001_135237.jpg
    683.7 KB · Views: 1,462
  • 20161001_140149.jpg
    20161001_140149.jpg
    579.6 KB · Views: 1,517
  • 20161001_140836.jpg
    20161001_140836.jpg
    543.3 KB · Views: 1,421
  • 20161001_140339.jpg
    20161001_140339.jpg
    610.6 KB · Views: 1,461
  • 20161001_140358.jpg
    20161001_140358.jpg
    584.3 KB · Views: 1,432
  • 20161001_140429.jpg
    20161001_140429.jpg
    562.5 KB · Views: 1,472
  • 20161001_140605.jpg
    20161001_140605.jpg
    568.4 KB · Views: 1,511
  • 20161001_140613.jpg
    20161001_140613.jpg
    574.8 KB · Views: 1,488
  • 20161001_141028.jpg
    20161001_141028.jpg
    533.4 KB · Views: 1,479
  • 20161001_141034.jpg
    20161001_141034.jpg
    598.2 KB · Views: 1,448
  • 20161001_141044.jpg
    20161001_141044.jpg
    571.2 KB · Views: 1,434
  • 20161001_141259.jpg
    20161001_141259.jpg
    609.3 KB · Views: 1,429
  • 20161001_141308.jpg
    20161001_141308.jpg
    574.1 KB · Views: 1,433
  • 20161001_145316.jpg
    20161001_145316.jpg
    500.4 KB · Views: 1,408
  • 20161001_145323.jpg
    20161001_145323.jpg
    664.6 KB · Views: 1,422
  • 20161001_143205.jpg
    20161001_143205.jpg
    512.5 KB · Views: 1,426
  • 20161001_143158.jpg
    20161001_143158.jpg
    519.3 KB · Views: 1,407
  • 20161001_143221.jpg
    20161001_143221.jpg
    537.6 KB · Views: 1,413
  • 20161001_143213.jpg
    20161001_143213.jpg
    521.4 KB · Views: 1,496
If you usually use your saw on a rail you might want to check it on the rail just like you did with it on the MFT.

Peter
 
Peter Halle said:
If you usually use your saw on a rail you might want to check it on the rail just like you did with it on the MFT.

Peter
Strongly agree. The saw shoe is not flat. It contacts the rail green strips at 4 points, which are not necessarily the same points that touch the table when off the rail.
In addition non-slip strips compress when you put pressure on them while cutting. Hence, the altimate check is squareness of the material you cut.
 
So, I tried it on the rail, and it wasn't so easy to get an easy zero calibration point because of the reasons mentioned. The green strips are somewhat in the way and compress differently.  And lots of little raised lips in the aluminum track.  I went back to just using the MFT surface, since when I chatted with Festool Service, they mentioned to me that they actually do the blade setup on a super-flat metal block [forgot exactly what the tech called it].  But they don't do the calibration on the track itself.

But I found a spot on the track that seemed pretty flat [across two raised lips in the center of the track].  And the readings were very similar.  Seems to be a difference of 0.1-0.2 degrees when compared to just using the MFT table surface.  I'm fine with that. 

To be honest, I found--on average--0.2 degrees of difference from the resting position of the saw [no plunge] to the fully-plunged depth.  I figured the Fast Fix lock-out position is pretty consistent with the thickest types of materials I'm cutting on a regular basis. And just set my blade at that position.  [Also checked it at around 30mm deep, since I'm normally no thicker than 3/4" material.  I'm spot on at 90 degrees around 30mm.  At full 55cm depth, there was--at max--a 0.2 degrees difference.  I think that's well within normal operating parameters of both my saw and my digital angle finder.
 
Why do you measure realative to the track? You need blade square relative to the material you cut (MFT surface), not the track surface. Put saw on the track and square on the table.
 
Svar said:
Why do you measure realative to the track? You need blade square relative to the material you cut (MFT surface), not the track surface. Put saw on the track and square on the table.

I gotcha. I just did a quick test that way.  No difference in readings. On the track, off the track.  My measurements read the same on both [when zeroing out from the MFT] . The only thing that really affects my numbers--at least with my saw--is the plunge depth.  And we're talking 0.1-0.2 tenths of a degree difference amongst that entire range.  My Wixey has an accuracy rating of 0.2 degrees, so some of this could just be normal limitations of the test devices themselves.

I'll try to pick up some wood tomorrow so I can do some testing of the actual results.  Will keep ya posted.
 
Back
Top