Need help - boring 35mm hinge cup holes and my 1010 keeps walking

bwehman

Member
Joined
Mar 21, 2016
Messages
335
Hey all! Making a bunch of kitchen cabinet doors with Blum hinges, and I can't keep my 1010 from walking as I'm boring the hole. The result is a hinge cup hole that sort of drifts off to one side rather than go perfectly straight down. Is the 1010 just the wrong router for this? Should I be using the 1400 or 2200? Would that even make a difference? Or should I really be using something like a drill press?


Attachments

  • IMG_3399.jpeg
    IMG_3399.jpeg
    280 KB · Views: 293
A 35mm hole is a lot to ask of a 1010. I have always used a drill press and clamped down the wood firmly. Even with a 2200, I’d try to find a way to clamp the router so it cannot move.
 
FWIW, it did a perfect job for about 15/20 holes. Looking back though, it was simply random chance that it didn't move. My fix was to fill the botched holes with a couple dominos and epoxy, plane down, try again (paint grade doors). I did the first one on the repaired door and it walked again so I just left the shop to look for a different solution before ruining the rest.

I thought maybe somehow a guide rail could help secure it? Should I buy a drill press?

 
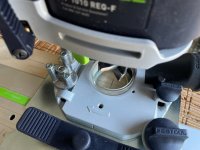
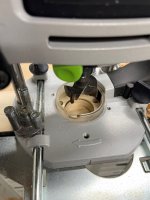
In reality, any plunge router is capable of this. The most important thing though is controlling it (and the workpiece of course)
Assuming that your doors are not moving, the router is the issue.
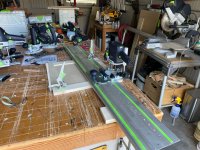
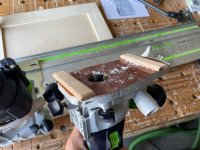
By the pics, I see you are using the edge-guide, which is good.....for one direction. It won't allow the router to move inward, which is only one direction. You still need to deal with the others.
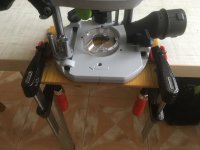
Do you have an FS (Guide rail)? This can constrain the router in every direction, with proper clamping, of course. An MFT, or other dog-hole table top, can be very helpful in that regard.

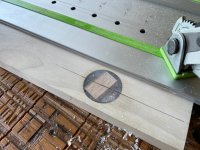
If not, since you are saying that it seems to be going the same direction, clamping a block to the work surface might help. The edge-guide is resting against the door at a specific point, when the bit is lined-up with the right point. "Stop" it at that point and try it again. This may work, or may force the movement another direction.....test on some scrap.
 
Hand made for OF 1010 (not R).Newest R compatible with 3 from 6 holes.Perfectly serving.All you need is to secure the router base during the process.
[attachimg=1]
[attachimg=2]
 

Attachments

  • IMG_8568.JPG
    IMG_8568.JPG
    1.7 MB · Views: 597
  • IMG_8571.JPG
    IMG_8571.JPG
    1.9 MB · Views: 589
Blues said:
Dont use a cannon to shoot a mosquito! (Old saying  :))
https://www.kregtool.com/shop/cabin...shelf-jigs/concealed-hinge-jig/KHI-HINGE.html

This simple jig works like a charm and is adjustable.

Love the quote haha. I *did* look at this, but for the number of holes I'll be drilling, the bit is said to not last long, and the housing occasionally melts. Also I already have the Festool router bit and would like to get my money's worth out of it if possible. Appreciate the rec though!
 
I use my jig with the CMT 392.350.11 cutter at the lowest speed of the router.The result is always stable and predictable in quality. I have never regretted the time spent on the manufacture on making this device (5 mm fiberglass, by the way).
 
Seeing as it's a reasonably wide cutter, does the cutter you're using have a centering point on it to keep it aligned while plunging?
 
luvmytoolz said:
Seeing as it's a reasonably wide cutter, does the cutter you're using have a centering point on it to keep it aligned while plunging?

Yeah, it's the Festool 35mm bit.
 
Love the quote haha. I *did* look at this, but for the number of holes I'll be drilling, the bit is said to not last long, and the housing occasionally melts. Also I already have the Festool router bit and would like to get my money's worth out of it if possible. Appreciate the rec though!

It's carbide tipped, makes clean holes and lasts plenty long. Replacement drill bit is $20. Local HD should carry it if you choose to try it. If it doesn't workout you can return it.
 
bwehman said:
How could I set up the MFT for this? That might be the solution.
In your situation
I would do it by clamping the door to the table, sandwiched with the rail. Then it's just a matter of using the guide stops to keep it from moving left to right. The rail stops the front to back movement.

Blues said:
Dont use a cannon to shoot a mosquito! (Old saying  :))
https://www.kregtool.com/shop/cabin...shelf-jigs/concealed-hinge-jig/KHI-HINGE.html

This simple jig works like a charm and is adjustable.

There is a point to what you are saying....but there is another old saying that works just as well
"Run what ya brung" Not the best grammar, but it works.
If a guy already has a way to do something, there is no point in buying a specialty tool that only does one thing.
From what I have heard, the Kreg jig is a bit of a mixed bag? Apparently it works ok, but it does have a high speed steel Forstner bit. That will cut into its lifespan. Unless a guy is capable/willing to sharpen it or replace it, the number of doors is somewhat limited.

So, the question in my mind is "Who is this for?" A person who only needs to drill a few doors is not going to spend the money. A person who is going to do "more than a few" will run into the bit-life thing. A person who does a whole lot of doors, wouldn't even consider it. So, who is it for?
 
I have the Kreg boring jig, which is fairly cheap, and is serviceable if you work carefully.

I replaced it with the Blum jig, which is far better.  I have never messed up a door using the Blum jig.

It allows 2mm to 8mm set back from the edge of the door for the cup.  It also accurately marks the location of the screws. 

I particularly like that it will optionally allow 8mm holes for knock-in dowels.  You can replace the knock-in dowels if they ever become stripped.

The built in clamp is secure and easy to operate.

The video show him marking the hinge location on the flat of the door.  I much prefer to mark the edge.  That way I can see that the jig is aligned with the mark, and also see that the jig is firmly resting on the setback cams.

In the video he is shown using a lot of pressure on the 35 mm forstner bit. That generates a lot of heat, and while I know that the heat is not supposed to be a problem with carbide, I will generally let the bit breath a bit about halfway through.

While pricey, this jig has proven to be reliable and durable, as well as a pleasure to use.
 
A 35mm Forstner bit is your friend.

In a drill, running at screwdriver speed, just as they were designed for.

Not in a router.

[attachimg=1]
 

Attachments

  • IMG_3986.jpeg
    IMG_3986.jpeg
    112.1 KB · Views: 576
Crazyraceguy said:
bwehman said:
How could I set up the MFT for this? That might be the solution.
In your situation
I would do it by clamping the door to the table, sandwiched with the rail. Then it's just a matter of using the guide stops to keep it from moving left to right. The rail stops the front to back movement.

Alrighty, I'm going to drag myself back to the shop and try this using the LR32 attachment/rail to help keep it stationary. Wish me luck.
 
Never had an issue using the 35mm boring bit with the LR32 system.  Use the lowest router speed setting.
 
bwehman said:
Alrighty, I'm going to drag myself back to the shop and try this using the LR32 attachment/rail to help keep it stationary. Wish me luck.

I didn't assume that far.....but it should work.

Also, I read where [member=53591]Blues[/member] said it was indeed carbide tipped. That what I get for assuming what I heard was accurate. Sorry.

woodbutcherbower said:
A 35mm Forstner bit is your friend. In a drill, running at screwdriver speed, just as they were designed for. Not in a router.
Virtually every person I have seen runs them too fast, same with hole saws. That's a killer.
 
Alrighty - not repeatable, but it’s completely locked into place.

Also thought I’d share my very-pro (lol) fix for the botched holes. Floated a couple dominos in epoxy, then planed it down using double-sided tape on the base of an MFK. Not elegant but did the trick!
 

Attachments

  • 4B223781-C4D8-4D78-8732-38E9ADEB6179.jpeg
    4B223781-C4D8-4D78-8732-38E9ADEB6179.jpeg
    524.7 KB · Views: 208
  • 0C526348-062A-4B2D-8157-E8FBA8BD1935.jpeg
    0C526348-062A-4B2D-8157-E8FBA8BD1935.jpeg
    285.1 KB · Views: 210
  • BC2FE2BE-5406-4F6D-B68B-FD5F9CE932D0.jpeg
    BC2FE2BE-5406-4F6D-B68B-FD5F9CE932D0.jpeg
    425.9 KB · Views: 211
  • E2C7BC72-CE61-41DF-8277-78C65BEA4546.jpeg
    E2C7BC72-CE61-41DF-8277-78C65BEA4546.jpeg
    346.5 KB · Views: 202
Back
Top